
|
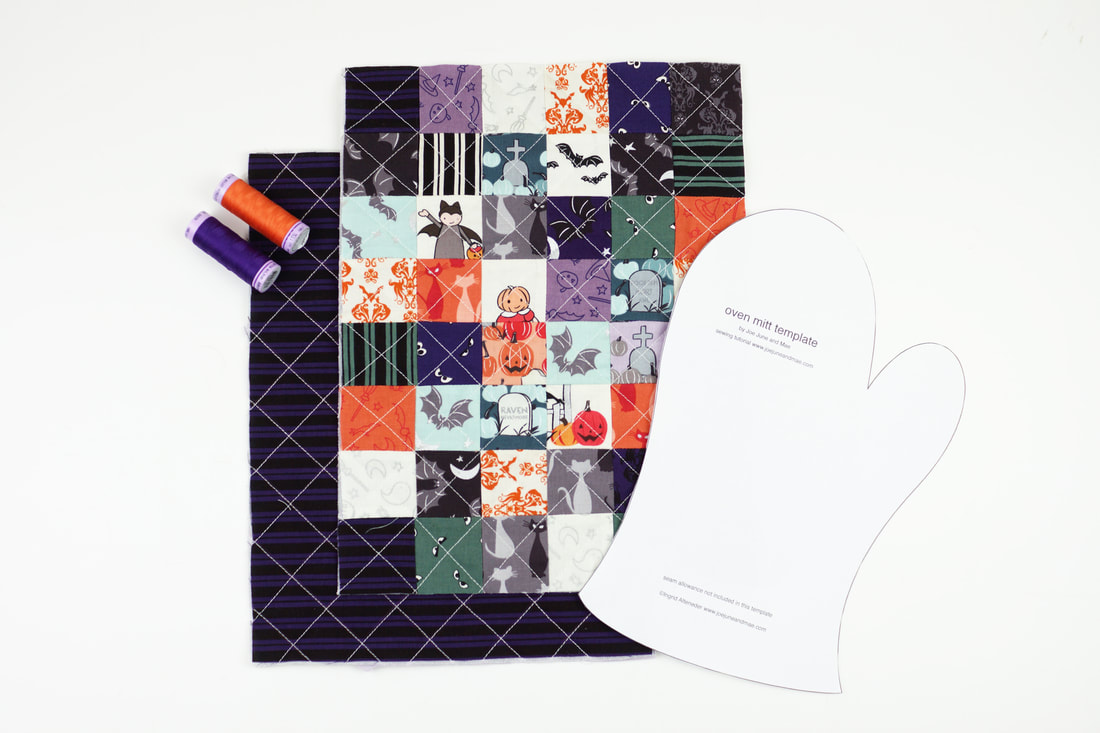
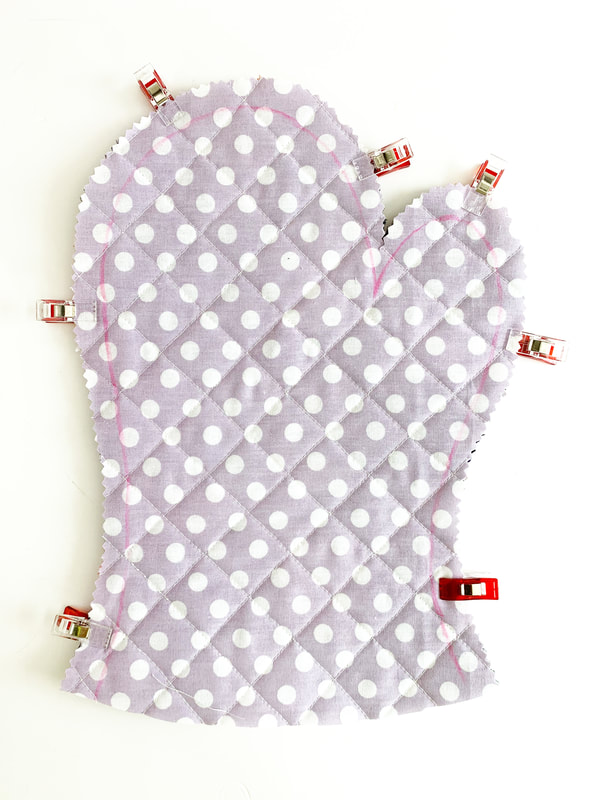
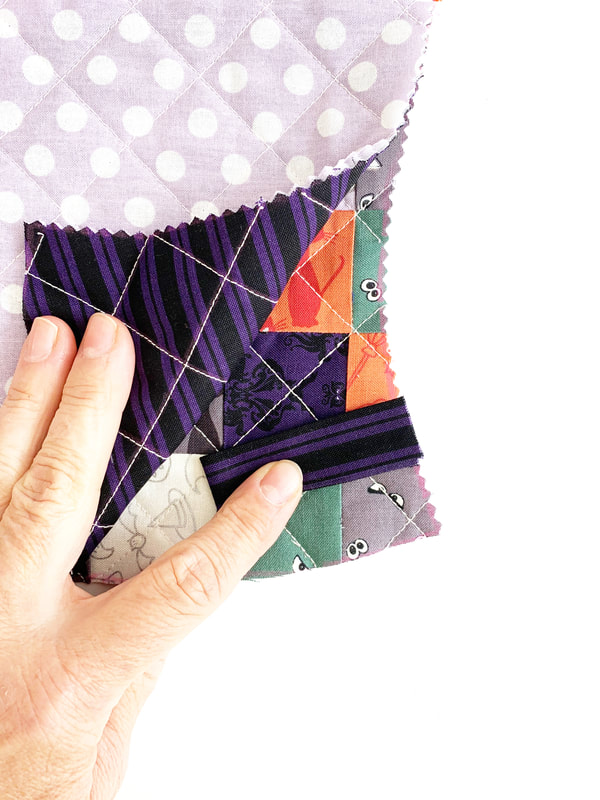
Doesn't this happen to you all the time as well? You have tons of the cutest fabric scraps left over? But of course you don't want to throw them out? I like quick and easy projects with these fabrics, so I don't end up collecting tons and tons of fabric pieces, which I do anyways, haha. So here is another super pretty and easy pattern... this time for quilted oven mitts. 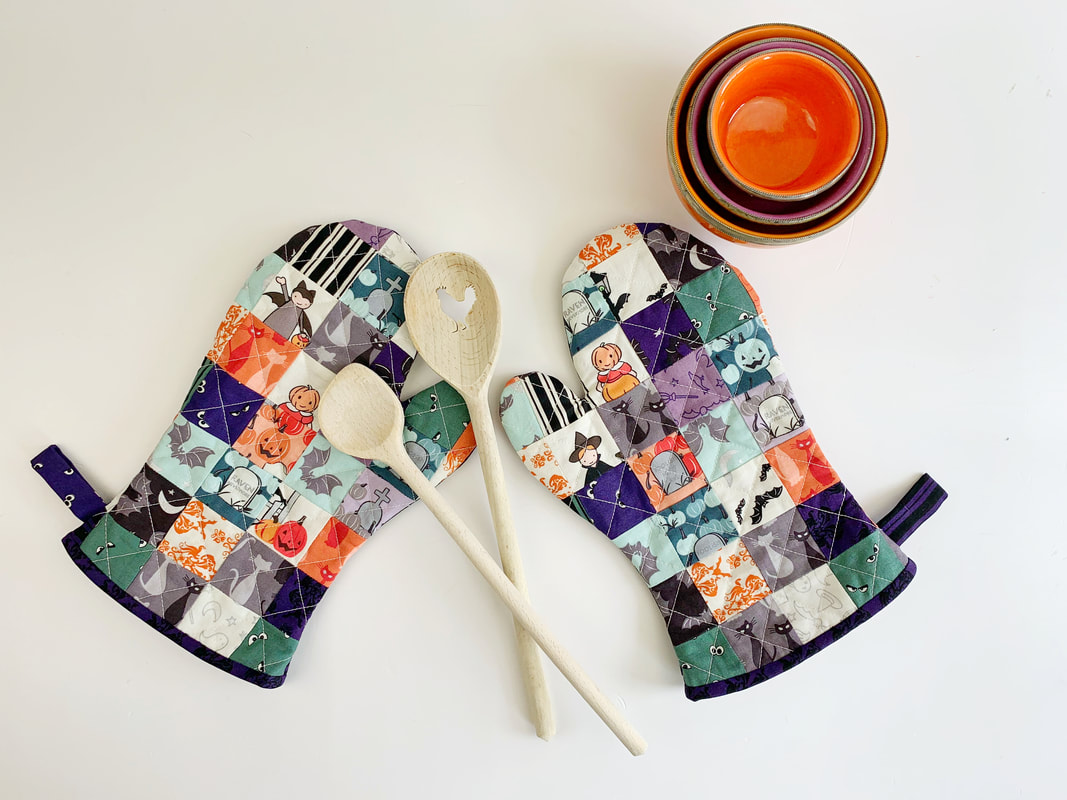 easy quilted oven mitts Materials needed: ( for one oven mitt) size aprox. 7" wide x 11" high. - 48 pieces of 2" fabric squares ( thank you Riley Blake Designs for this adorable fabric series 'spooky hollow' by Polkadotchair ) - 1 piece of fabric for the back 9.5"x 12.5" - 2 pieces of fusible batting ( or insul brite if you wanted to ) 9.5"x 12.5" - 2 pieces of lining fabric 9.5"x 12.5" - 1 strip of fabric 2"x 5" for the hanging tab. - 1 piece of bias cut binding strip 1.5" wide 17" long. - printed oven mitt template Instructions: 1. Cut all your fabric pieces. Cut 48 2" fabric squares. And cut out the oven mitt template which you will find here. 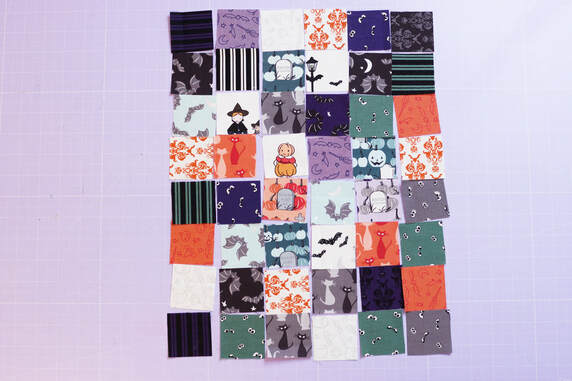 48 2" squares 2. Sew all the squares together. The easiest way, will be chain piecing the squares. Here's a quick video on how to do this. 3. Once you have all the squares sewn together, attach them to the fusible batting or insul brite. 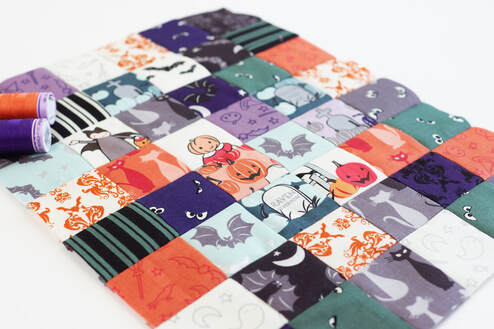 all 48 2" squares sewn together 4. Place the patchwork top on top the lining piece of fabric, wrong sides together. And quilt to your liking. I did quilt this with diagonal squares. 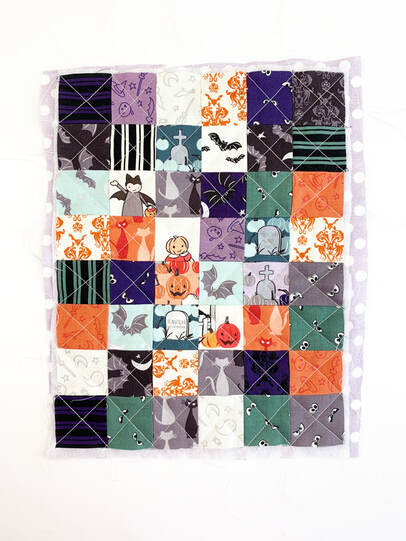 quilted top 5. Iron the back piece of fabric on to the fusible batting and place on top of the lining piece wrong sides together. Then quilt to your liking. I quilted diagonal squares here as well. I drew them onto the fabric with a fabric marker ( Koh-I-Noor Fabric pen, that can easily be dusted off after sewing). 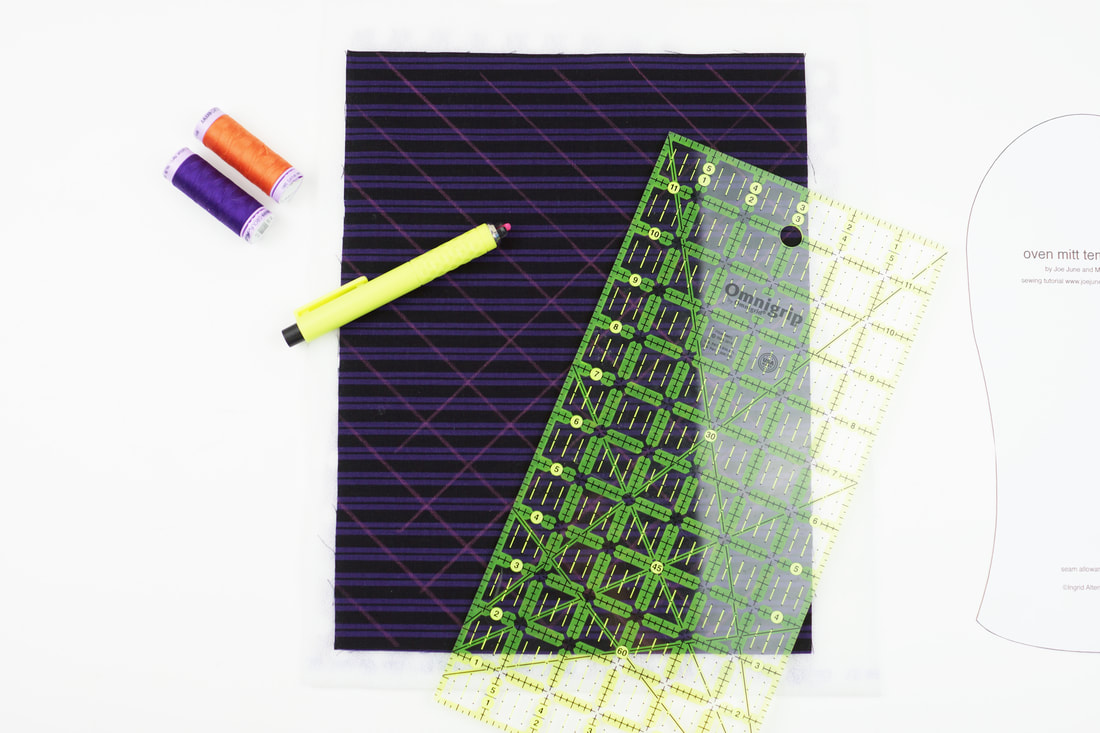 draw your quilting lines onto the fabric 6. Sewing the hanging tab: Fold the piece of fabric for the hanging tab in half, aligning the long edges. Sew along the long edge with 1/4" seam allowance and turn inside out. 7. Place the oven mitt template on the patchwork piece and draw around it with a 3/8" seam allowance. Turn the template around ( so the wrong side is now facing you) and place it on the back piece and draw around the template again with a 3/8" seam allowance. Cut out the oven mitt shape with zigzag shears, then draw the oven mitt shape on the lining side ( again I used the fabric pen, that can easily be dusted off) 8. Place front and back pieces wrong sides together . Place the hanging tab between the two layers at the bottom corner facing the inside of the oven mitt. Sew along the drawn line, securing the hanging tab in the seam, then cut back the seam allowance to 1/4 ". 9. Cut the seam allowance, between the hand and thumb part of the oven mitt, all the way to the seam. This makes sure you don't get weird pleats when turning the oven mitt inside out. 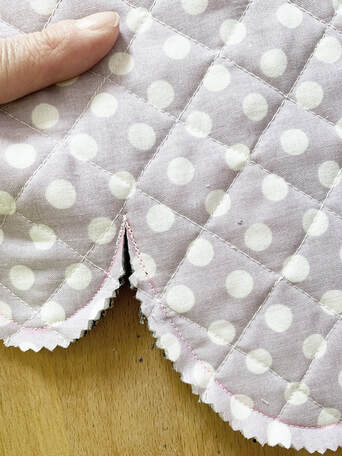 cut the seam allowance to the seam 9. Turn oven mitt inside out and clip the binding strip to the outside and stitch with 1/4" seam allowance. 10. Fold over the binding to the inside and hand stitch in place. 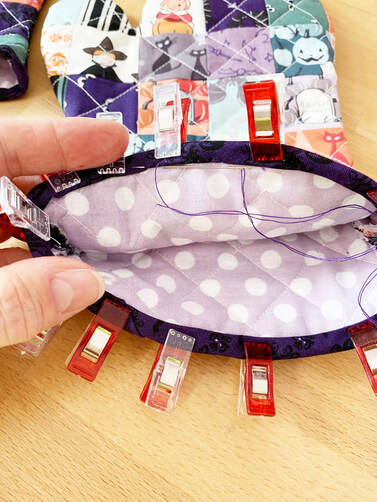 hand stitch the binding in place And here we go you're all done. So get your pots out and ... happy cooking. What do you think? These adorable oven mitts are a great gift for any one, don't you agree? 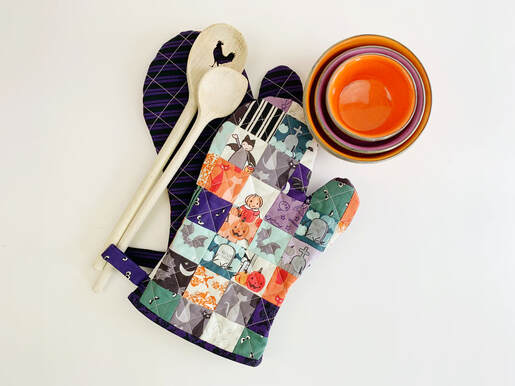 patchwork oven mitts Ingrid xx
5 Comments
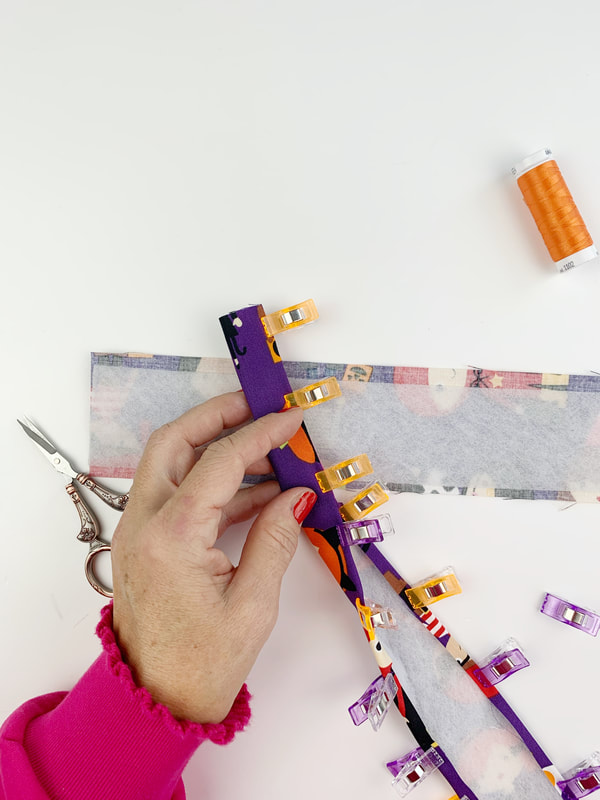
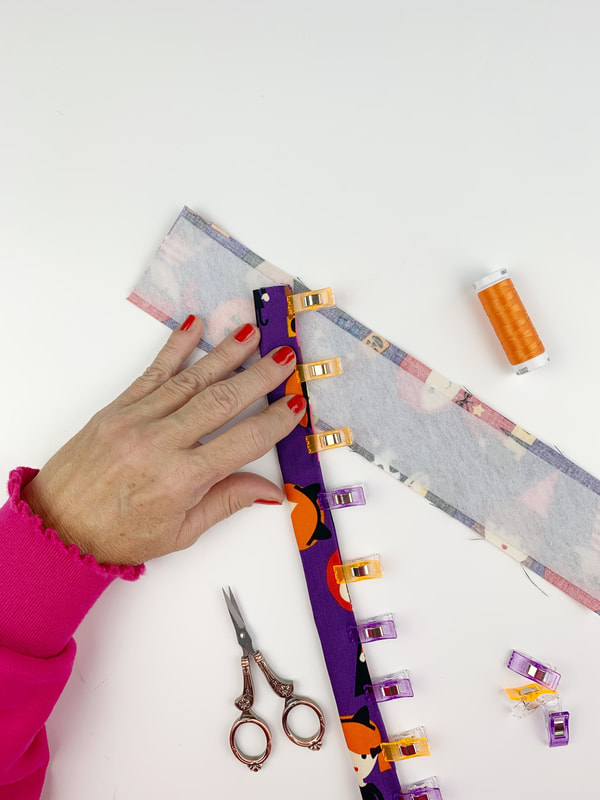
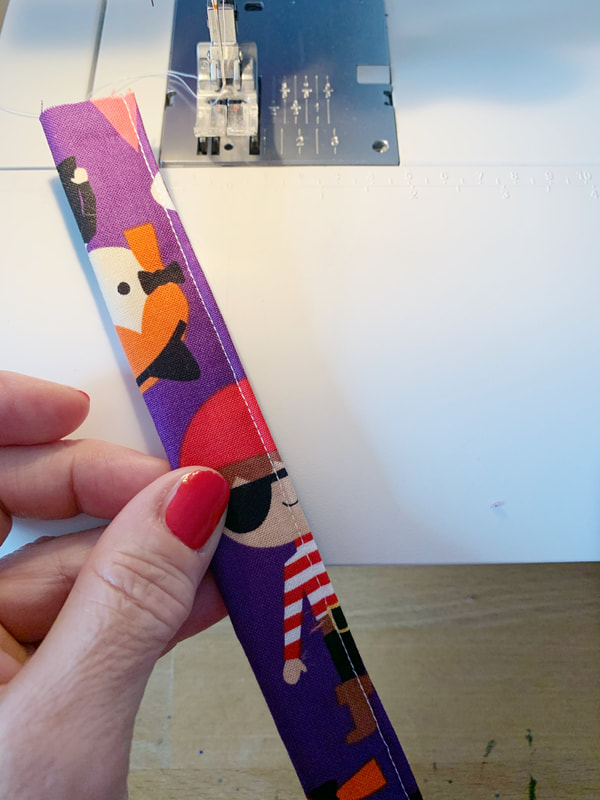
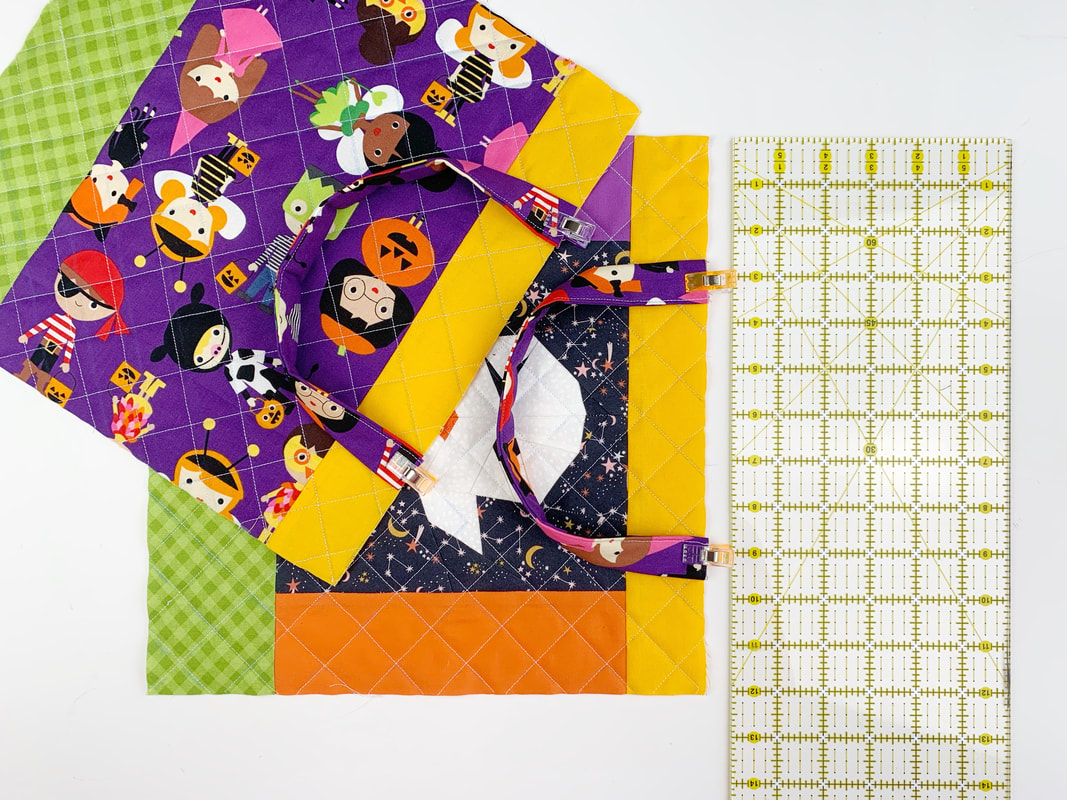
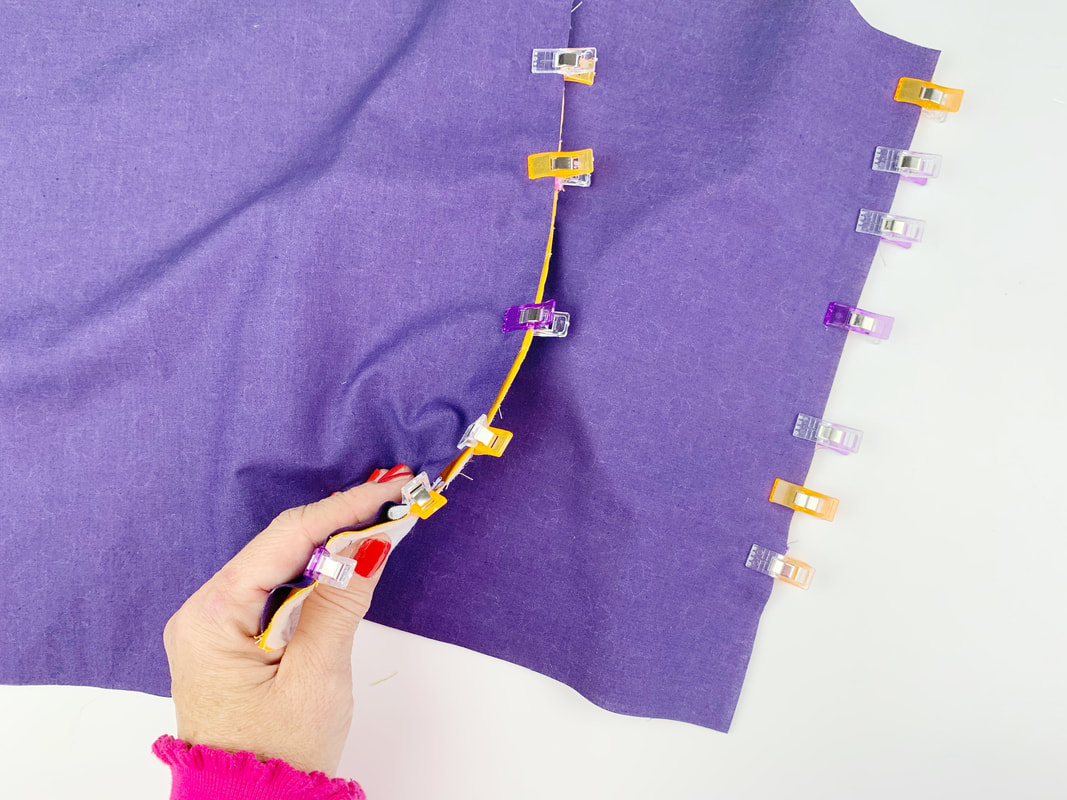
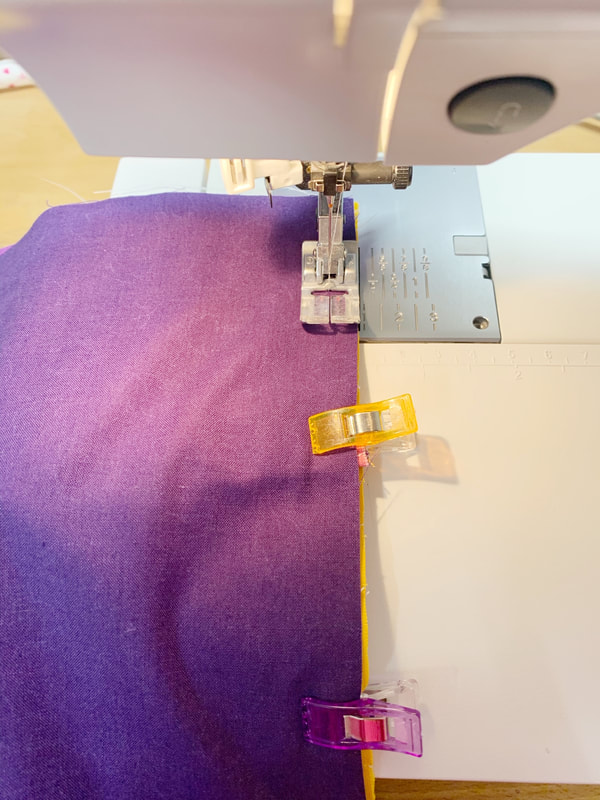
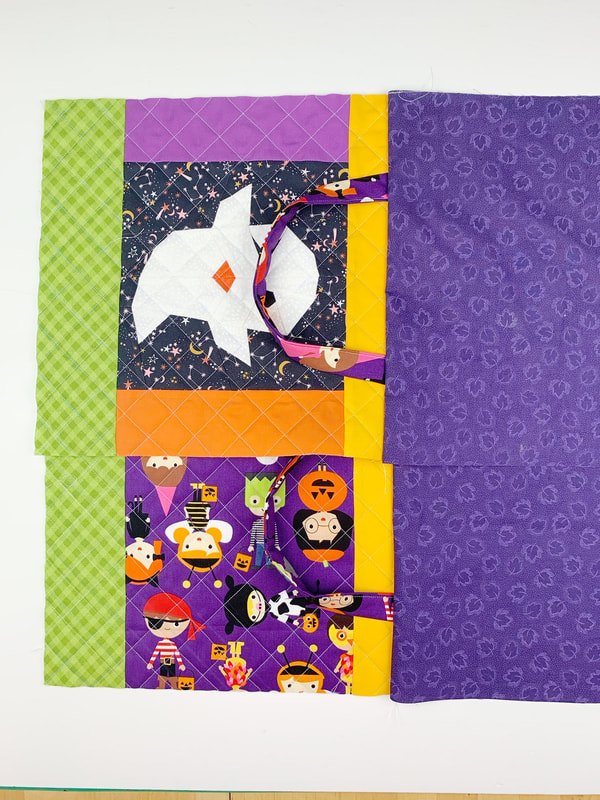
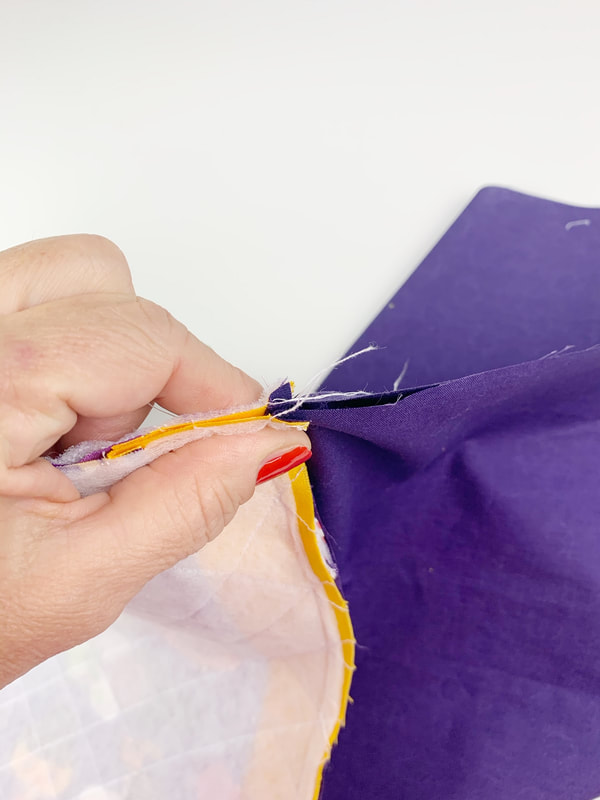
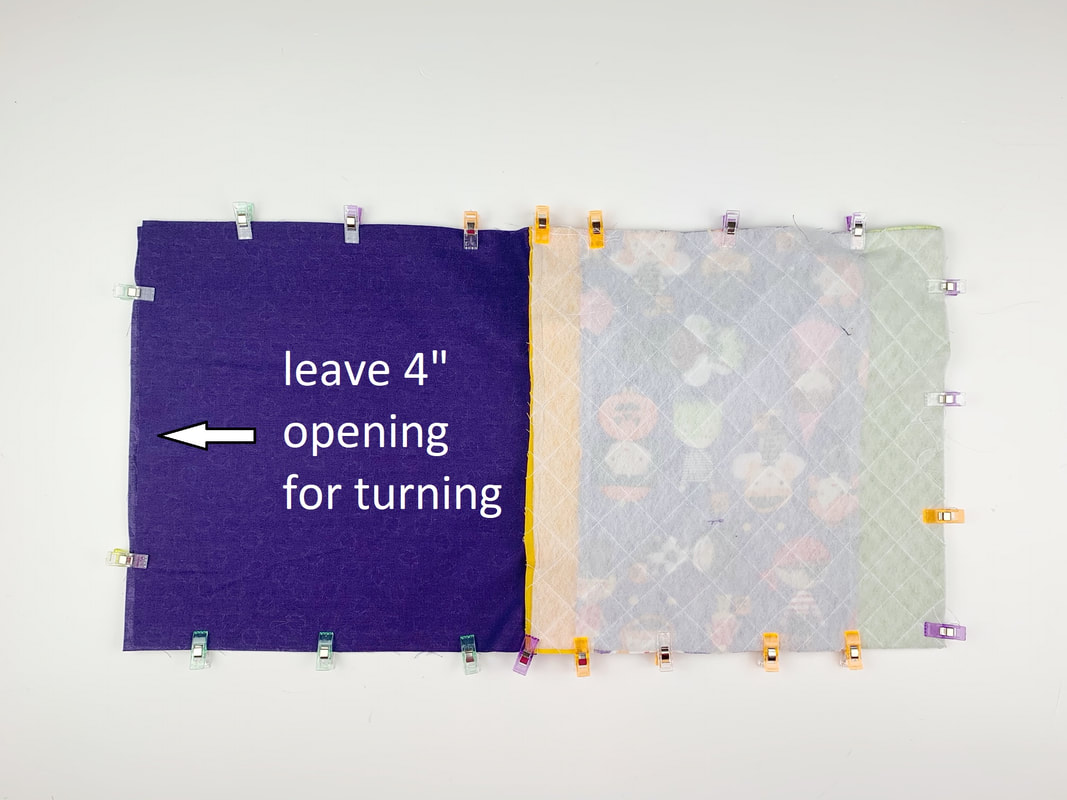
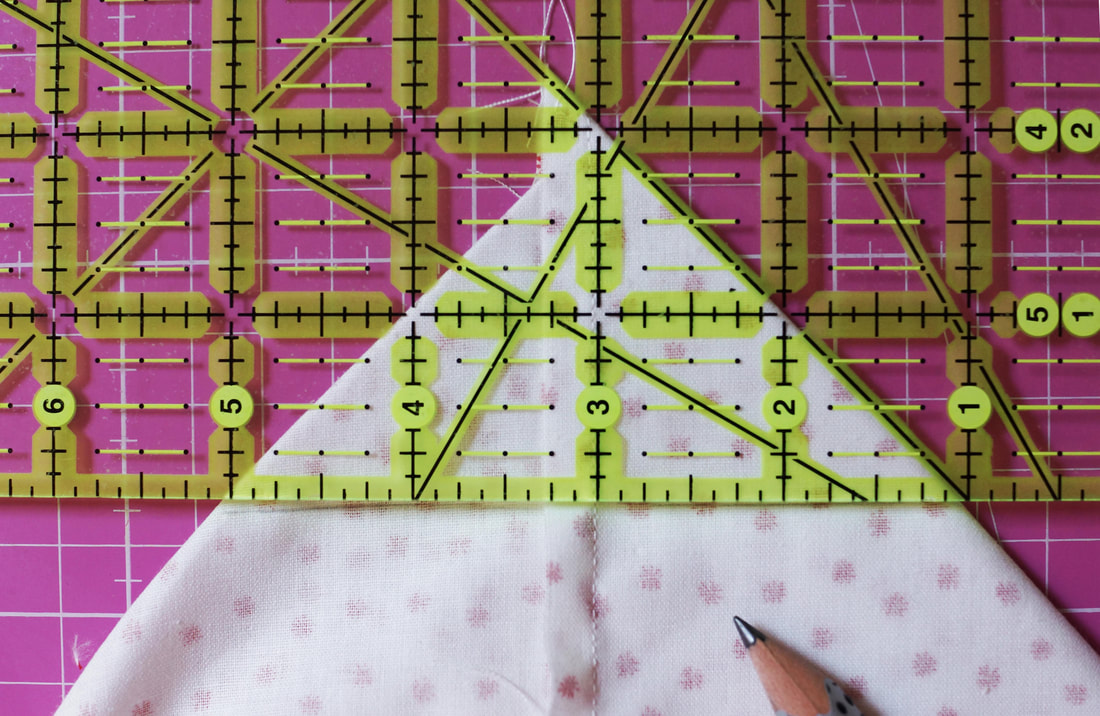
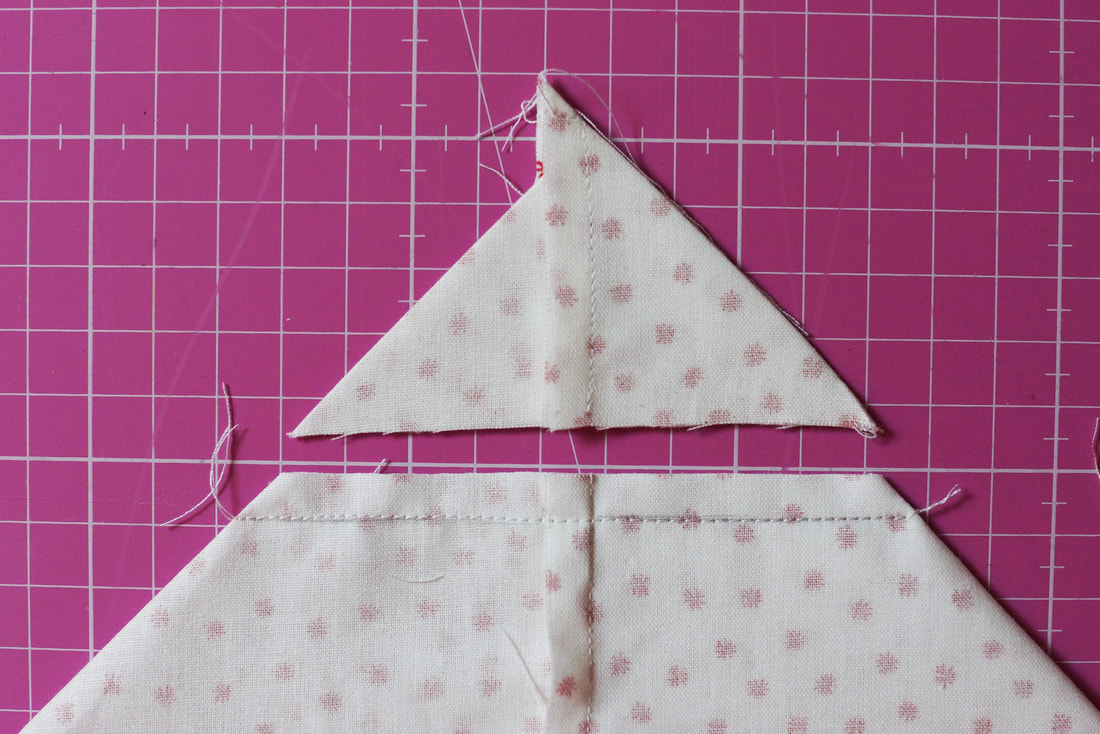
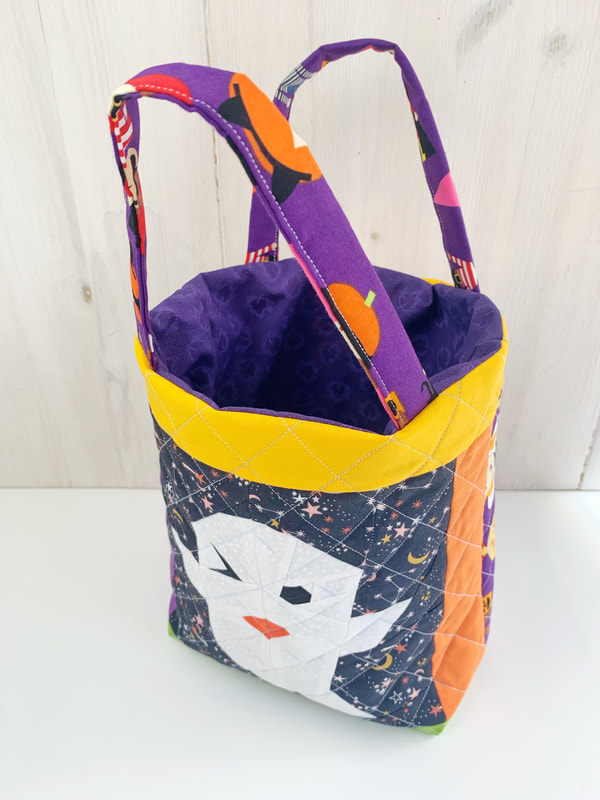
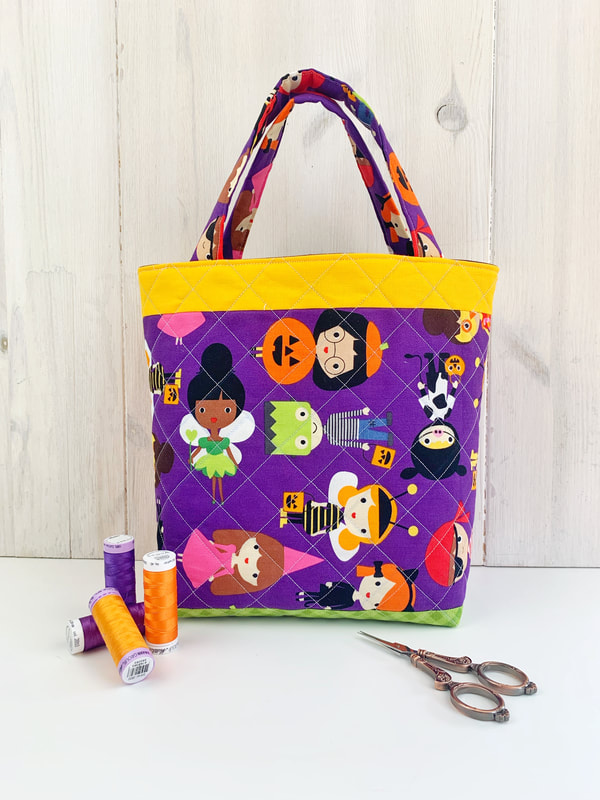
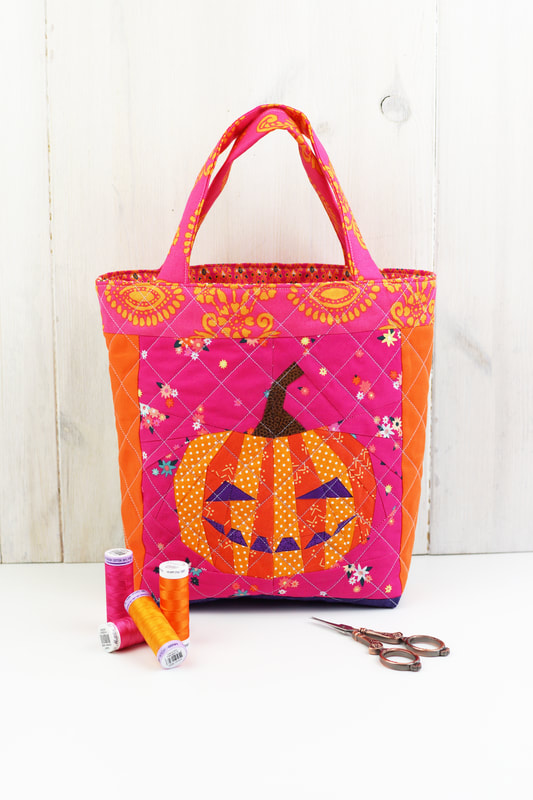
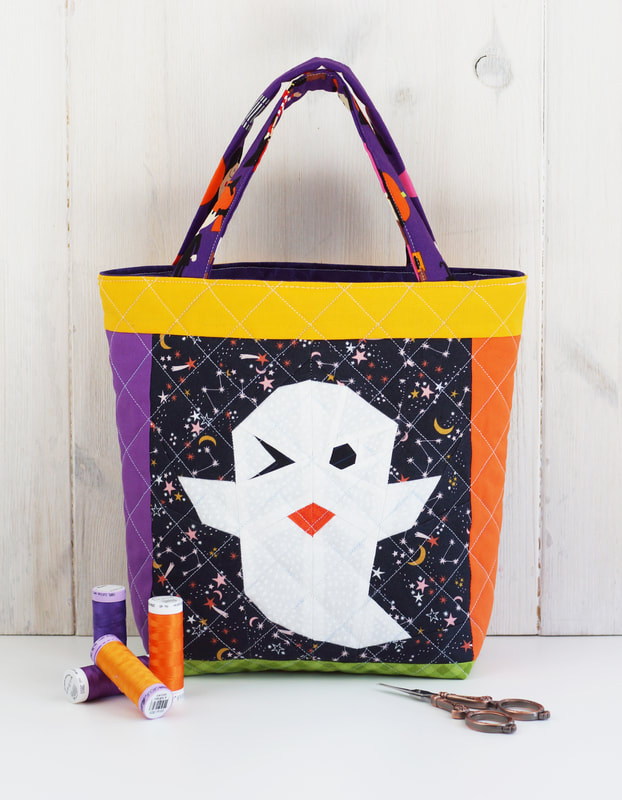
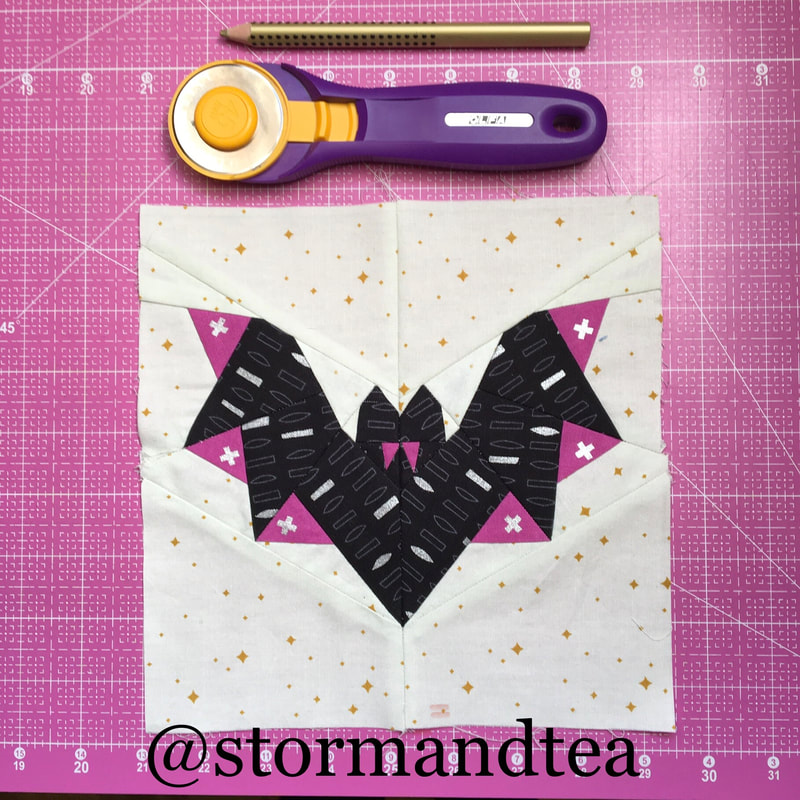
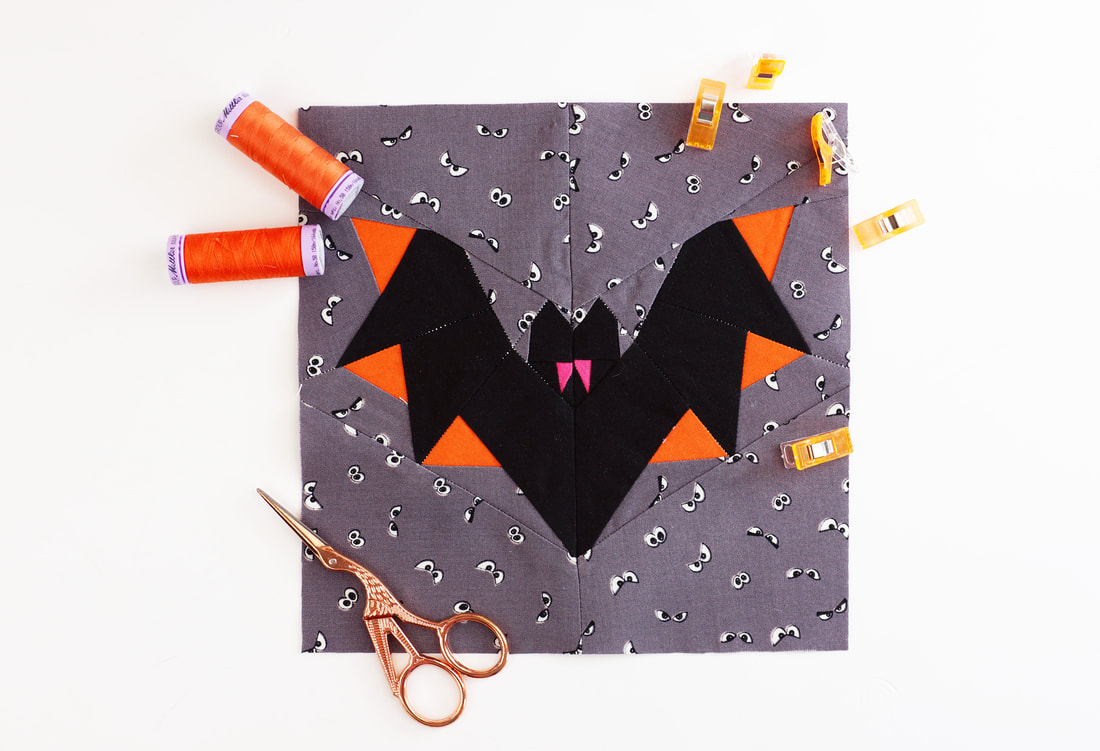
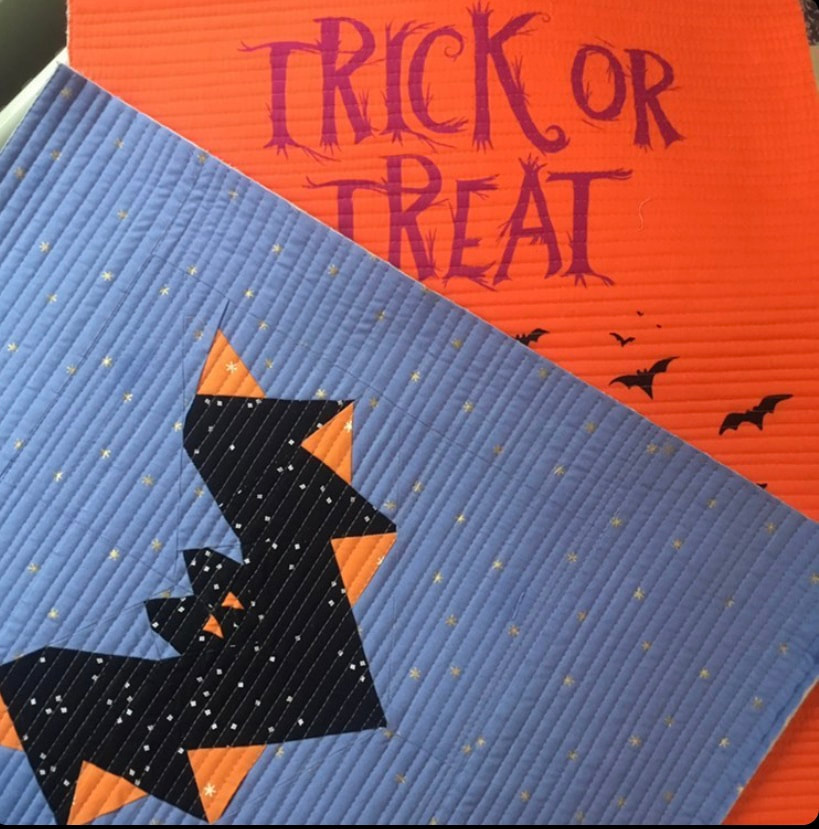
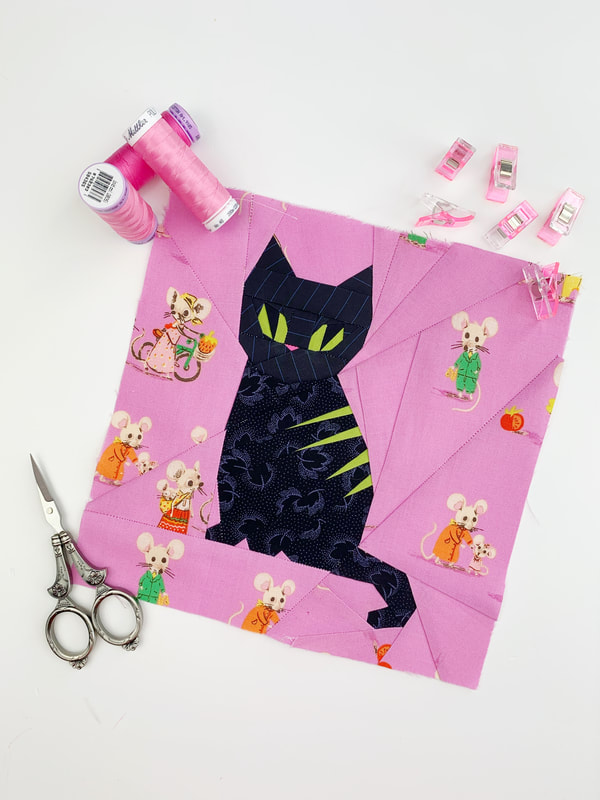
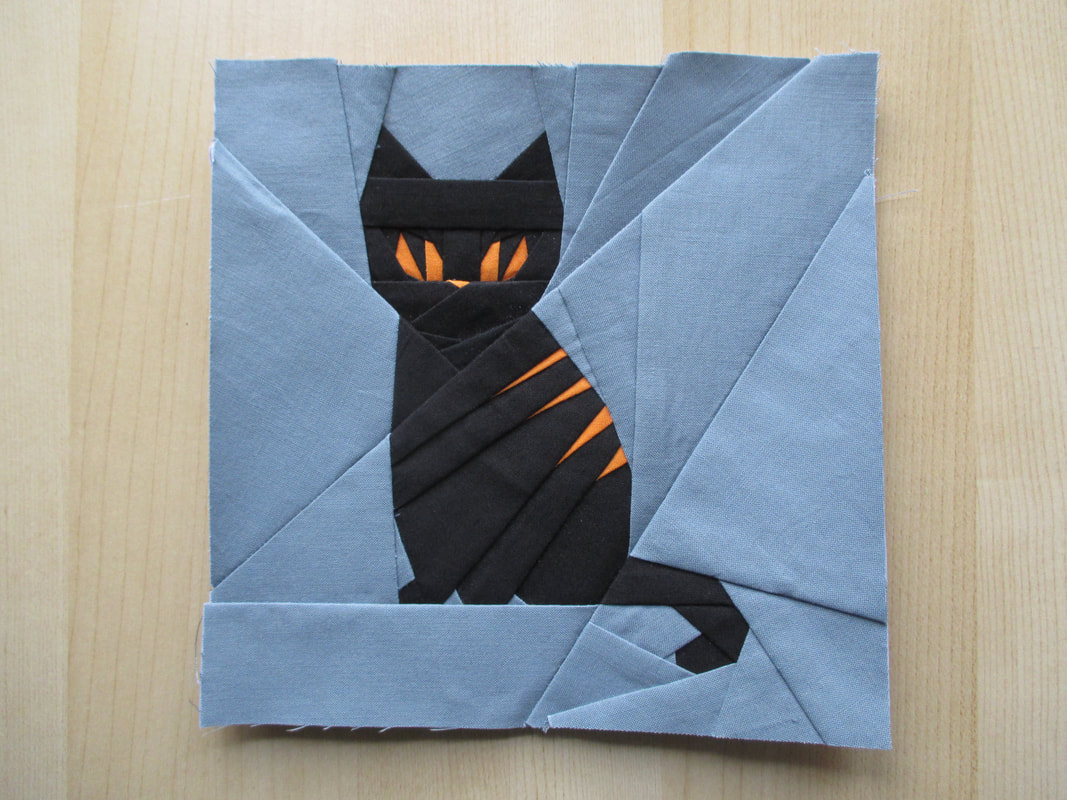
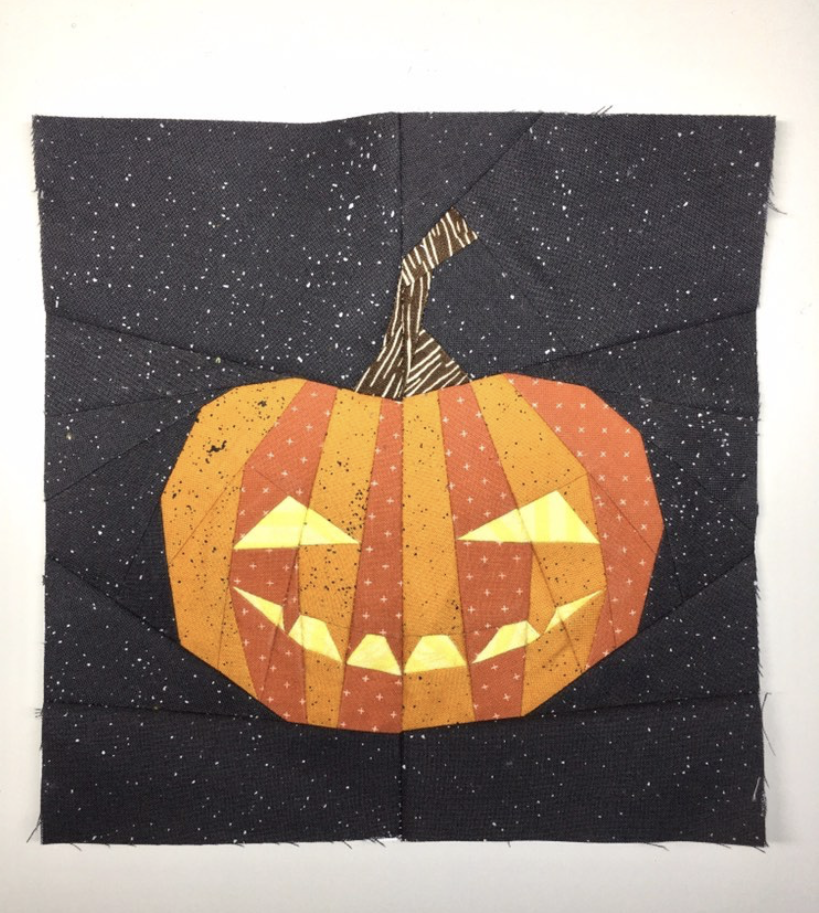
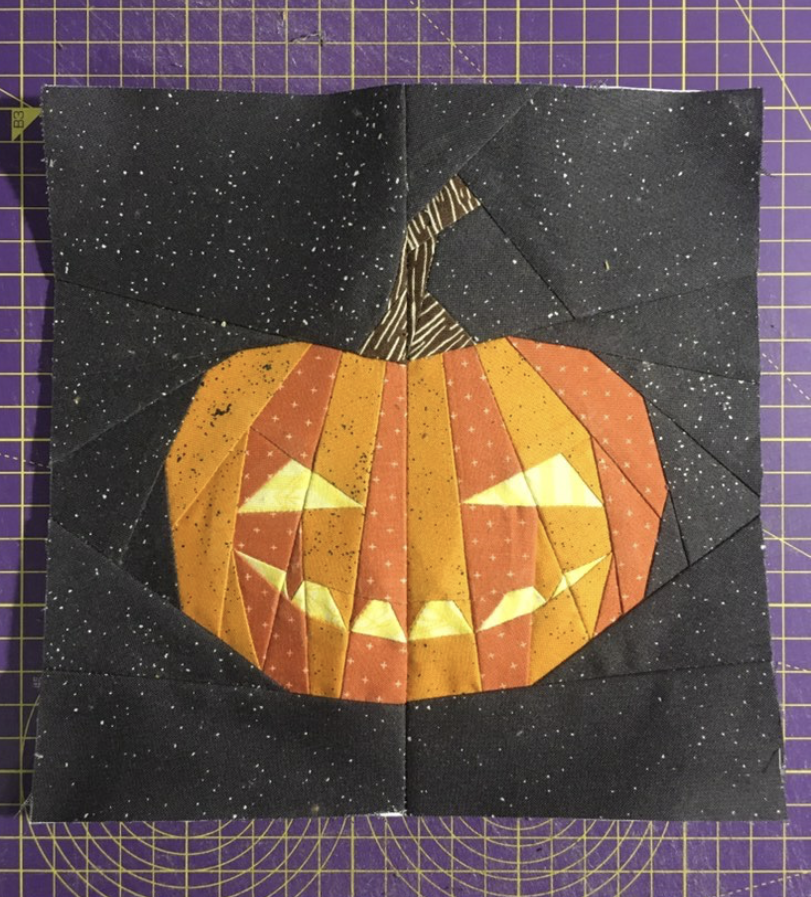
Halloween comes early this year, because Riley Blake Designs just released this super adorable fabric series called 'spooky hollow' designed by Melissa Mortenson of The Polka Dot Chair. 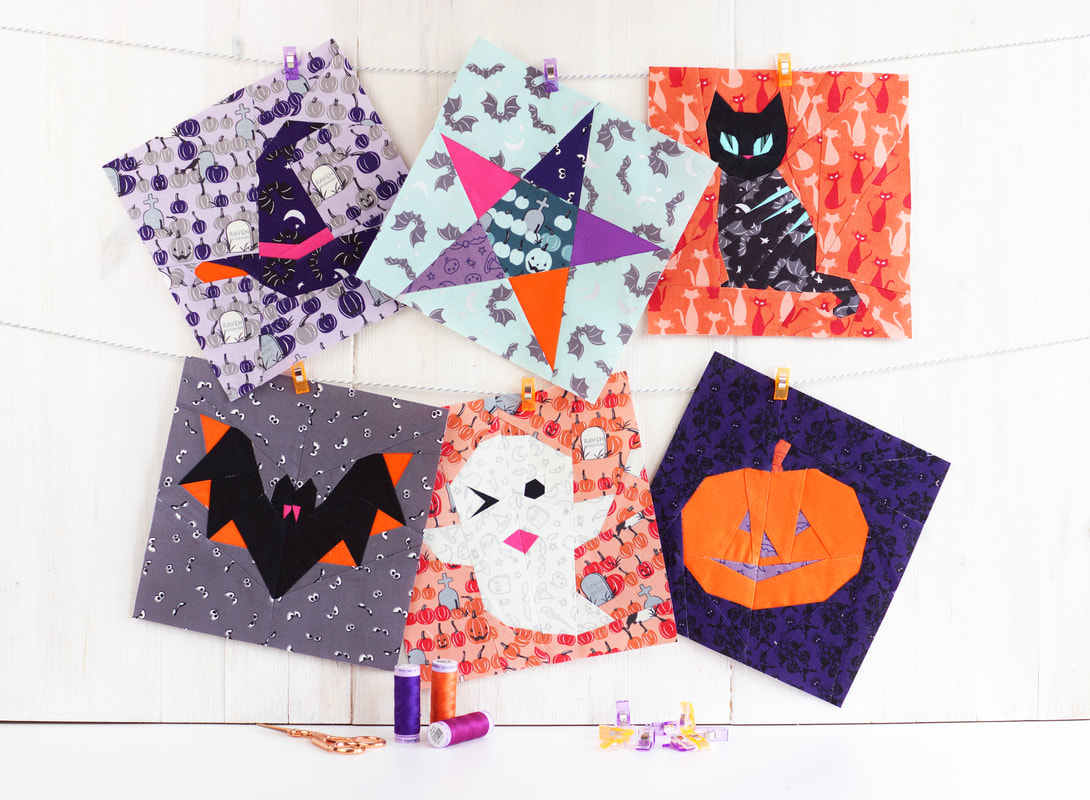 I decided to sew up all of my Halloween quilt blocks with this cute fabric series and I am over the moon with the results. The fabric patterns are small enough to work great as background fabrics, but are equally fun for fussy cutting. These quilt blocks will be perfect for these little trick-or-treat bags, it's a free pattern and tutorial. But let's see what all these Halloween symbols mean: The witch: 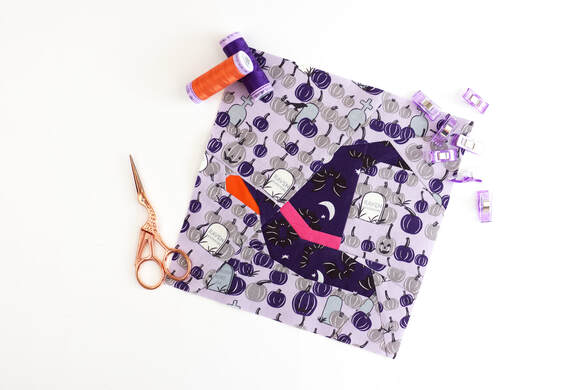 witch hat quilt block Halloween as we know it today, was celebrated by Celtic cultures as a feast for 'summer's end' and to honor the fall harvest. It was called Samhain, pronounced sow-in. It was celebrated on the evening of October 31. until sunrise on November 1. and is also known as the pagan New Year's Eve. It was a celebration for the deceased as much as for the beginning of the pagan New Year. Celebrations included bonfires and feasts. In the Middle Ages people who celebrated with bonfires were accused of being witches. And their power was believed to be greatest during Halloween night. So it's no surprise, that the witch, her hat or broomstick are still to this day, one of the most prominent symbols for Halloween. The bat: 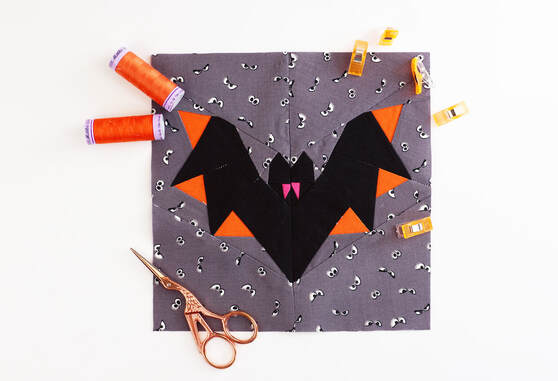 bat quilt block The original Celtic bonfires at Samhian would attract many bugs and flying insects. Which then caused bats to emerge at these festivals to have a little feast of their own. Therefore there's no Halloween without a bat. Halloween black cat:  Halloween cat quilt block The association of black cats with Halloween also comes form the Middle Ages. The women accused of witchcraft often fed wild cats or had pet cats themselves. Black cats were feared especially, since their dark black fur allowed them to roam through the dark undetected, leaving only their piercing eyes to be seen. And who doesn't agree, this is a little bit scary, right? The ghost: 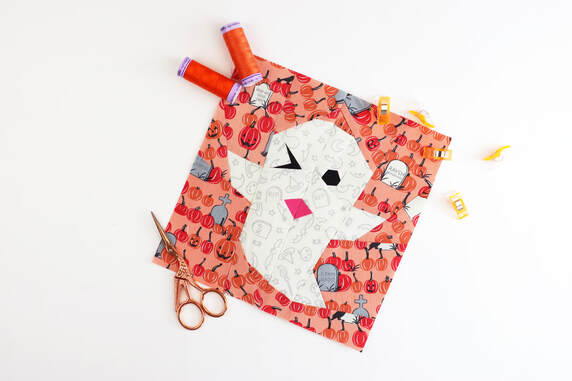 ghost quilt block Ghosts have always been a symbol for Halloween. Samhain and the Christian holiday 'All Hallow's Eve' or 'All Saints Day' are both celebrations for the deceased. During the night of Samhain it was believed, that the veil between the living and the dead is the thinnest and people are closest to the dead and their spirits. Making the ghost the most fitting symbol for this 'ghosty' holiday. The Jack-o-lantern: 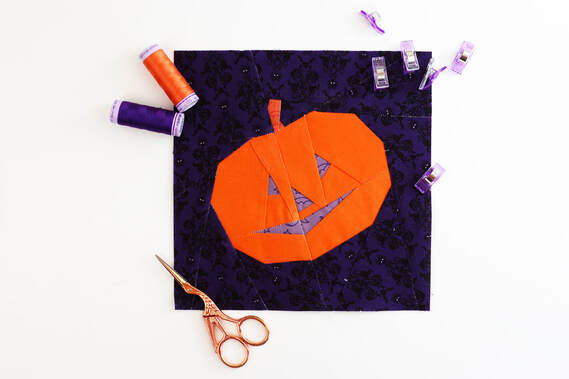 pumpkin quilt block The Celts would carve turnips on 'All Hallow's Eve' and would place and ember inside. This was done to keep evil spirits away. Funny enough pumpkins didn't exist in Ireland at that time that why turnips were used. The Pumpkin only became popular when the Irish migrated to America and were more popular and easier to carve that turnips. So what do you think? Are you in the mood to start Halloween sewing early this year ? 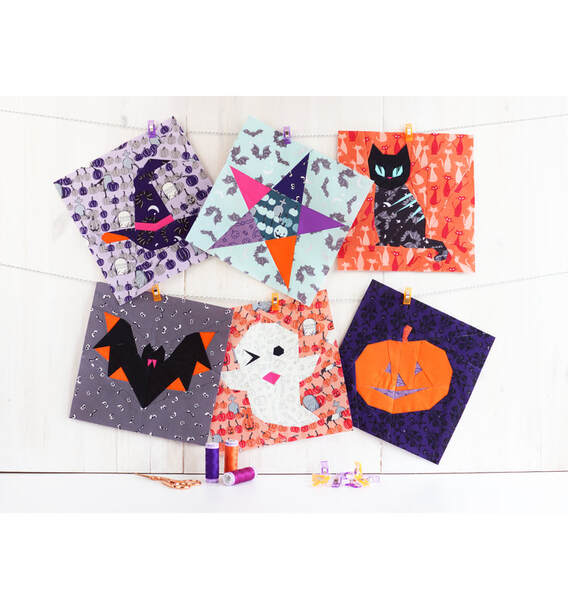 Halloween quilt block pattern Thank you so much to Riley Blake Designs for supplying the absolutely adorable Spooky Hollow fabric series designed by Melissa Mortenson that I used for these cute quilt blocks. Ingrid xx Halloween is approaching and I want to show you how to sew a stunning little Trick-or-Treat bag with one of my quilt blocks... and best of all its really easy. 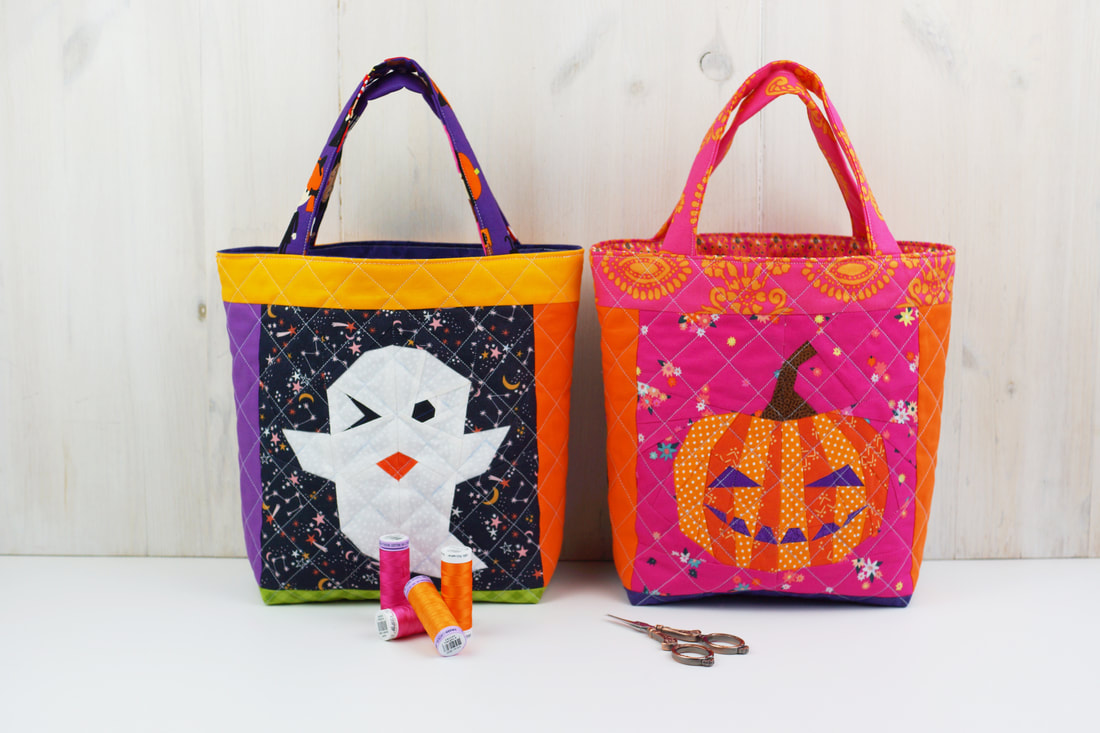 cutest ever trick-or-treat bags Finished bag size : 8.5" wide, 9.5" high and 4" deep at the bottom Fabric/ Materials needed: (all measurements are width x height) > 1 FPP quilt block 8.5" x 8.5" (ghost pattern shop here) > 2 strips of fabric on each side of the FPP block 2.5"x 8.5" > 2 strips of fabric for bottom panel 12.5"x 3" > 2 strips of fabric for top panel 12.5"x 2" > 1 piece of fabric for back 12.5"x 8.5" > 2 pieces of fabric for lining 12.5"x 12" > Fusible interfacing 2 pieces 12.5"x 12" > 2 strips of fabric for handles 2,5"x 12" > 2 strips of fusible interfacing 2"x 12" 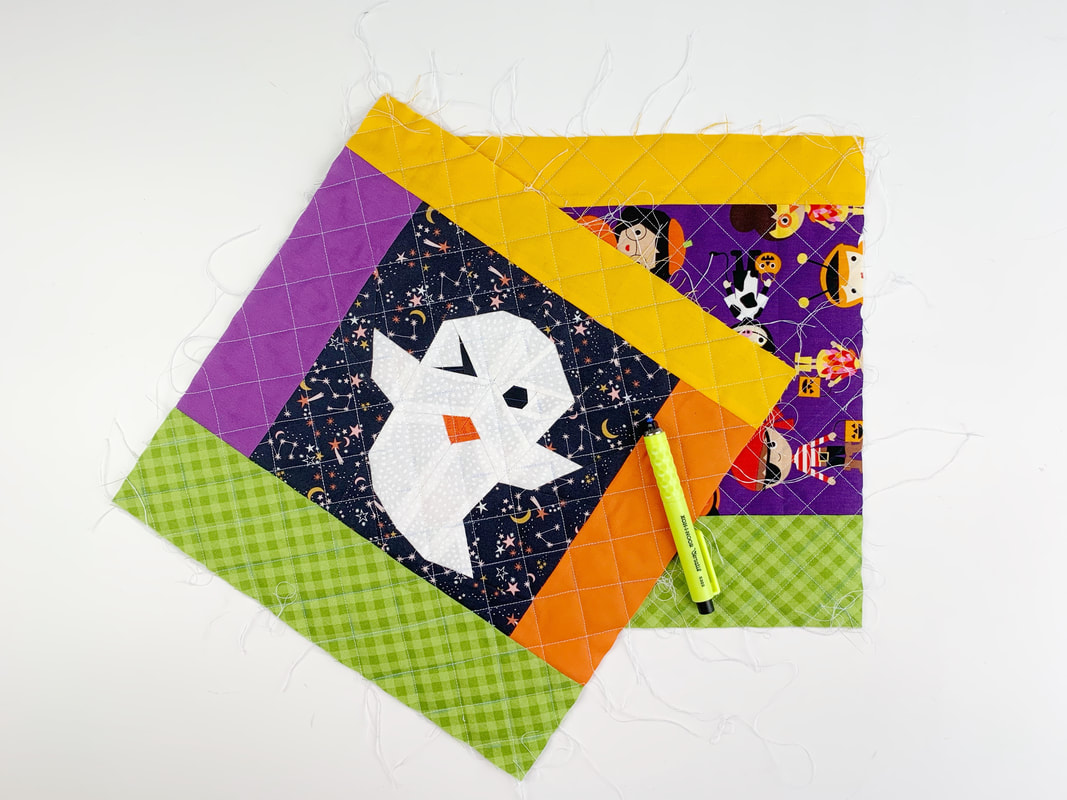 Front and back exterior fabric pieces of bag Instructions: -Sew your Foundation paper pieced quilt block - I chose the little ghost . ( shop Halloween patterns here ) the block will measure 8.5"x 8.5" when sewn together (unfinished- meaning not sewn into a project yet). -Cut out all the fabric, lining and fusible interfacing pieces. -Attach the side strips to the quilt block. Then attach the bottom and top panel to the quilt block and fabric for the back ( see picture above). Interfacing gives your bag more structure and stand. Iron on the fusible interfacing to your front and back exterior main pieces of your bag. 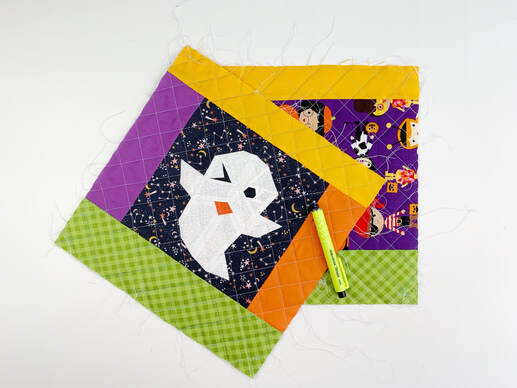 Trick or Treat bag exterior pieces quilted - Quilt your exterior pieces to your liking. - I did some diagonal straight line machine quilting. - I drew the lines with a washable fabric marker ( this one can actually just be dusted off, it's a dressmaking chalk pen, that comes with several different color refills) - Then I machine quilted the front and back exterior fabric pieces with diagonal 1" squares. Sewing the handles: - iron on fusible interfacing on fabric strips of handles, center to width of fabric, leaving 1/4" seam allowance on both long sides of the fabric strips. - Fold over 1/4" seam allowance on each side of the fabric strips and clip in place - (I use only orange and purple clips, to stay in the Halloween spirit :-) - Now fold the strip in half and clip in place again. Then sew along the clipped edge with a small seam allowance to finish off the handle strip. - Repeat for second handle. - Attach the handles at 3" from the outer edge to the top of exterior front and back fabric pieces. And clip in place. - Lay lining fabric right sides together on top of outer bag pieces and clip in place at top edge. Handles are now sandwiched between lining and outer piece. - stitch along top edge with 1/4" seam allowance. - fold exterior and lining pieces open. - lay both trick-or-treat bag pieces on top of each other, right sides together - Clip or pin the raw edges in place, matching up each seam and clipping or pinning the matched up seams. - Leave a 4" space at the center of the bottom end of the lining, this is your opening for turning the bag later. - Then sew along the four open sides. Do not sew the 4" opening at the end of the lining pieces. - For a flat bottom of your bag, you need to box all four corners. Two corners of the lining and two corners of the exterior fabric. Starting with flattening the corner, the seams, bottom seam and side seam should be on top of each other. Then measure 2" from the top corner with an acrylic ruler and draw a line across with your fabric marker or a water soluble pen. Stitch along that line and trim off the corner, leaving a 1/4" seam allowance. (Repeat this for all four corners) 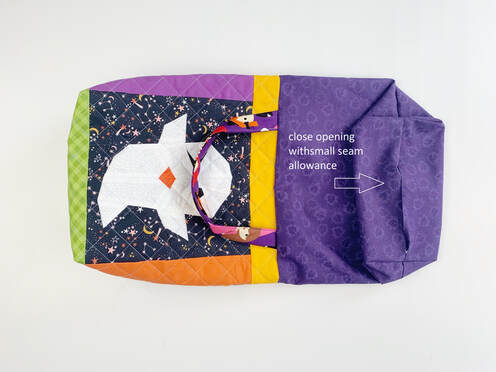 - Turn your bag by turning the pieces right sides out, pulling through the opening in the lining. Push out the corners nicely. Press the lining opening under 1/4" and stitch closed with a small 1/8" seam allowance. - Fold lining into bag and stitch along top edge of bag to secure handles and lining. Et Voila.... your cutest ever quilted Halloween TRICK-OR-TREAT bag is all done. How are you all celebrating Halloween this year? Let me know ....
Ingrid xo 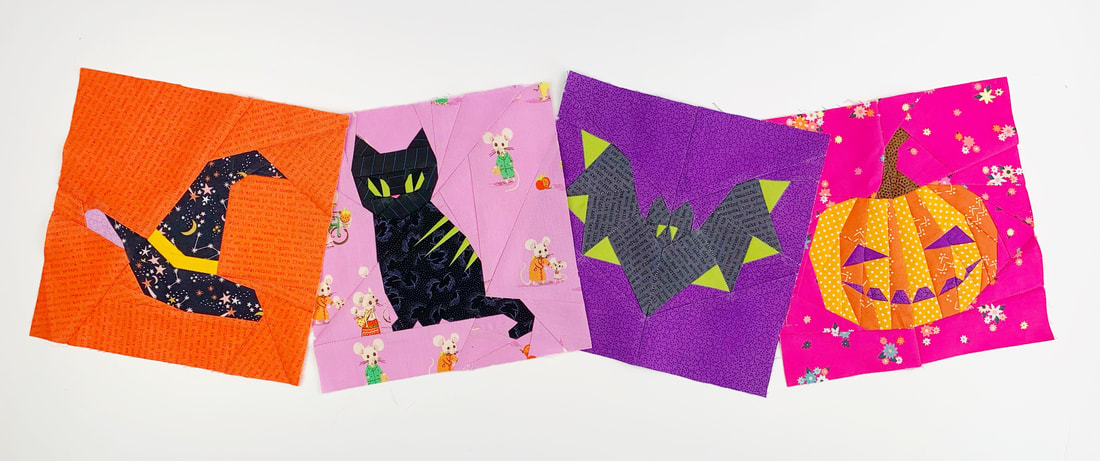 Halloween quilt block pattern BOO HOO This year Hallooween will be very special. A full moon, a blue moon, daylight saving time, Saturday celebrations plus the unprecedented events of this year will make Halloween 2020 one day/night to remeber. So much has changed, but the love for spooky, scary and fun delight is as strong as ever. So lets see how we can celebrate this Halloween in a safe, fun and special way. 1. Small group Party Invite a small group of your closest friends or family and have an unforgettable get together under the light of the blue moon. How about a Halloween picnic or a Halloween hide and seek? 2. Zoom Party Why not coordinate a neighborhood Zoom Party with a costume contest, games and scary stories? Everyone can plan goody bags ahead of time and they can be dropped off on doorsteps in advance. 3. Candy games with your kids Use your imagination and hide candy all over the house, maybe even inside and out. Kids can win prizes for finding the candy. How about you create different theme rooms in your house and organize a Halloween scavenger hunt? Make a gift certificate to stay up late and watch a movie. 4. Fun and memorable photos This year will be a very special Halloween. Don't forget to take 'once in a blue moon Halloween' photos. Make sure you show off all your fantastic Halloween decorations. Now is the perfect time to sew some of your favorites. Use these photos to mail out some fun Halloween cards. Anyone will be happy to receive a spooky card at any time. 5. Scary memory videos How about some fun, spooky and scary Tik Tok videos. Show off your fantastic costumes. Maybe dress the family as a theme or all members the same? Let your imagination run wild! 6.Halloween Karaoke We all have those Halloween hit lists with Thriller or Monster Mash. Organize a Karaoke night with your family inside or with a small group of your closest friends in the backyard. Your neighbors might enjoy to cheer you on. 7. Pumpkin carving Party Every family member or friend carves his won special pumpkin. Organize a contest with prizes, photos and videos. May the best carver win. 8. Halloween Pinata Pinatas are always a fun way to entertain children. Fill your favorite Halloween Pinata with tons of candy. Organize a game night for your kids and the pinata will be the final prize of the night! 9. Cook a bloody Dinner Don't just cook the Halloween dinner beforehand, but make it a dinner cooking Halloween night. Your could make feet loaf, hot dog mummies a pumpkin puking guaamole or a berry eye ball punch. Dress up and cook together, celebrate the cooking and stay in your character, with the language, accent and more. Take tons of photos to remeber this special night. 10. Online murder mystery Party Invite your friends and family to dress up in their costume and join the mystery fun. Design your own murder mystery party or sign up for one online. 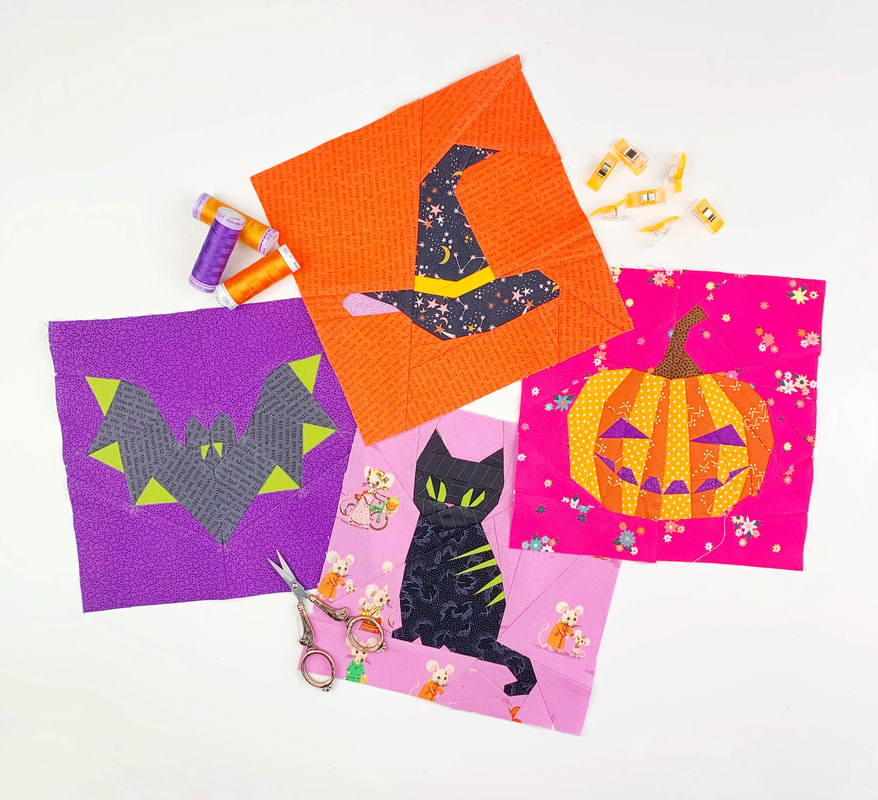 Halloween quilt block pattern Do you have any more ideas for a 'once in a blue moon Halloween night' ?
Let me know your suggestions.... Shop all the HALLOWEEN patterns here. And show me your makes with #jjmhalloween Most of all have tons of fun this year Ingrid xoxo |

Author
Ingrid Alteneder Archive
March 2022
Categories
All
|


 RSS Feed

|
Visit us at
|