
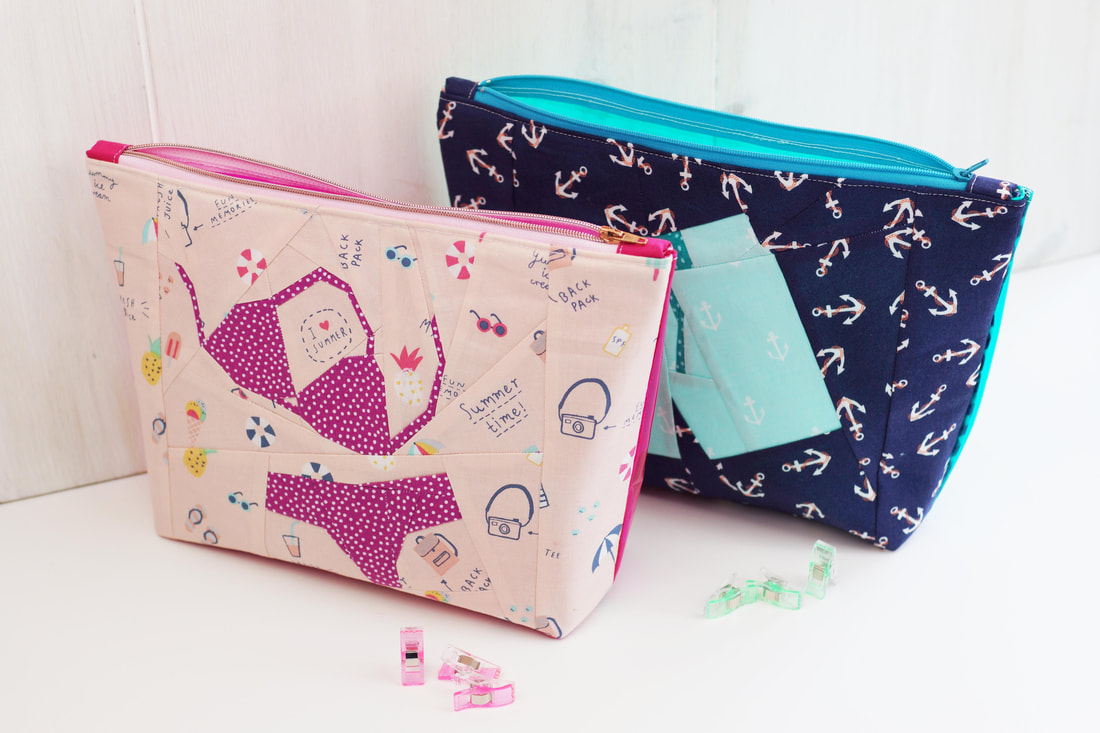
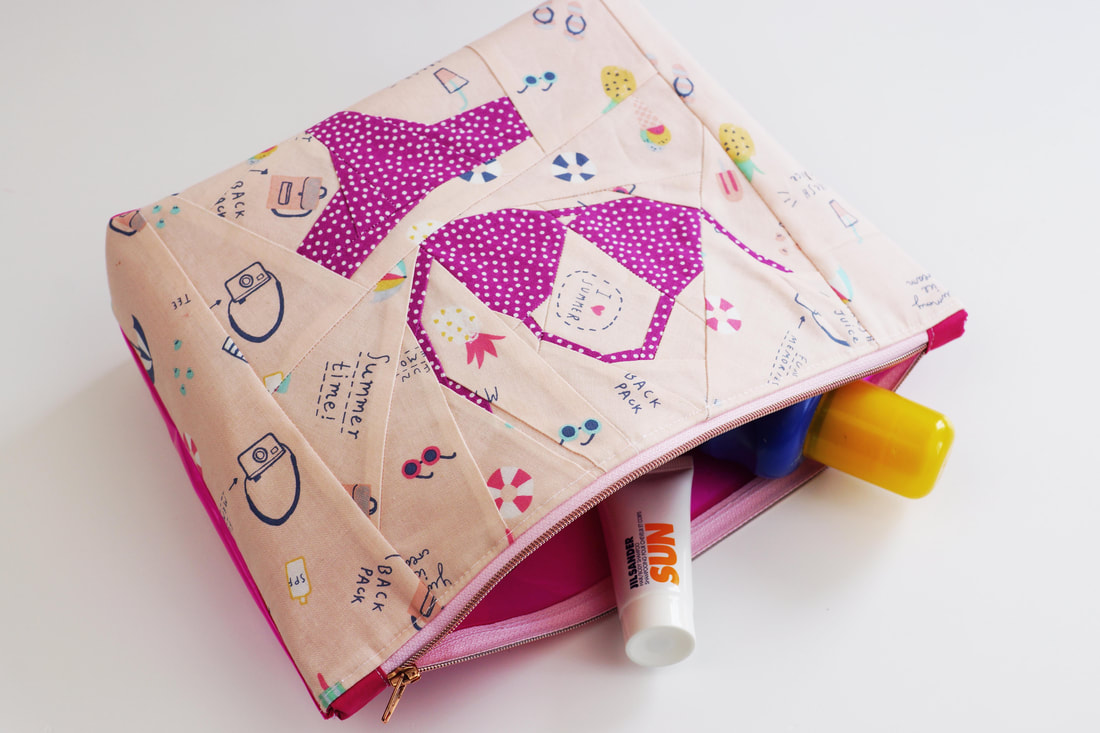
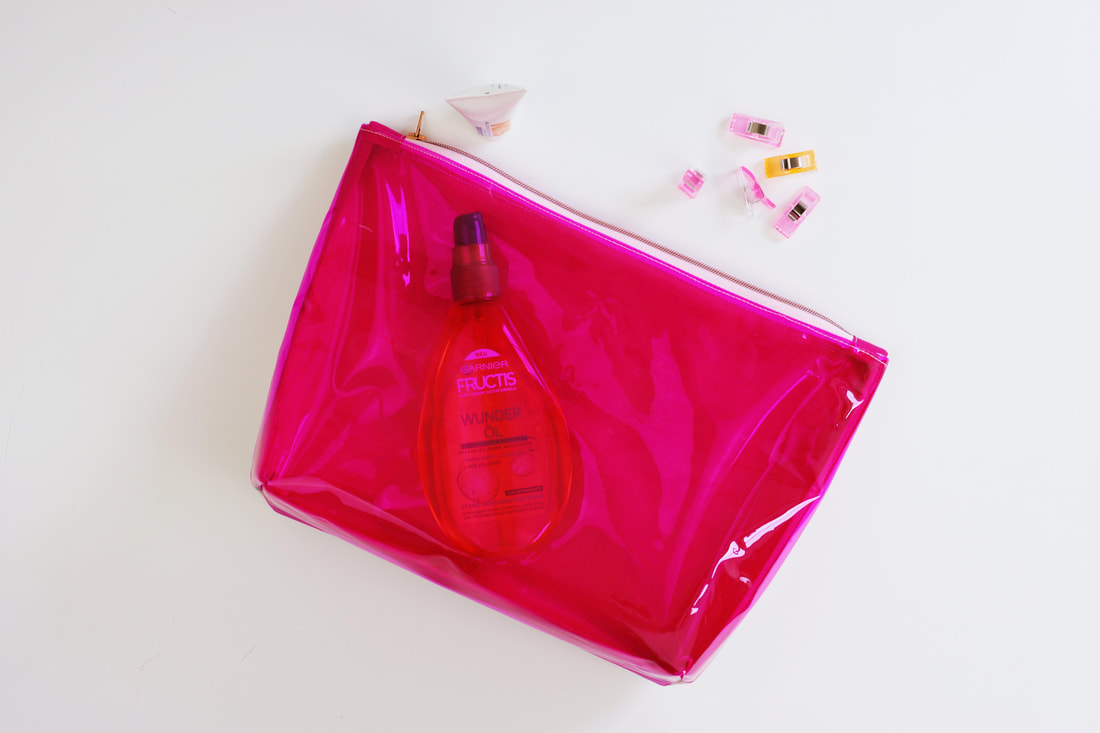
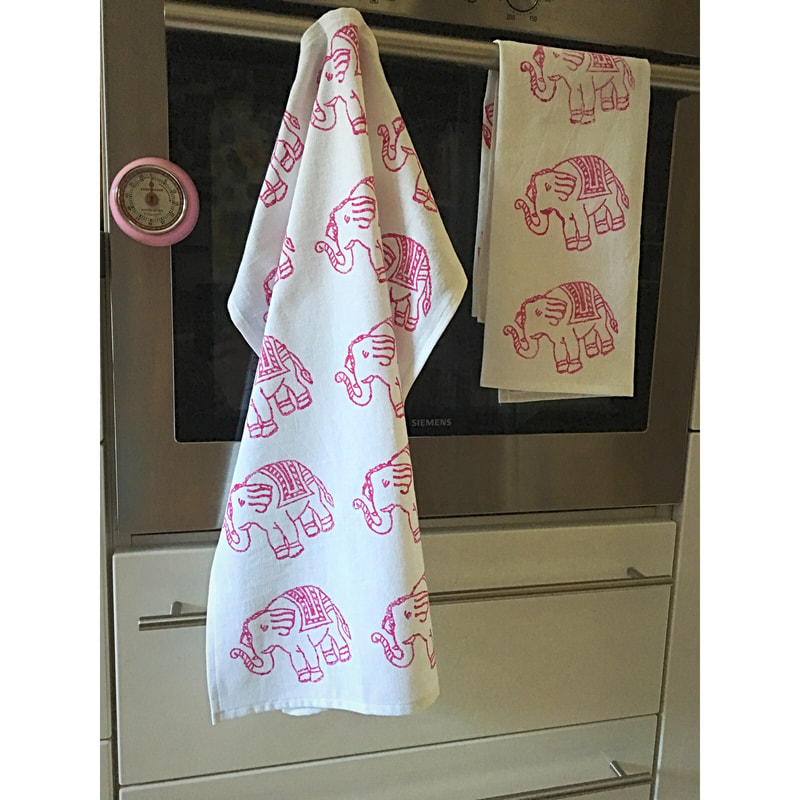
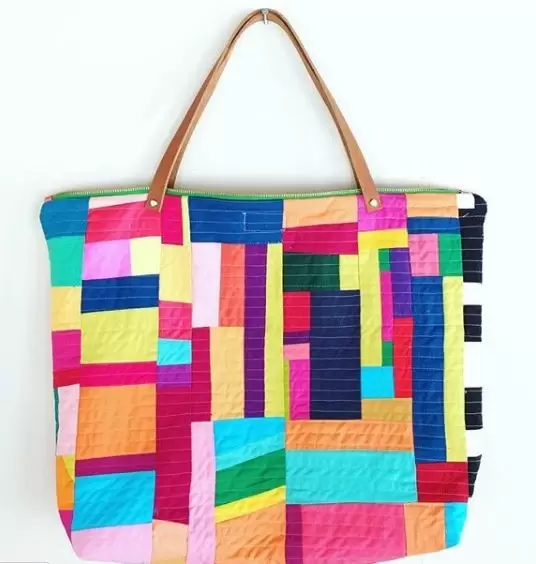
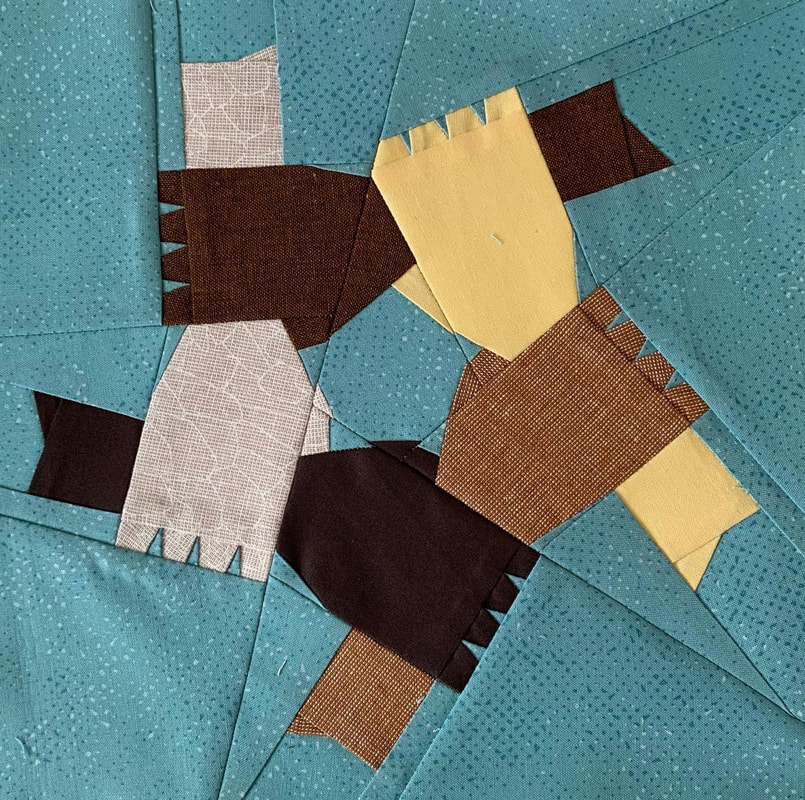
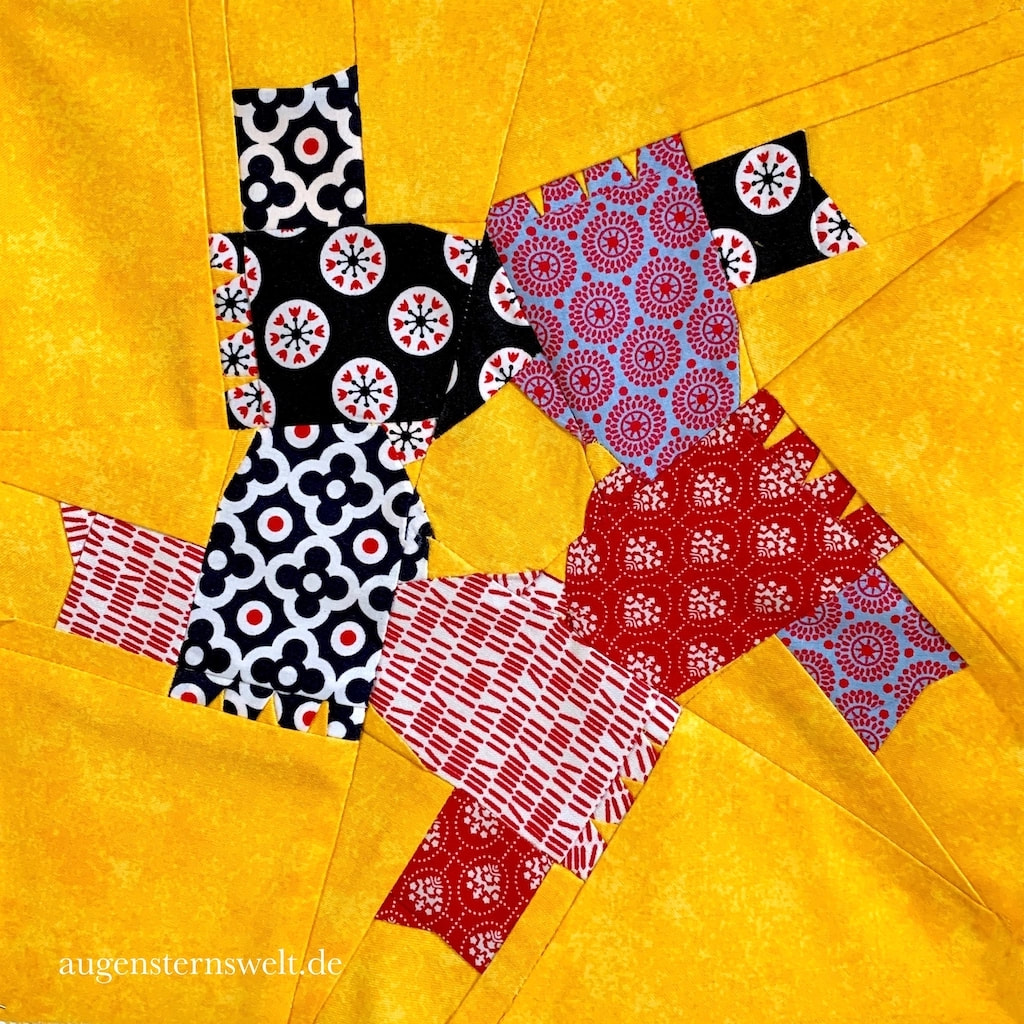
#twopiecepouch
Sometimes connection happens in the most unexpected ways. This happened when I first saw Natalie Santini's profile on Instagram @sewhungryhippie you could even say it was love at first sight, literally. 'I believe we're all interconnected, to each other and to the Earth-more than we realize.'- this is Natalie's quote and she's 100% right. I love her quirky, fun and colorful sewing projects, photos, patterns and general approach to life. She has some fantastic items and projects in her shop, and the thing that really caught my attention are her fun and bright colored vinyls and patterns with them. So immediately there was a pattern idea that popped into my head and Natalie was on the same page right away. And we created the ' TWO PIECE POUCH' #twopiecepouch
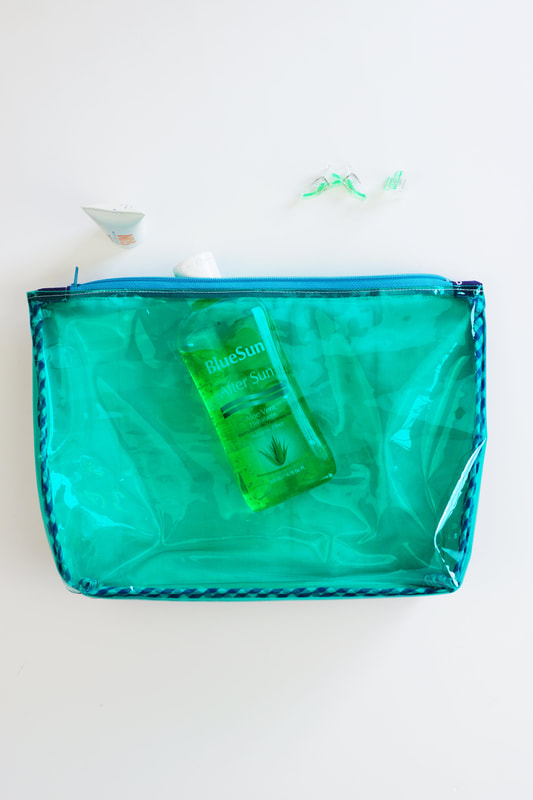
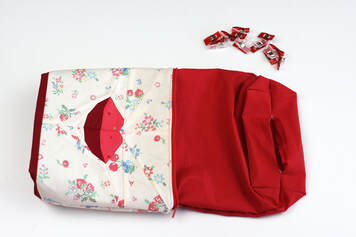
a super practical and pretty wet bag for BIKINI/SWIMMSHORTS
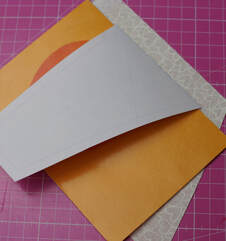
This is a fab combination of foundation paper piecing and vinyl.
Natalie's fantastic way of sewing a beautiful pouch with vinyl and two of my summer, beach quilt block patterns make some useful and fantastic pouches. I am sure it happened to you as well, you spend all day at the beach, want to pack your things but all the swimsuits are still wet, so you wrap them in the towels. When you get home, the towels are moist, the pages of your book or magazines are wet and roll themselves. And to top it all off, one of you ( I'm not pointing fingers :-) forgot to close the lid of your sunscreen all the way, so it's spilled nicely all over your beach bag. 
Needless to say these problems will all be solved, when you store your wet bikini or shorts perfectly in this pretty vinyl pouch.
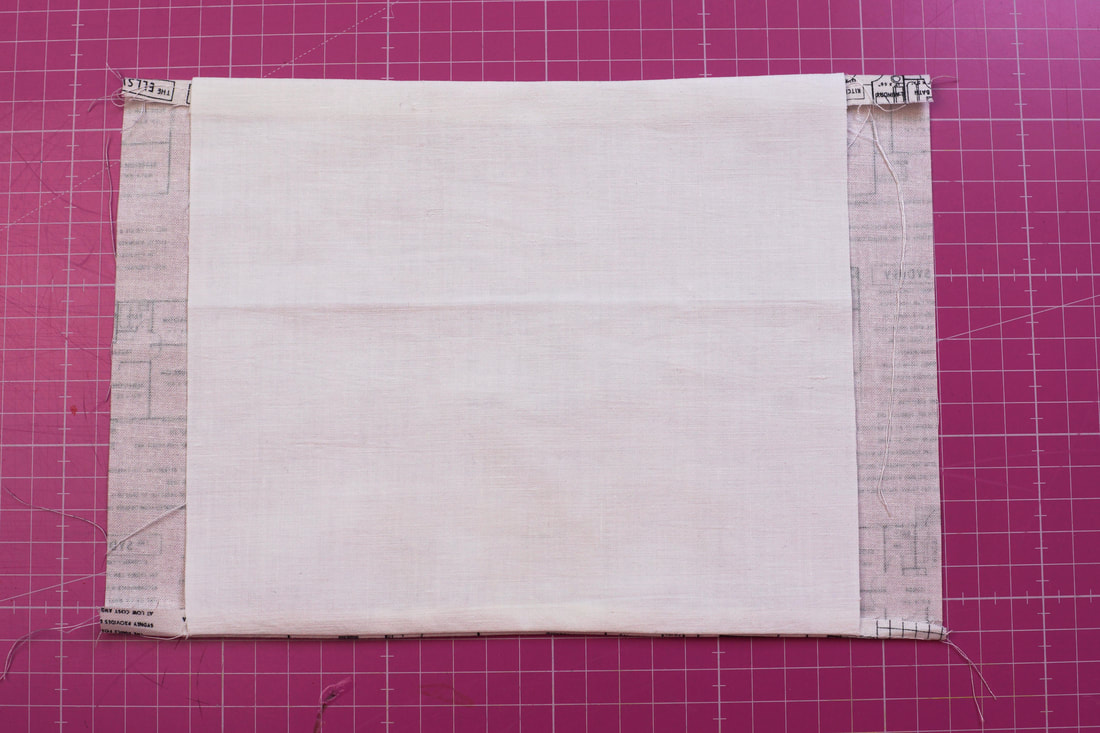
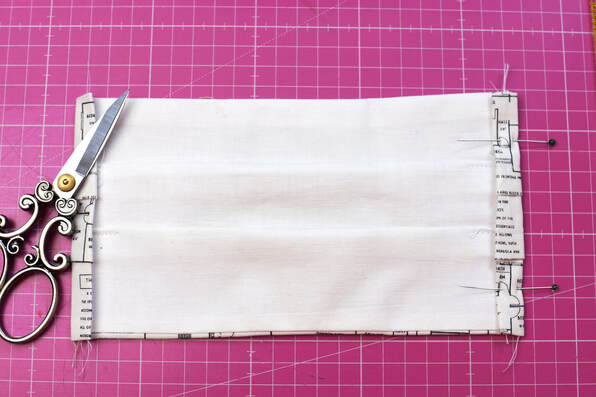
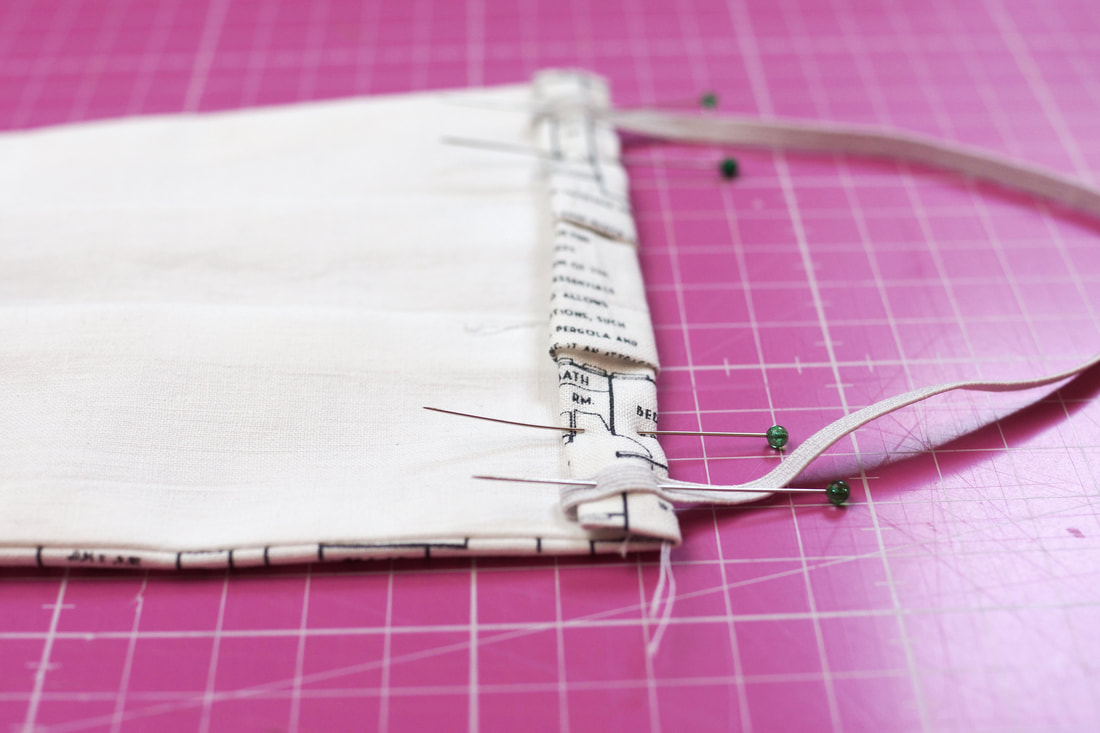
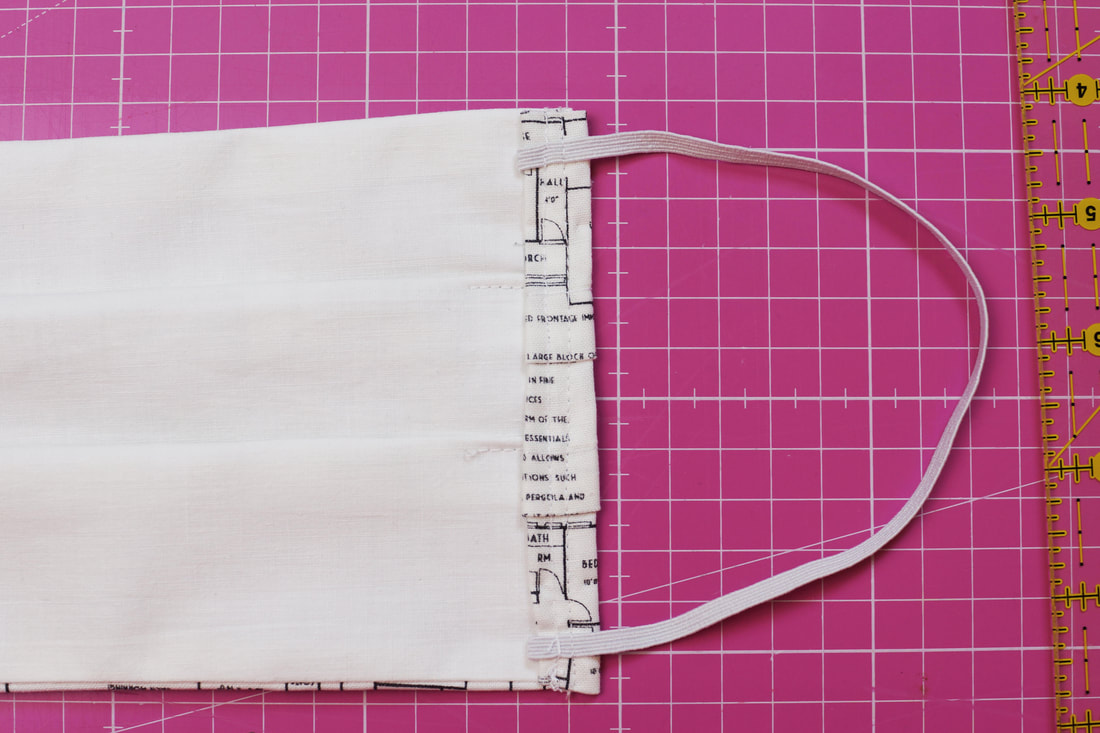
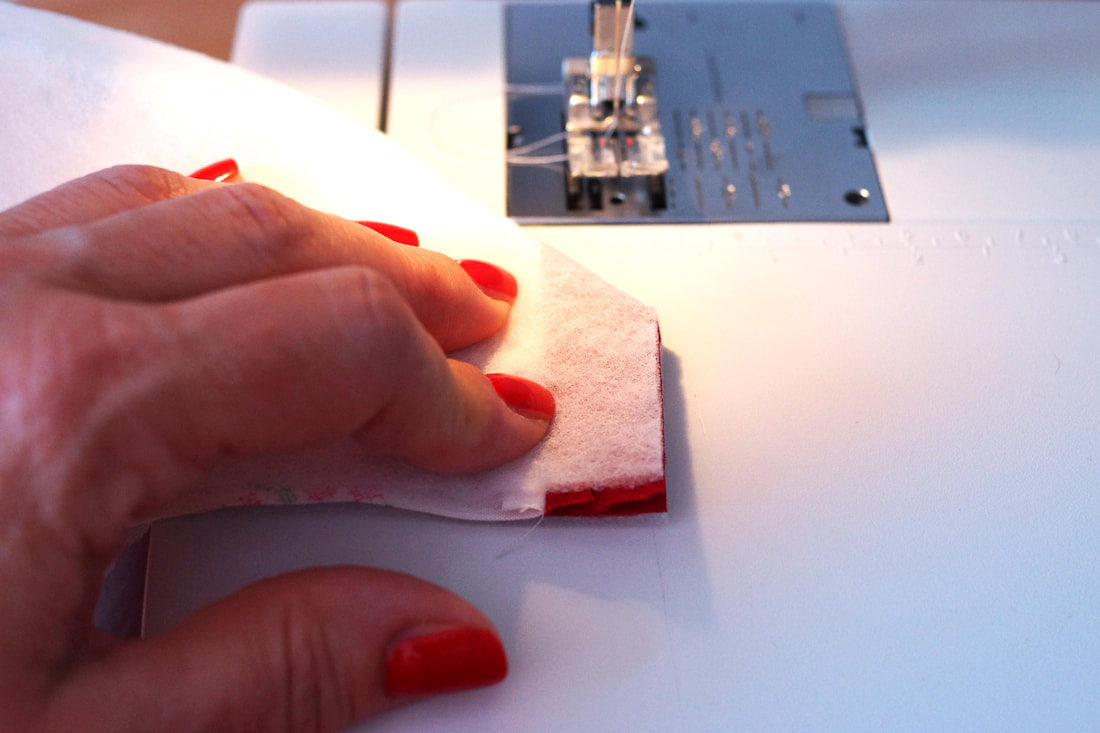
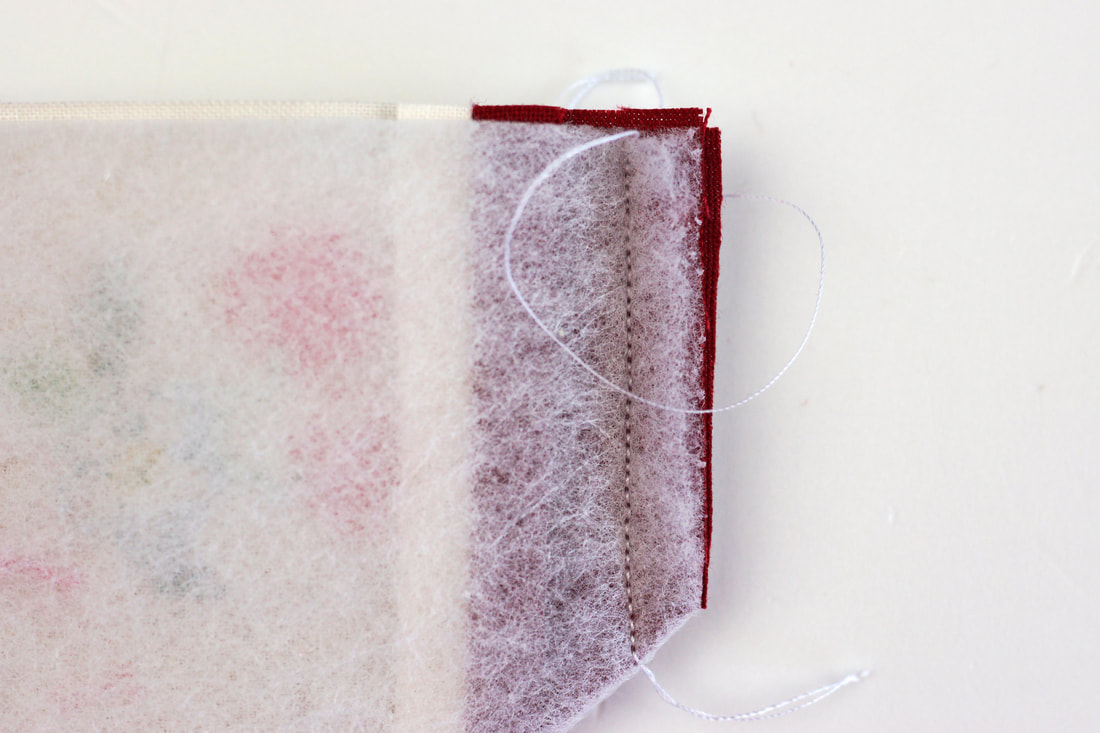
Your beach bag and all the rest of your stuff stays nice and dry, clean and safe. Plus you will be the hit at the pool or beach with this adorable #twopiecepouch. This pattern shows you step by step how to sew a vinyl pouch, as well as two unusual quilt blocks . The instructions are for two different quilt block sizes each, as well as two diffferent pouch sizes. The pouches don't have open vinyl seams, but awesome binding covered seams inside. 
awesome binding covered inside seams
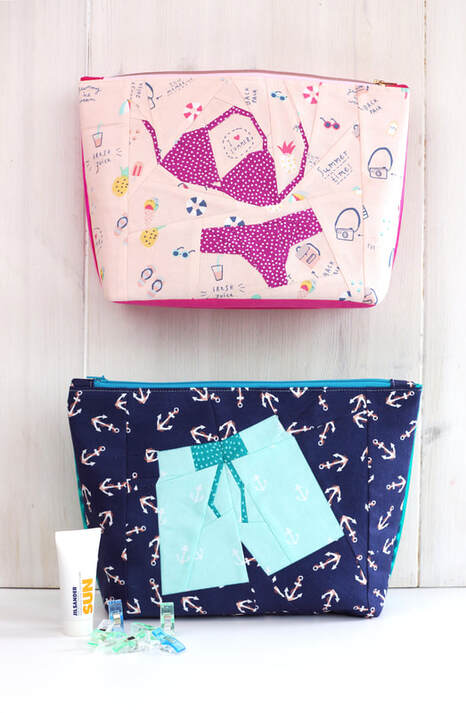
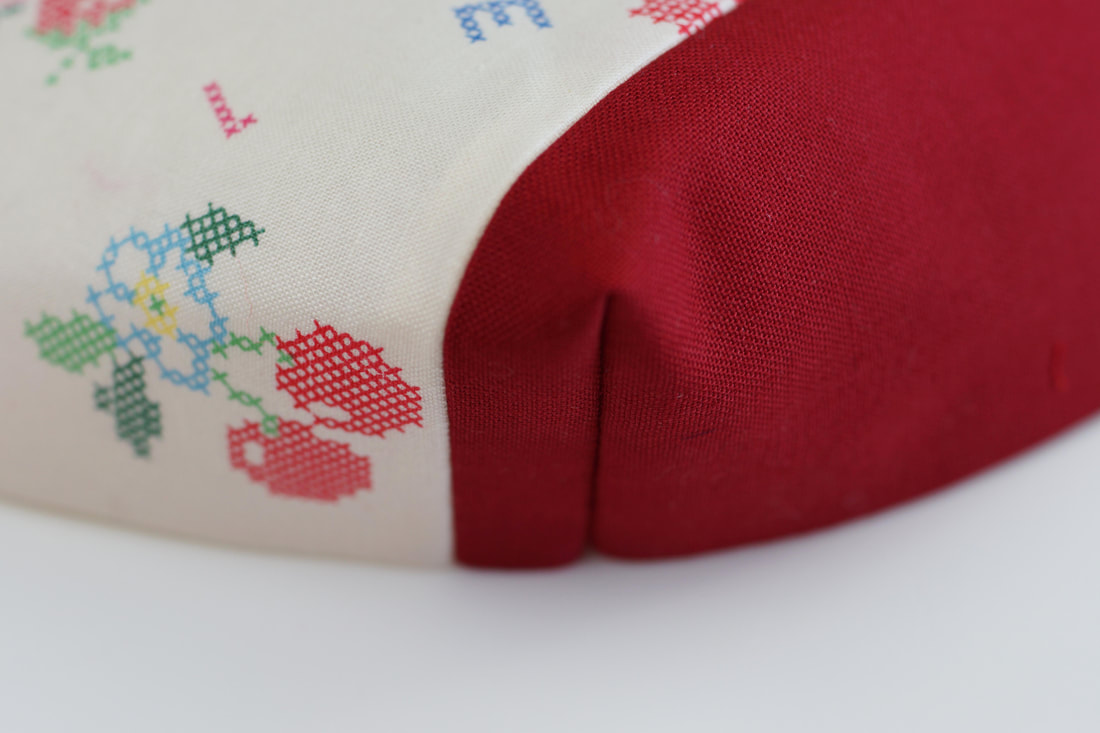
#twopiecepouch bikini and swimshorts
Get your sewing machine ready and make yourself some stunning
beach-bikini-swimmshorts wet bags. Shop the pattern here. And if you share them on social media why not use #twopiecepouch so we can cheer your makes :-) happy sewing Natalie and Ingrid xx
0 Comments
How to recycle pre-loved fabric? And most importantly, how to use pre-loved fabric? If you want to check out our updated fabric recycling article, visit our newly renovated blog!  vintage fabrics, curtains, table cloths and mens dress shirts Of course we did not invent recycling. Recycling is as old as history of human kind. Our ancestors did it out of necessity. I remember my grandma and also my mum keeping leftover anything, and I am not just talking food. Maybe that's why I became a 'keeper of everything' as well. Recycling is finally a 'THING' again and an important one at that. And nothing combines importance, necessity and beauty quite like a quilt or a mosaic. Have I told you that I am collecting broken dishes and tiles as well, nicely sorted by color? But that's a story for another time. We're talking fabric today. Why recycle fabric? There a a few reasons why we should recycle fabric: 1. fabrics are pretty expensive: We all know, especially if you've been sewing for a while, sewing isn't a cheap hobby. A yard or meter of fabric can easily cost between 18-24 Euros. And depending on your project this can get really expensive. 2. for environmental reasons : The cost of the fabric isn't everything, let's talk environment. Fabric has to be produced, that means cotton fields, pesticides, lots of water etc. Then it has to be bleached and printed, packed and shippped worldwide. This is just the quick version , but you get the drift, if puts a strain on our environment. So even if we can reduce this by a little bit it makes a difference in the big picture. 3. memories / history: Some of the items , that we recycle remind us of people, places or experiences, and are so worth keeping. Your dads favorite shirt, your daughters first dress, your grandmas sheets, whatever it is, it can turn a sewing project into a very special gift or keepsake. And even if it's not a personal memory, it can be a 'feel' of time or history. and last but not least 4. the beauty of vintage prints This is my favorite, since some of those vintage fabrics, just have the nicest and coolest prints, weaves or textures. They will turn your sewing project into an awesome item.  pre-loved hand towels, mens dress shirts, pillowcases and table linnens Where do you find 'pre-loved' fabric for quilting? There are numerous places to find beautiful used fabrics. But not all of them are useful for quilting or sewing projects. Look out for anything cotton or cotton blend. You will probably find wash care labels in clothes, but it's harder with fabric remnants or home decor fabrics. Cotton fabrics are usually stiff and can be crushed easily and the crease will stay in the fabric. Whereas man made fibers such as polyester, nylon and rayon etc. are smoother and creases will not stay as much in the fabric. You can always test the fabric with burning a little corner, if you're really not sure. Natural fibers will burn as opposed to man made fibers that will melt. Thrift stores: Here you can find anything from clothing to fabric remnants, pillowcases, table linnens, curtains/drapes and sheets. Fine cotton sheets are awesome for the backing of quilts. Coarser cotton sheets can be turned into bags, pouches dish towels and much more. Let your imagination run wild and try to experiment, you'll be surprised at what you will find. Flea markets : As with thrift stores, check out anything that catches your attention. A cute cotton dress with a flower print, a nice cotton mens dress shirt with an awesome stripe, some 70's table linnens with huge orange flowers.... the possibilities are endless. Garage sales: Same as the above, when you see items that catch your attention, check for stains, holes or tears. Depending on what you'll be using the fabric for you can still use one that has some imperfections. Sheet especially need to be checked in the middle they are often faded or thin in the center from longer use. It might not be a big deal , because you decide to cut it up anyways, but knowing what you get is always good. 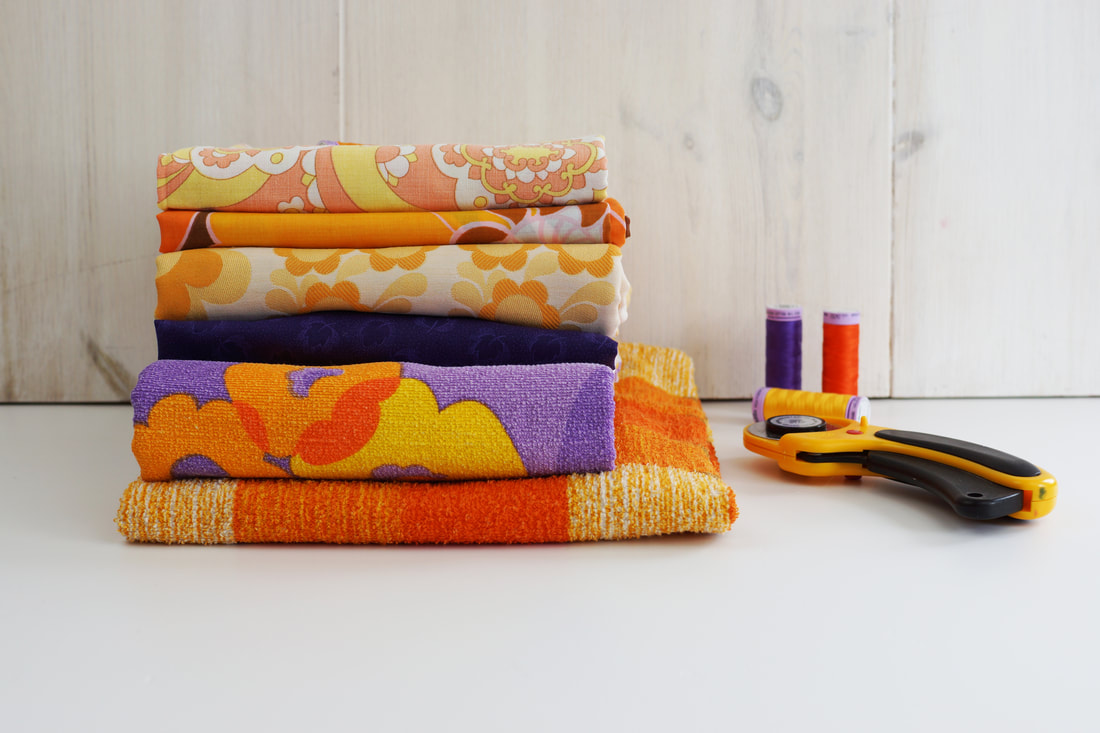 recycled fabrics, sheets, table linnens, curtains and towels Now that you found a whole bunch of fabrics what's next? First of all I like to wash the fabrics. Most of your finds might be washed already, but I like to make sure I wash them again for two reasons, one, I want to be sure there are no bugs, dust, smell etc. and two, I want to make sure none of the fabrics bleed after I've sewn them up. For pre-loved clothing I cut the items up into usable fabric pieces. This means I will cut off collars, cuffs, buttons etc. and fold the usable parts as I would fold my fat quartes. For sheets etc. I will cut stained or teared parts and fold the rest as well. Then, being a color freak I like to sort the fabric by color so I can easily find them when I want to use these treasures for new sewing projects. Here are a few projects I made with pre-loved fabric: Quilts I made with recycled fabric: 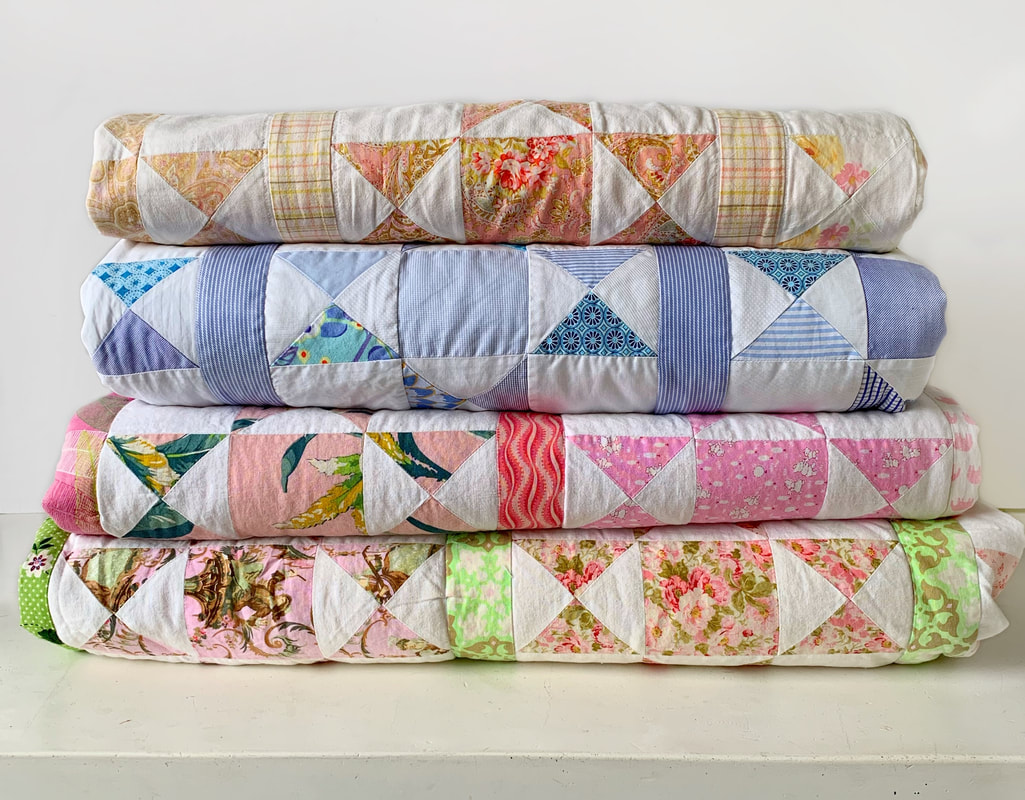 These are just a few of the quilts I made with recycled or pre-loved fabrics. All the white fabrics are pre-loved sheets, the blue quilt is almost entirely made with mens dress shirt fabrics and sheets, I just added a few quilting cottons to give it a more modern look. What do you think you guys? Wanna go fabric thrifting?  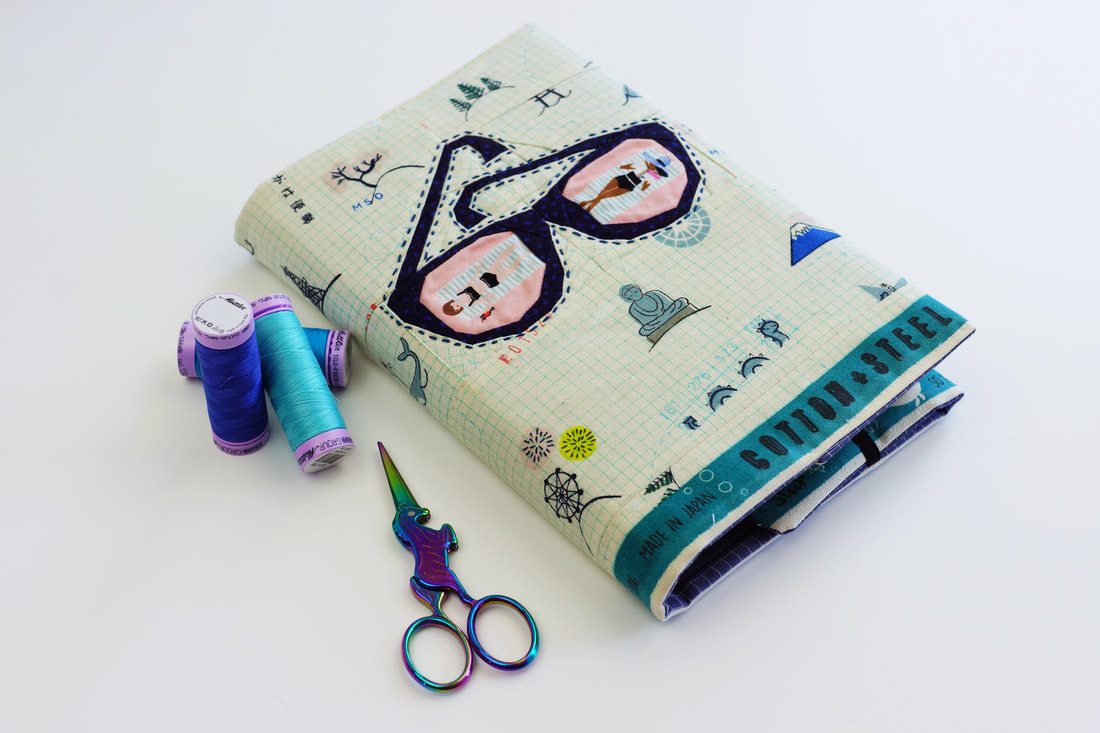
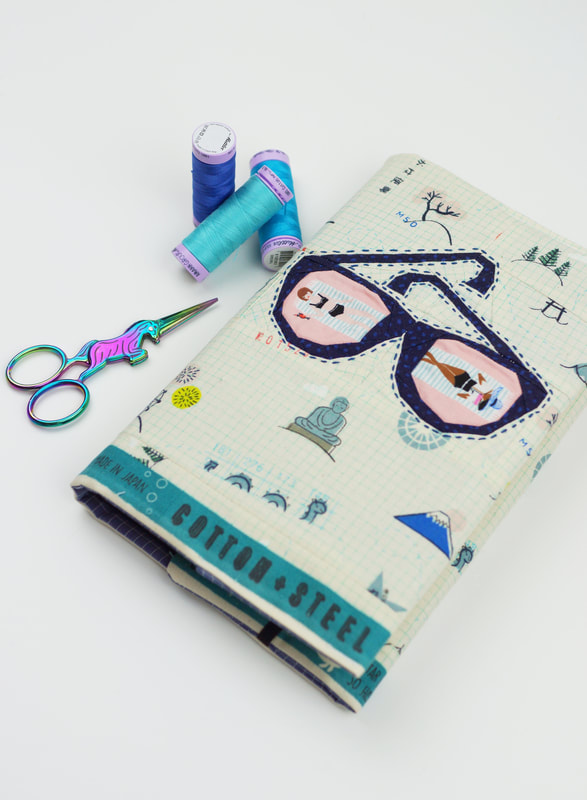
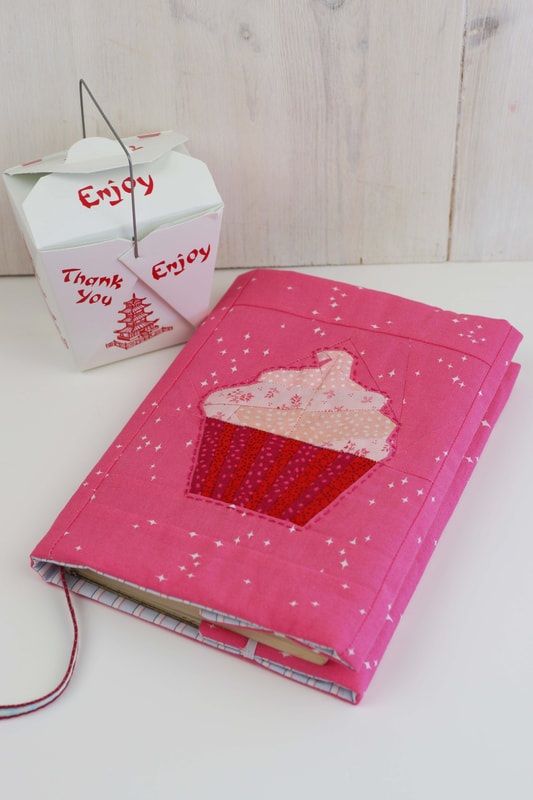
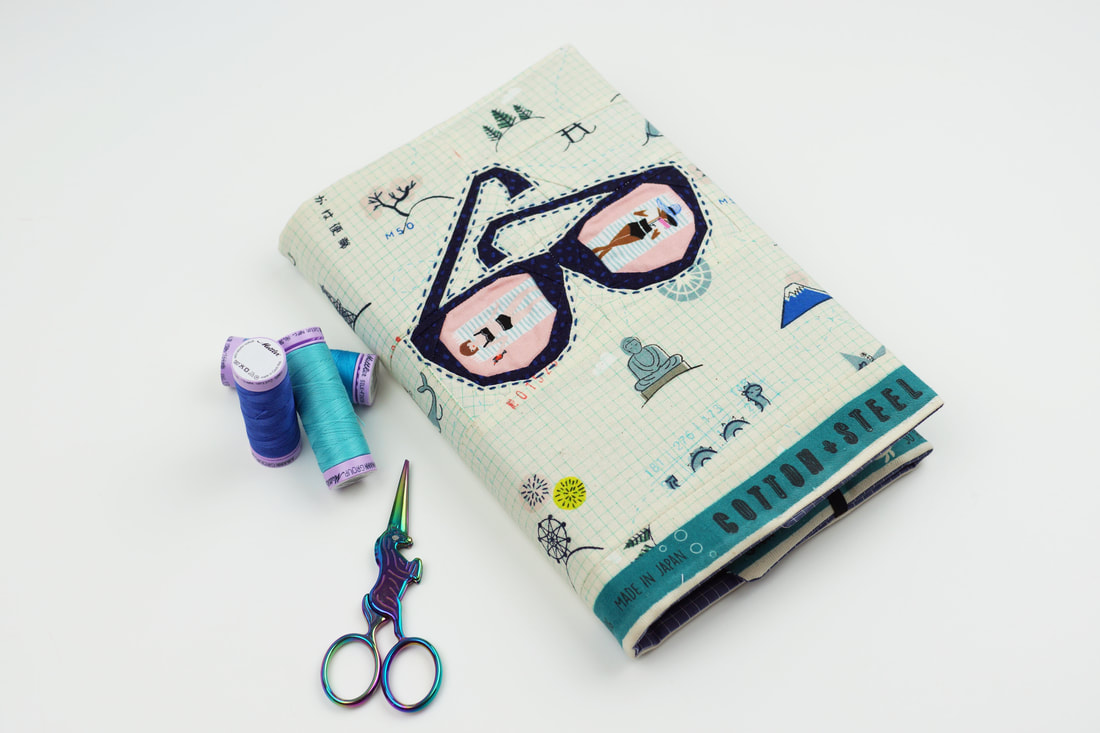
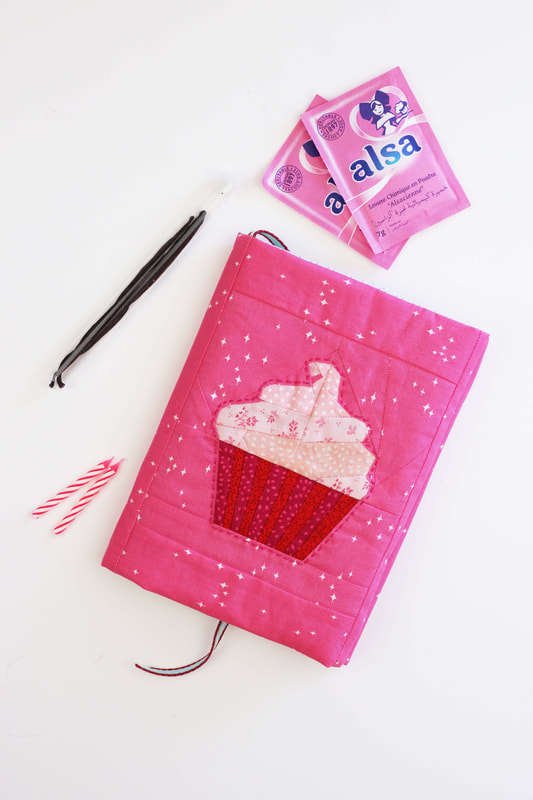
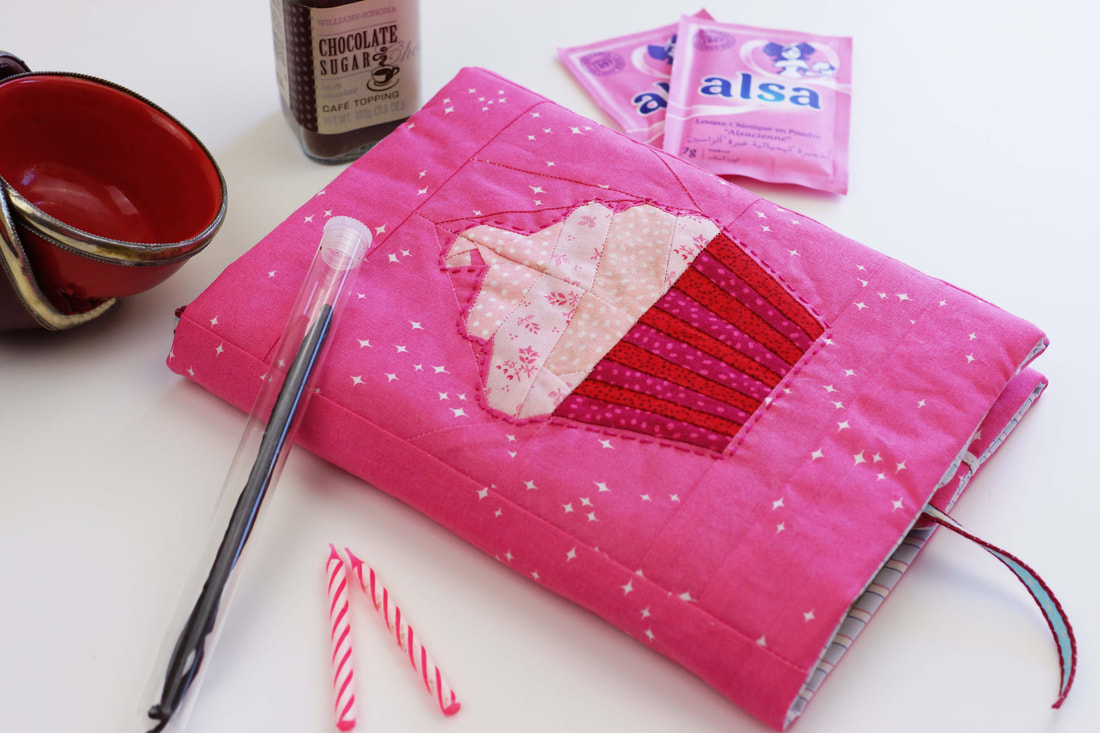
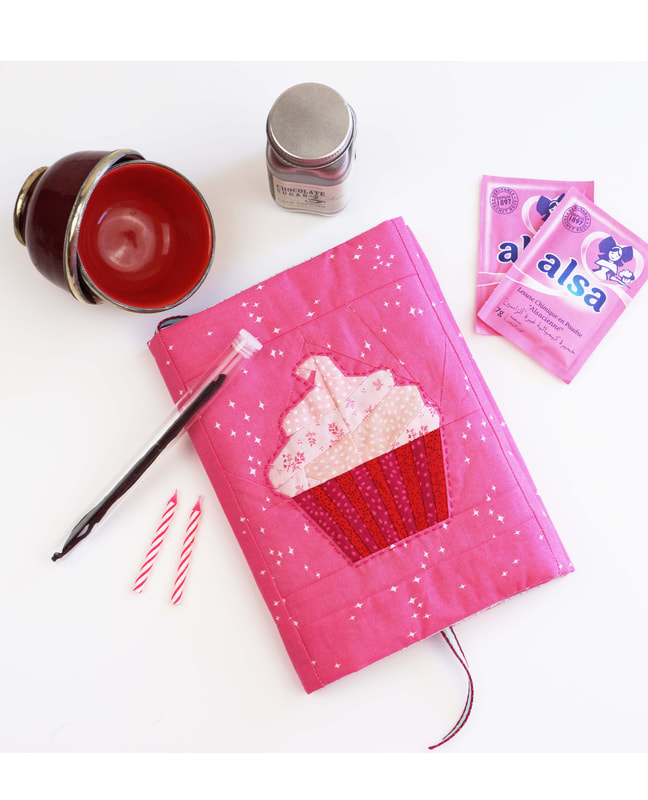
adjustable, quilted, fabric book cover
A quilted fabric book cover is not only extremly pretty on your coffe table,
it also comes in very handy if your reading is as 'deep' as mine. Life is serious enough, so I sometimes enjoy 'easy' literature also called romance novels. Especially on holidays, or to wind down after a long day. But obviously not everyone needs to know what I'm reading, right? Literally no one needs to judge my book by it's cover :-) So why not sew yourself a fun and easy, adjustable, quilted fabric book cover with the sunglasses quilt block pattern of mine? Perfect right?
Materials/ fabrics needed:
> the finished sunglasses quilt block ( or any other ) > fabric for the outer book cover (approx. 10"x 20" including quilt block depending on book size) > fabric for the lining ( approx. 10"x 20" depending on book size) > fusable light weight batting ( 10"x 20" depending on book size) > 10" elastic band > ruler, clips, scissors, thread and sewing machine I use a 1/4" seam allowance unless noted otherwise. 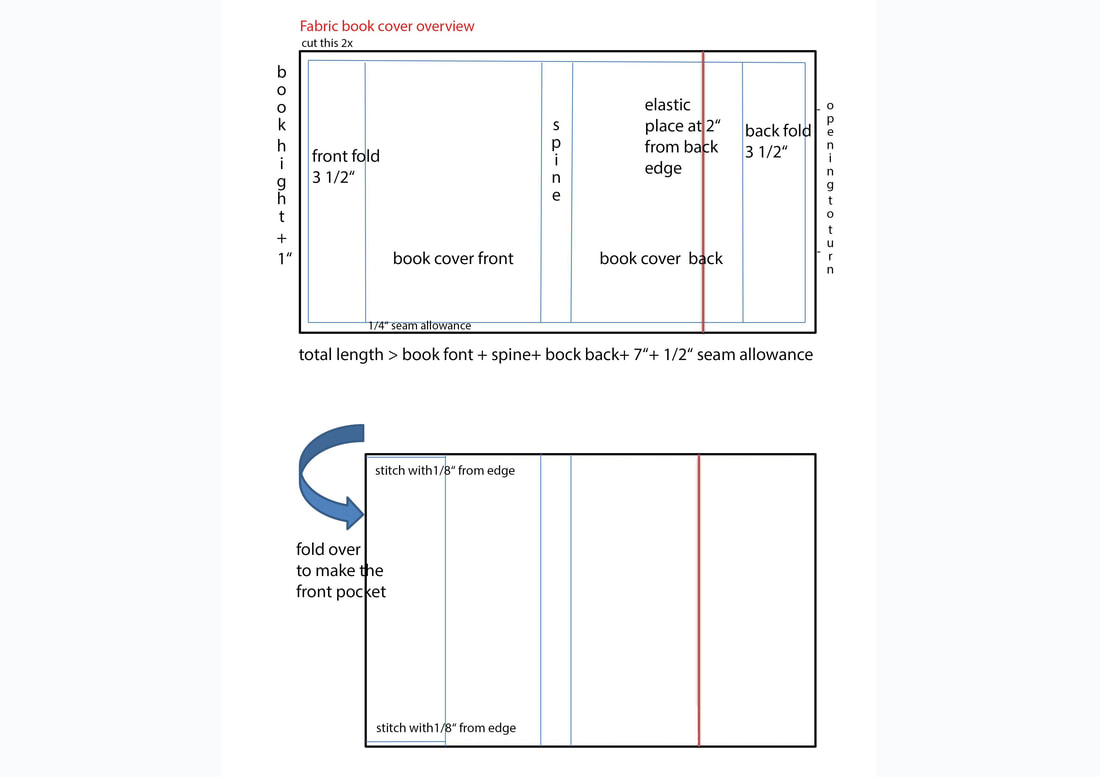
The size of your fabric depends on the size of your book.
I made my book cover to fit most average size hard cover novels, which is roughly 5 1/2 "x 8" with a 1" spine. The book cover is adjustable in length. This is how you calculate the total size of your fabrics and batting needed: > total length will be: book front + spine + book back + 2 x 3 1/2" fold + 1/2" seam allowance > total width (hight or top to bottom) will be: hight of book + 1" . 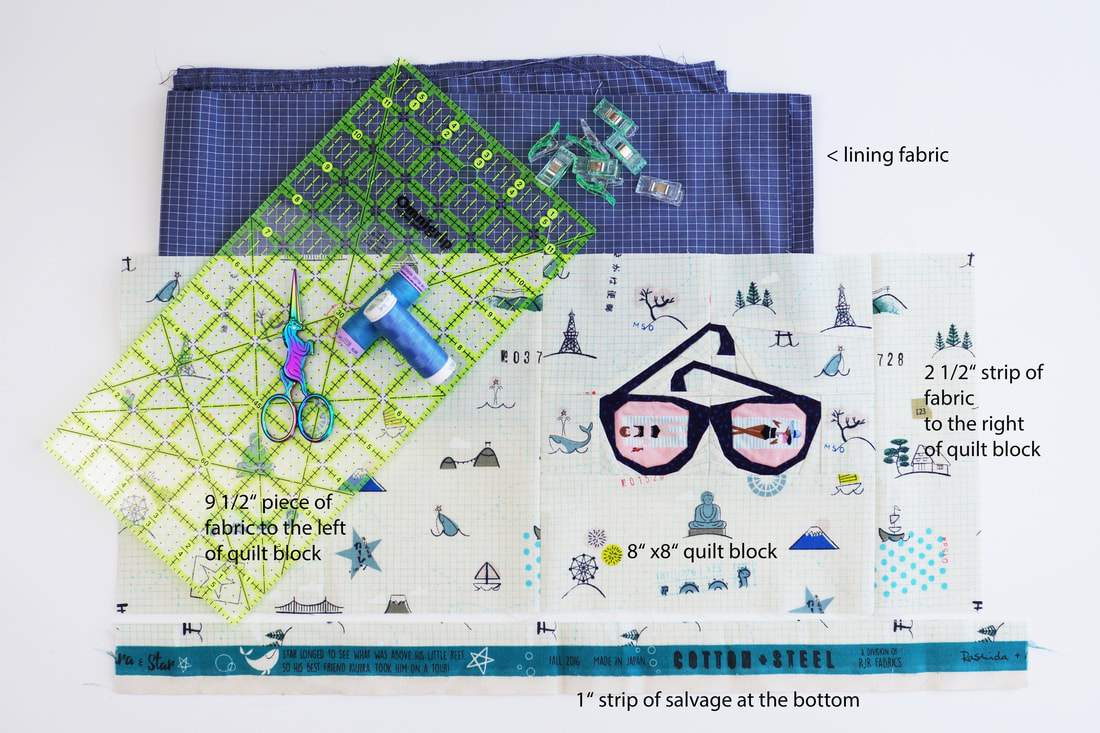
quilted, fabric book cover materials
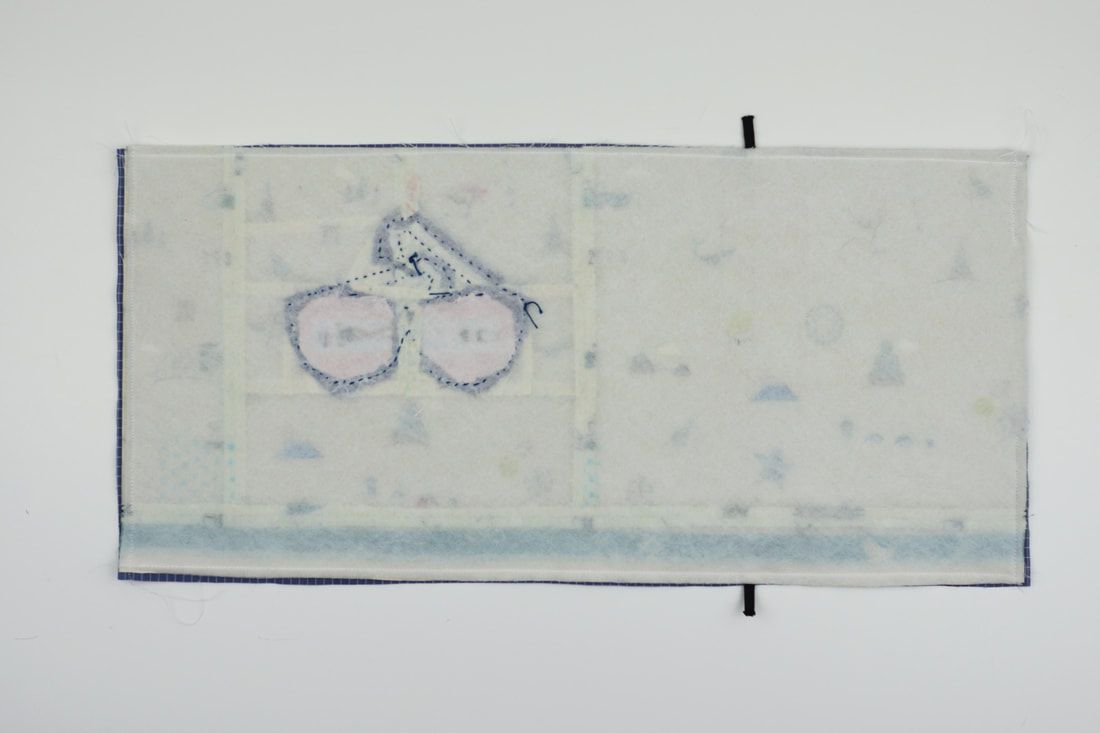
The sunglasses quilt block I used is 8"x 8" finished, I added a strip of fabric 2 1/2"
to the right and a piece of fabric 9 1/2" to the left. I also added a 1" strip of some very cute selvage to the bottom. The finished piece of outer fabric is 9" x 19 1/2" , same size for lining and batting. 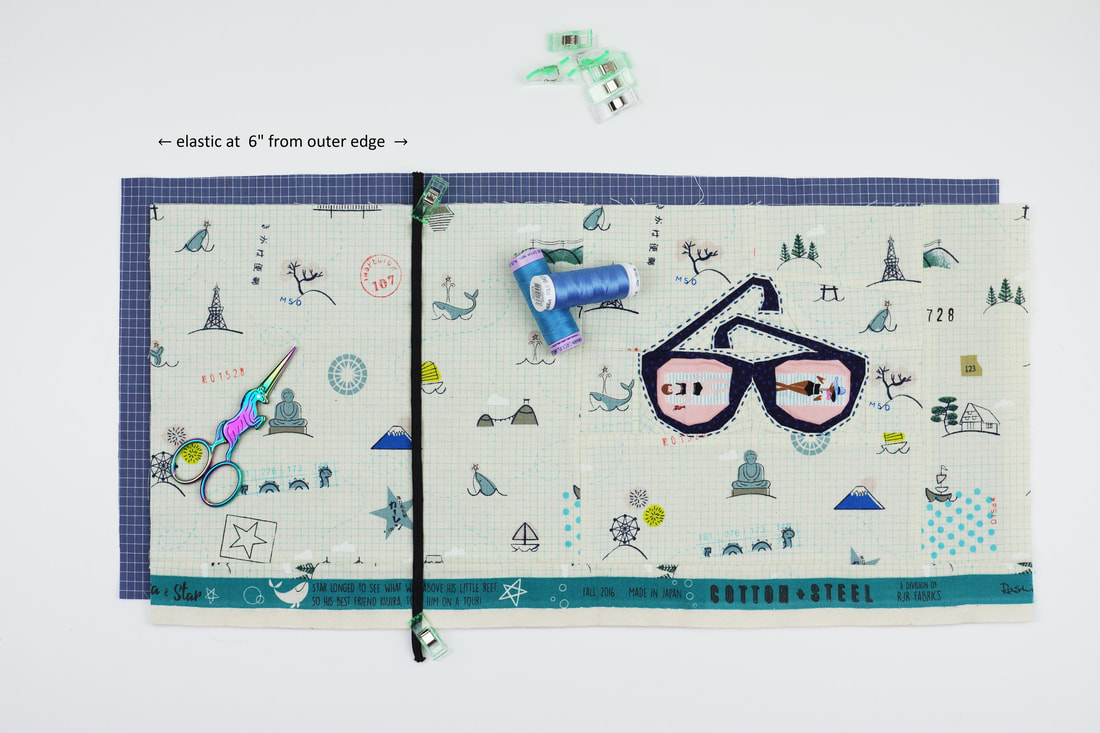
elastic placement
Iron on the fusable batting to the outer book cover fabric then clip the elastic band at about 2" from the back edge of the book (if your size is different then this one) or 6" from the outer edge ( the short side of the fabric).
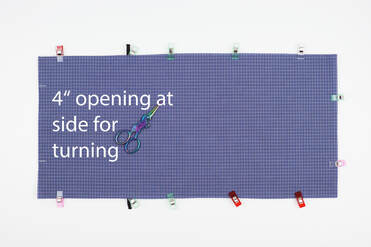
I did some hand stitching around my glasses, you could also quilt the outer fabric with simple straight line quilting, or what ever quilting you prefer. Now place outer fabric and lining, right sides together and clip or pin ( I prefer clips) in place.
Stitch all the way around and leave a 4" opening at the side (the one that will be folded into the book's back) for turning.
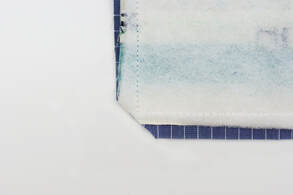
Cut off the edges for nicer corners.

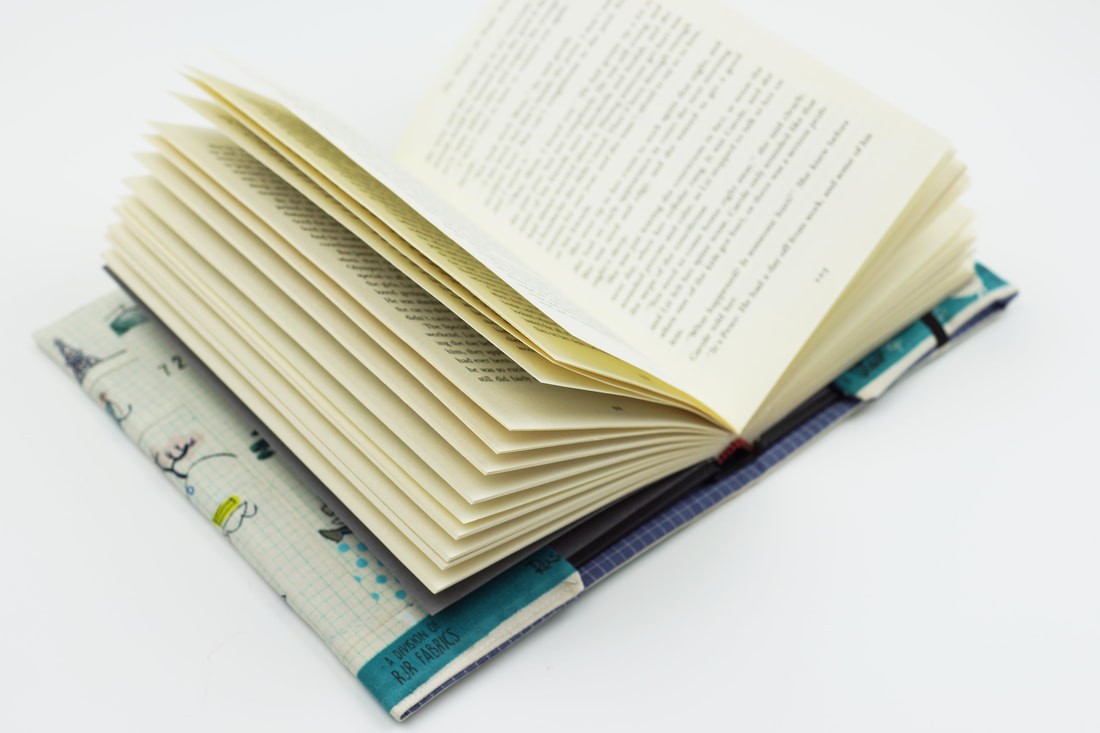
finished quilted fabric book cover
Turn the book cover through the opening on the side, and close the opening,
by folding the seam allowance inside and stitching the opening close with a 1/8" seam from edge. Fold in the front pocket 3" - 3 1/2" and stitch top and bottom with 1/8" seam. Fold the back pocket under the elastic. And well done your adjustable, quilted book cover is finished. 
This quilted book cover will be a wonderful addition if you're gifting a book
or will work just as well for a diary or note book. Any other ideas? Let me know. I cant wait to see what you guys come up with. Share your creations on social media and use #joejuneandmae so I can cheer your makes. happy sewing Ingrid xx
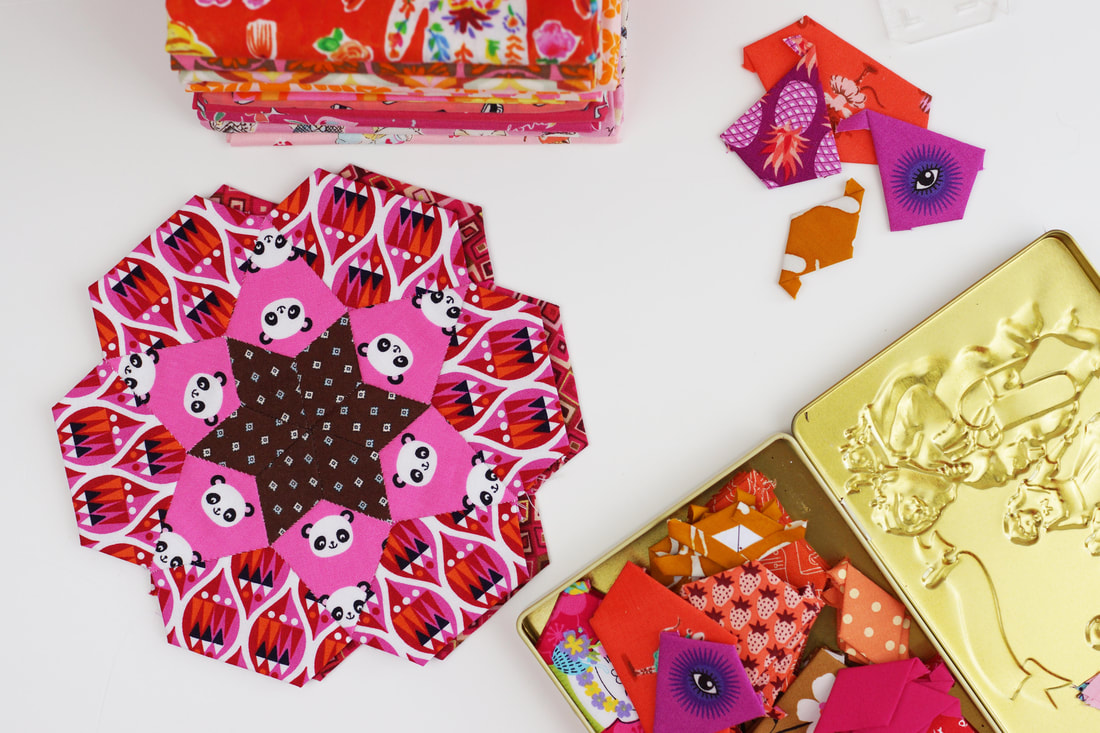
What is fussy cutting patchwork and how to use it in Foundation Paper Piecing, English Paper Picing or quilting in general?
I have been quilting for a long time, and I remeber the days when I was cutting fabric for a quilt and was giddy with joy when the pattern of the fabric ended up centered in the shape I was cutting. Little did I know back then, that this was actually 'a thing'. It's not only a thing, it also has a name........ It's called FUSSY CUTTING. 
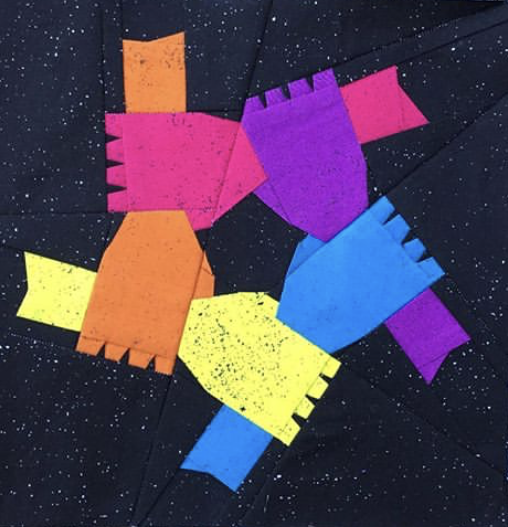
sailing-yacht-quilt-block-pattern
As I went on, on my quilting journey I noticed that some people were really 'lucky' and got their print centered all the time.... really lucky indeed.
I have to confess till then, I was still trying to use up as little fabric as possible and it didn't even occur to me, that someone would deliberatly just cut an image out of a piece of fabric. 
why didn't I think of that?
So there is was, FUSSY CUTTING .
A whole new world opened up to me. Fussy cutting is when you cut your fabric to showcase a specific area of a print rather then cutting random pieces. There are different reasons for fussy cutting depending on your project or quilting technique. You use fussy cutting to: 1. Feature a particular part of a print or you 2. Use a specific part of a print in your quilt pattern to enhance the pattern. These reasons also determine the techniques and tools you use. So lets start with featuring a particular part of a print:
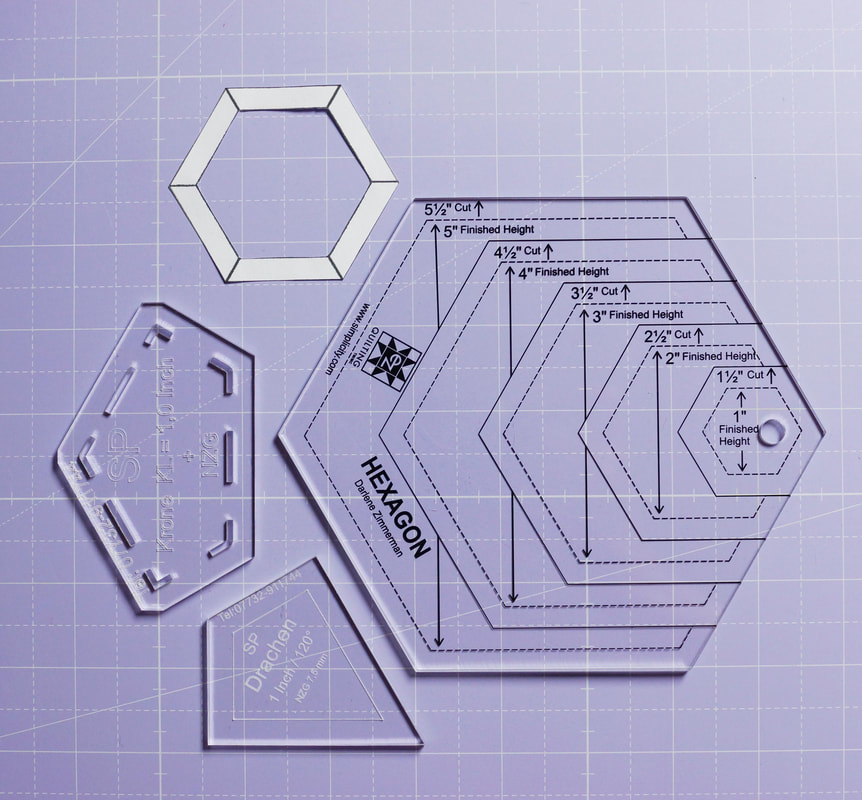
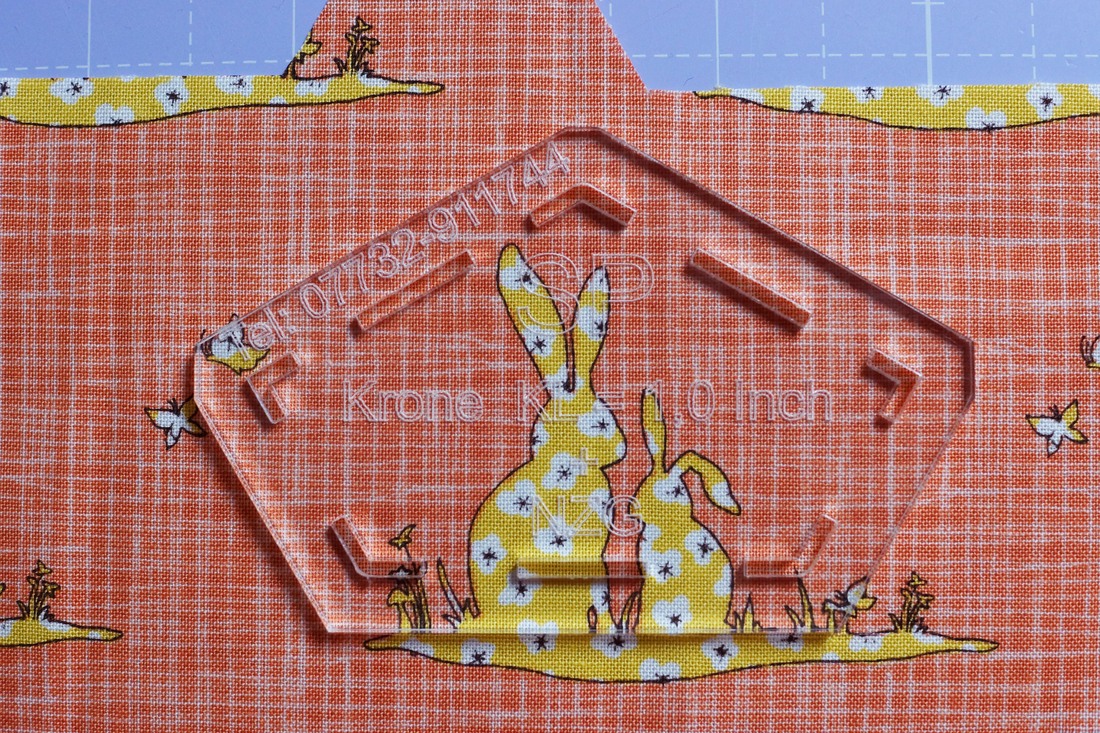
1. This method is usually used with English paper piecing, but also with squares, triangles or other geometrical shapes.
You can use acrylic templates to cut your shapes or make your own templates out of cardboard. The advantage of acrylic templates is, they're easy, reusable, see through and include a 1/4" seam allowance. If you make your own template, which is absolutly fine, draw your shape on cardbord and add 1/4" seam allowance, cut out the desired shape and you're left with the seam allowance 'frame' , which you then use to cut your fabric along the outside line. Either way, place your template on your particular part of your print and cut along the outside lines with your rotary cutter or fabric scissors. I prefer a rotary cutter, so the fabric can stay put on my cutting mat and I don't move the template by accident.
For geometrical shapes its best to use an acrylic ruler, these can be easily placed on top of your print and your design can be centered accordingly.
Make sure you don't forget the seam allowance, trust me it happened to me more than once, that I cut a cute image only to notice afterwards that I had fogotten the seam allowance. 
basic acrylic ruler 6"x 12"
Fussy cutting to enhance your foundation paper piecing pattern:

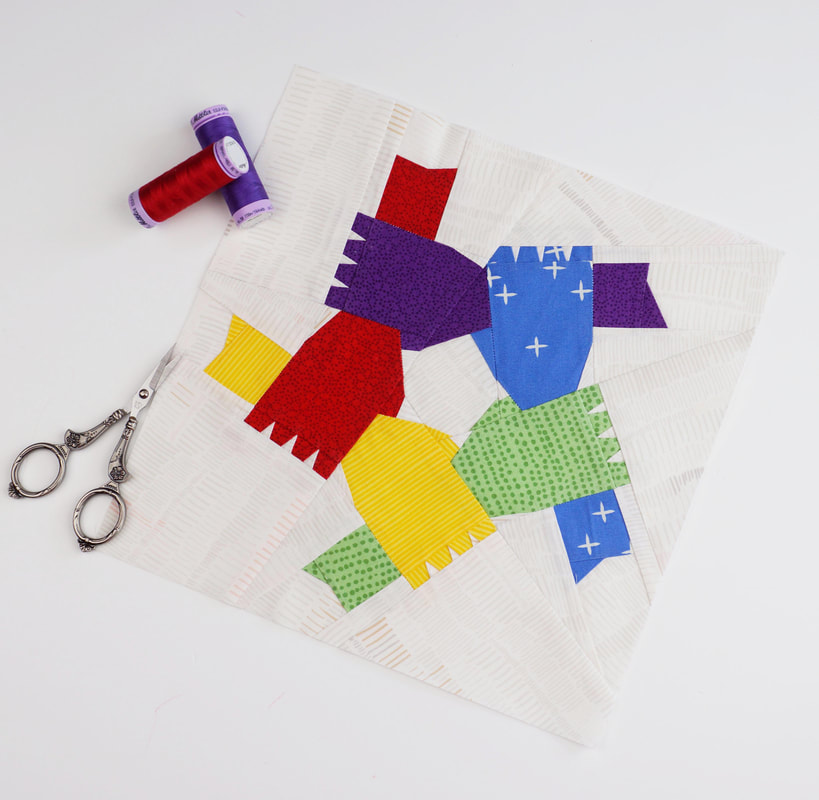
several boat quilt block pattern
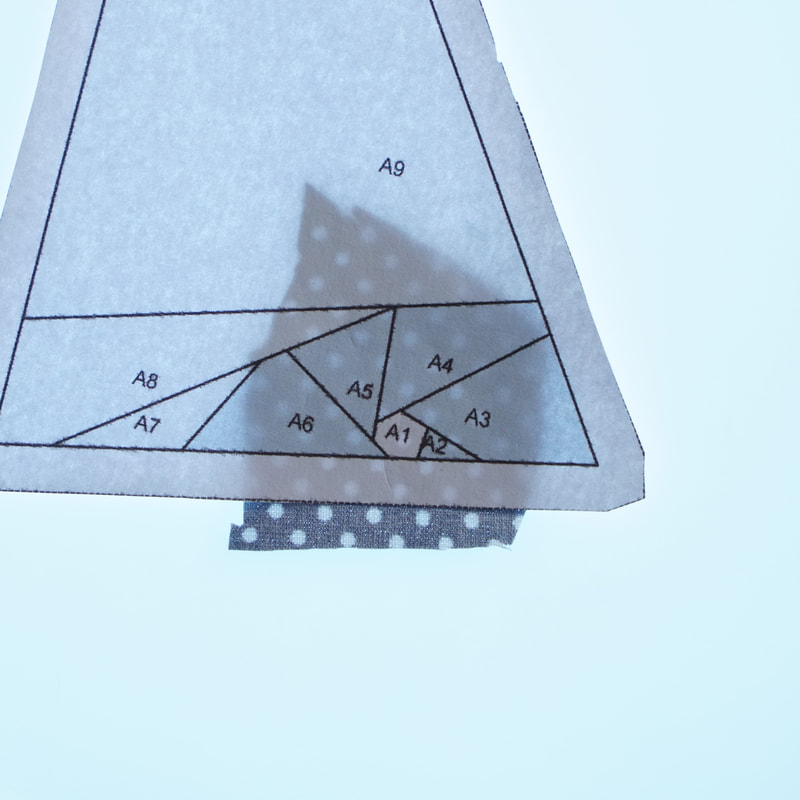
2. This is a bit more tricky , as you're not only working with a mirrored image, but also with weird angles in the pattern sometimes.
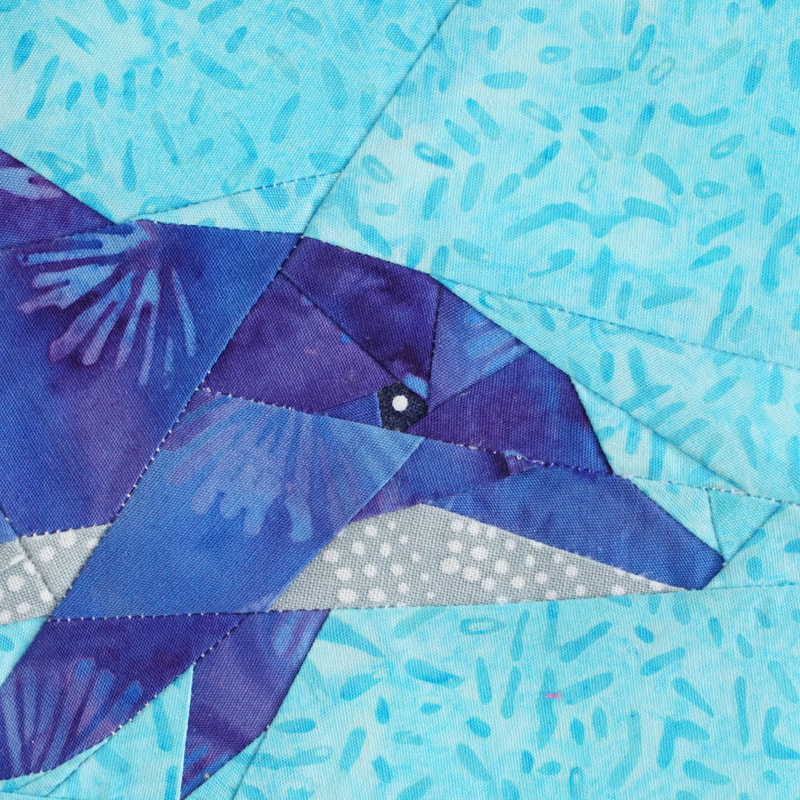
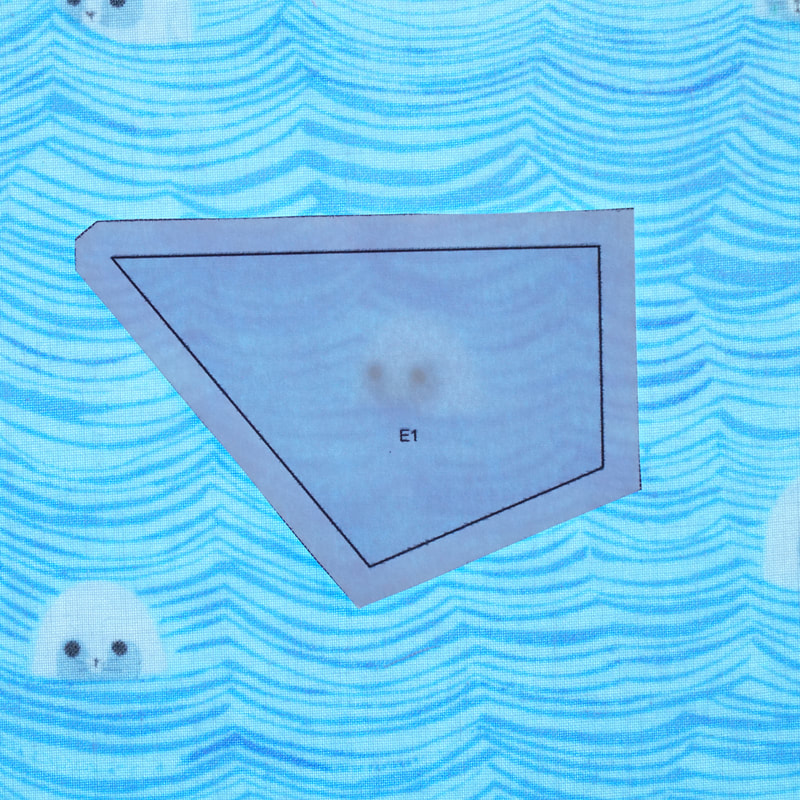
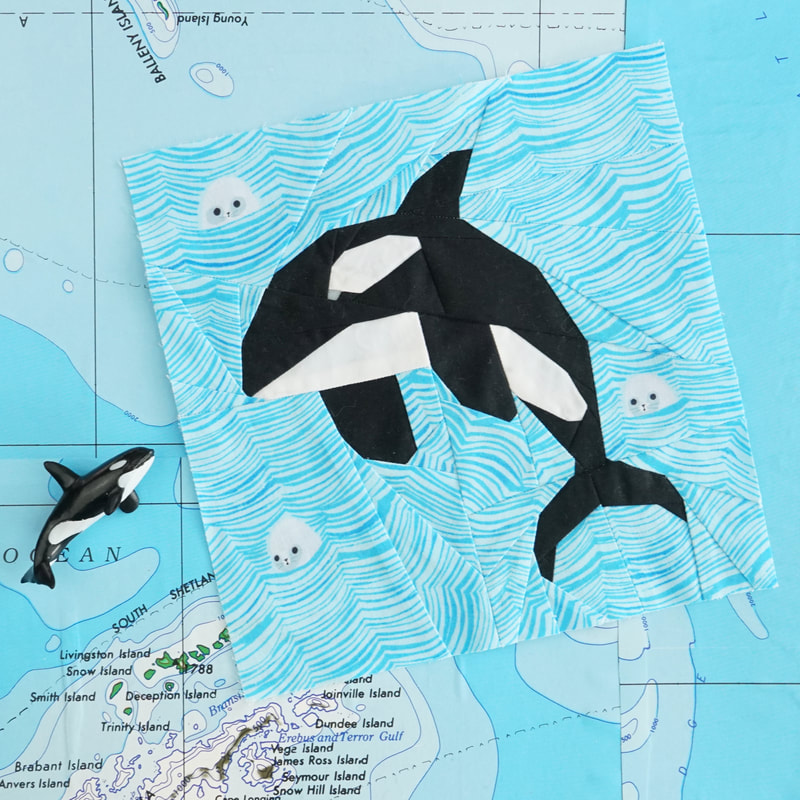
Let's start with the easier part placing a particular part of a print on your foundation paper piecing segment. This can be done to give an eye more life by using a dotted fabric, or by adding some print detail to an otherwise simpler background, as I did with the seals in the orca pattern. This is fairly simple if the part of the segment that you wish to place the print on is part 1, as shown in the photos below. I always use a fabric glue pen, it just makes your life so much easier. The dolphin and the orca pattern are featured in my new book. Which can be pre ordered here.
It becomes more challenging if it is any other number of a particular segment and has weird and pointed angles on top of it. But there are a few tricks.
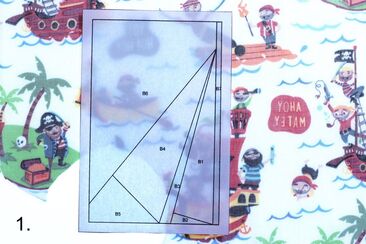
1. First you place your segment wrong side (unprinted ) on wrong side of fabric.
Here I chose the pirates for part B1. I use a fabric glue pen, and glue the segment onto the fabric (glue only B1). If you're planning on doing this a lot, a light box comes in very handy, but for starters just hold your segment and fabric against a light or your window. 2. Cut out, with aprox 1/4" seam allowance, around the perimeter of B1. You can use a ruler to do this and a rotary cutter, I usually just use fabric scissors and eye ball it. (I trim the seam allowance after sewing part 2 and 3.) Then sew part 2 and 3 with your chosen fabric for those parts.
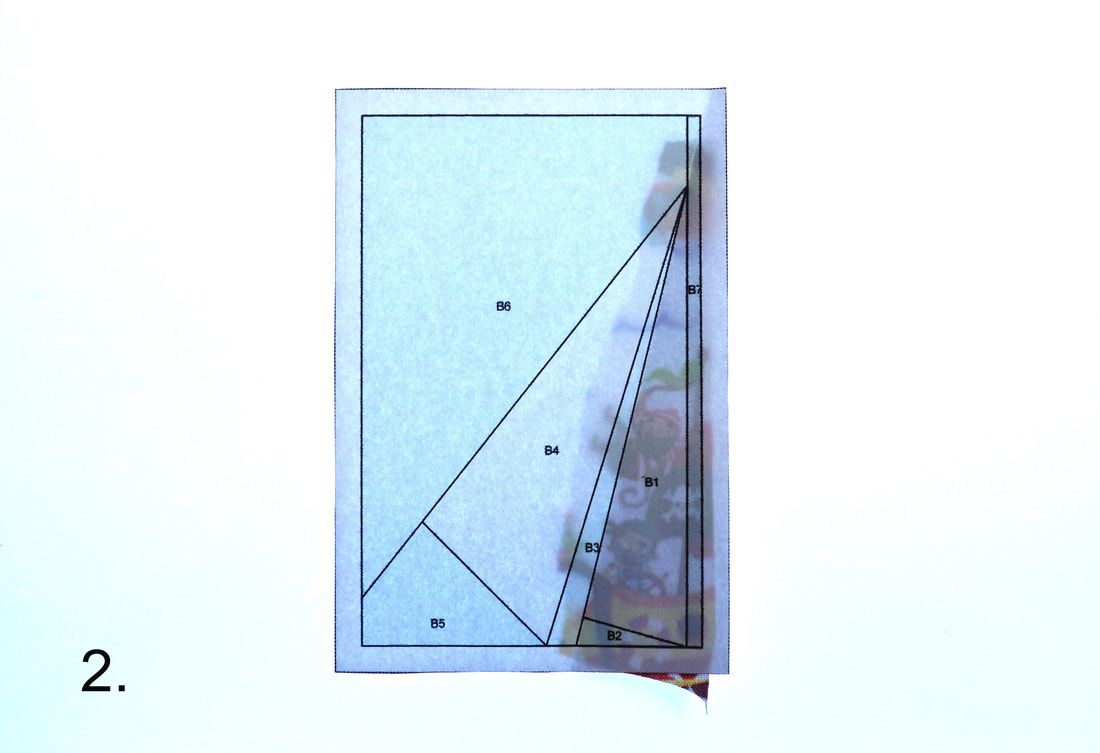
3. Trim the seam allowance. I am using here the add-a-quarter-ruler, since I want this particular seam allowance to be super accurate.
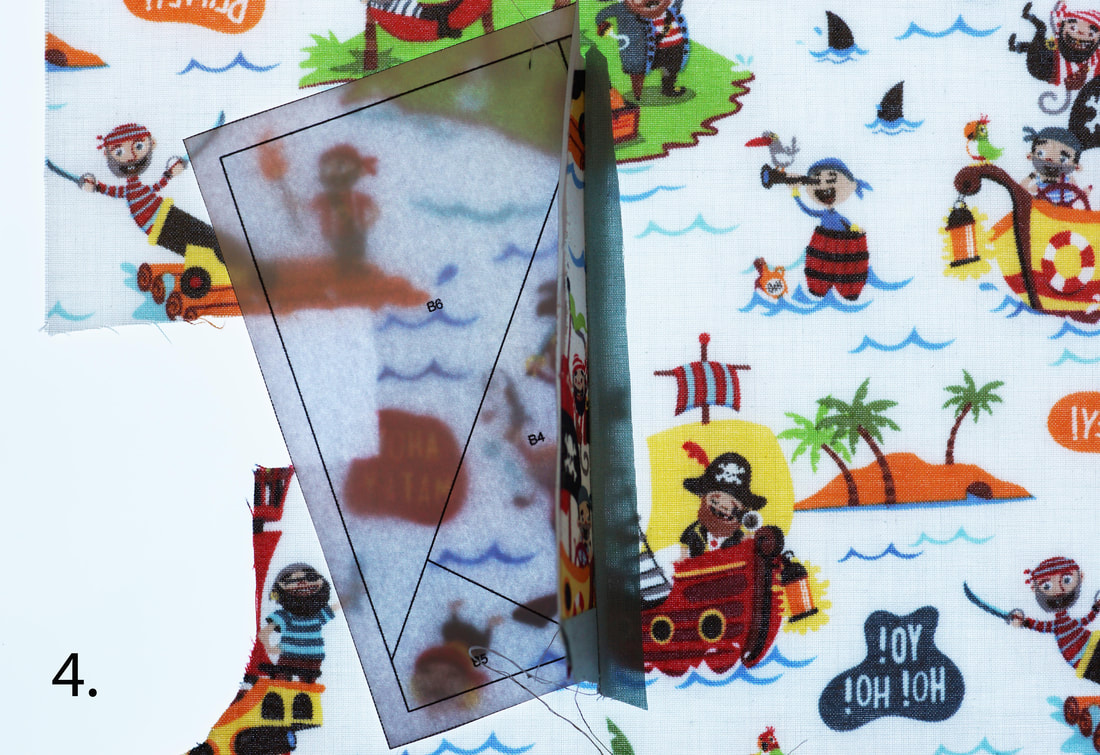
4. Now place the segment part B4 (wrong side of paper on wrong side of fabric) over your fabric folding back the seam allowance of B3 and glue in place. ( just glue B4, with just a little bit of glue, you'll remove it later)
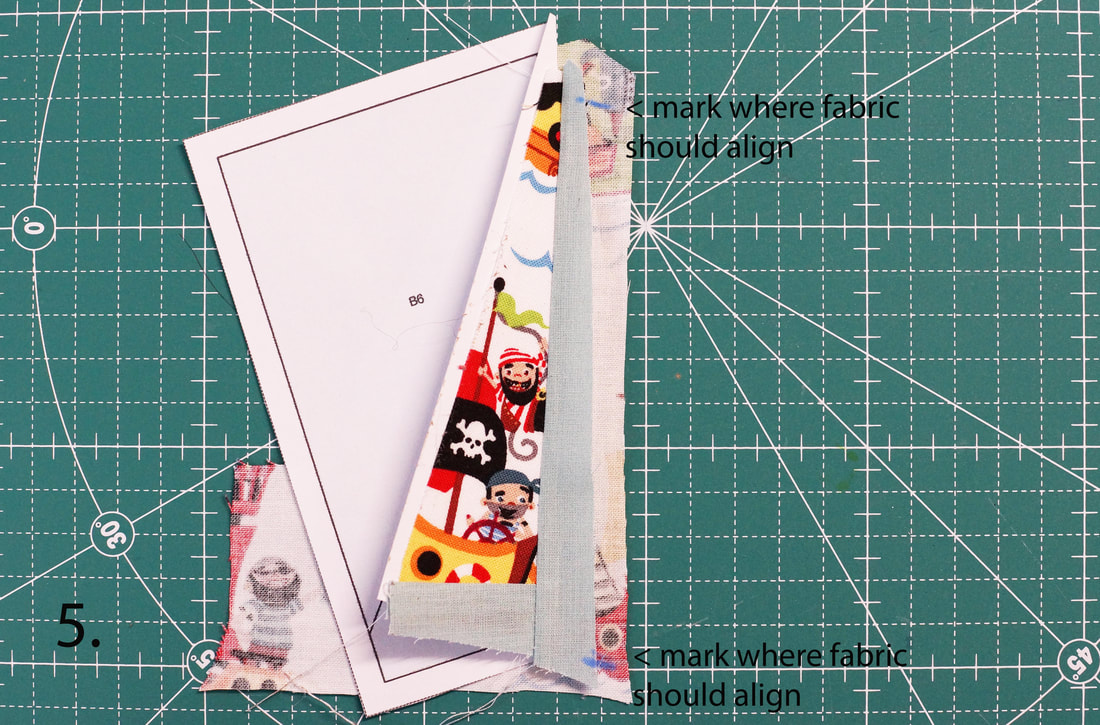
5. Cut out roughly and mark with water soluble pen, where fabrics should align.
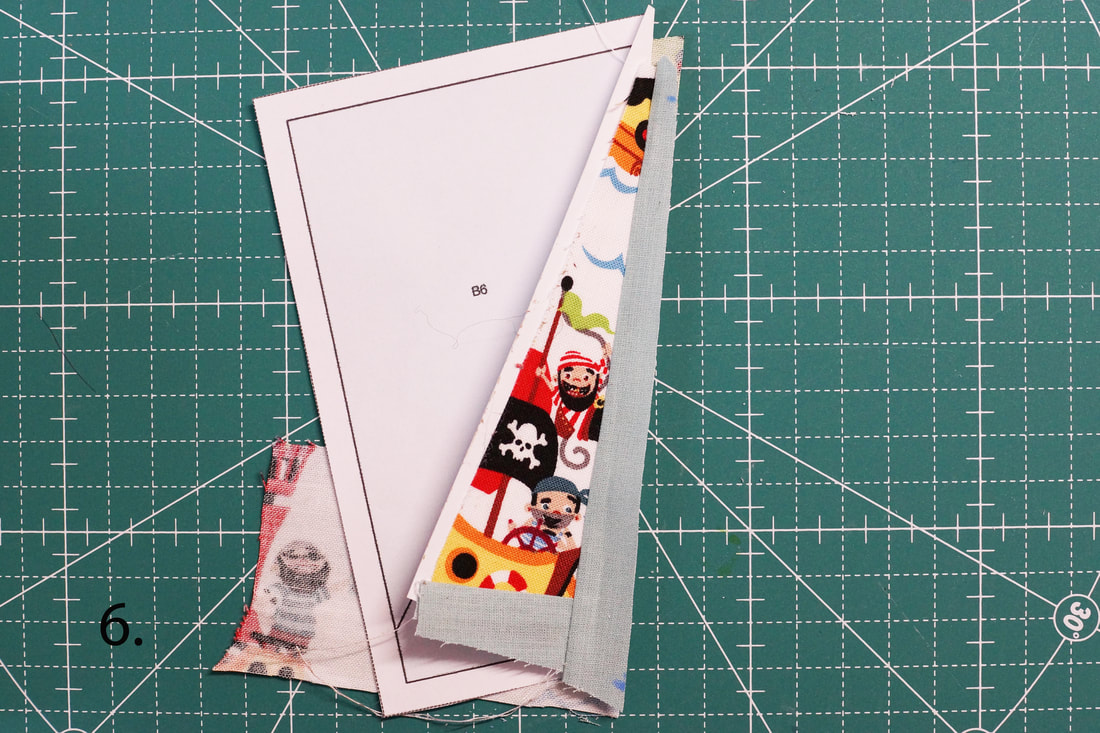
6. Then trim along the raw edge of B3. Use a ruler and rotary cutter you want this to be accurate. 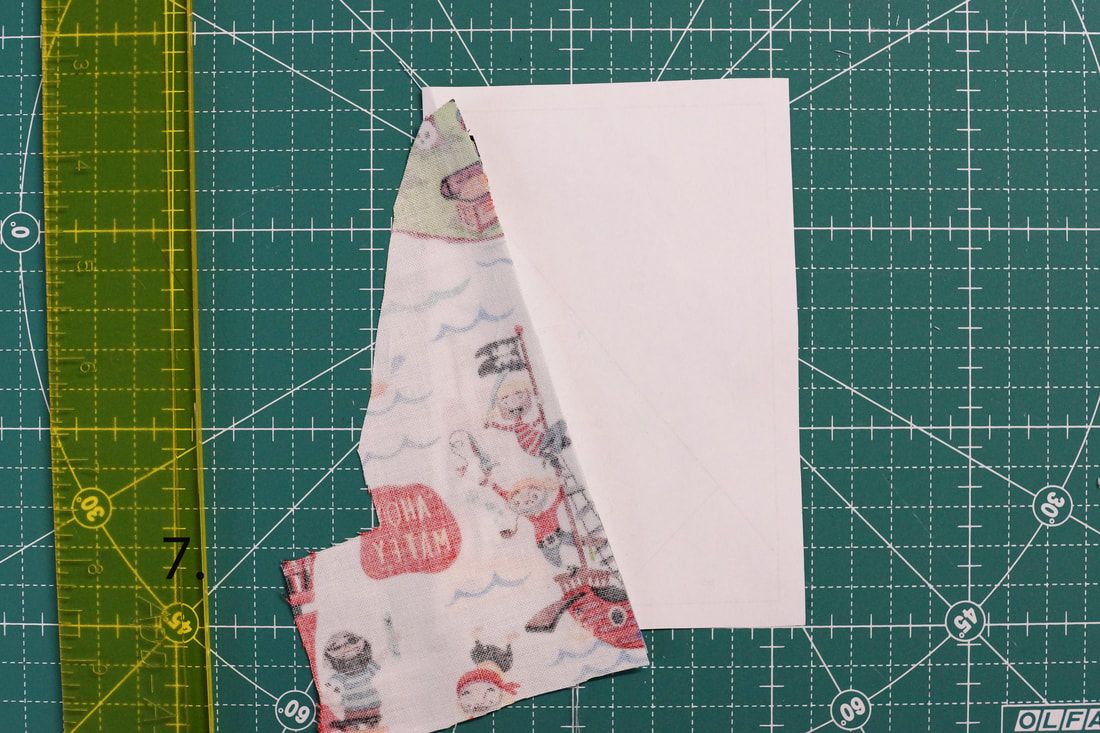
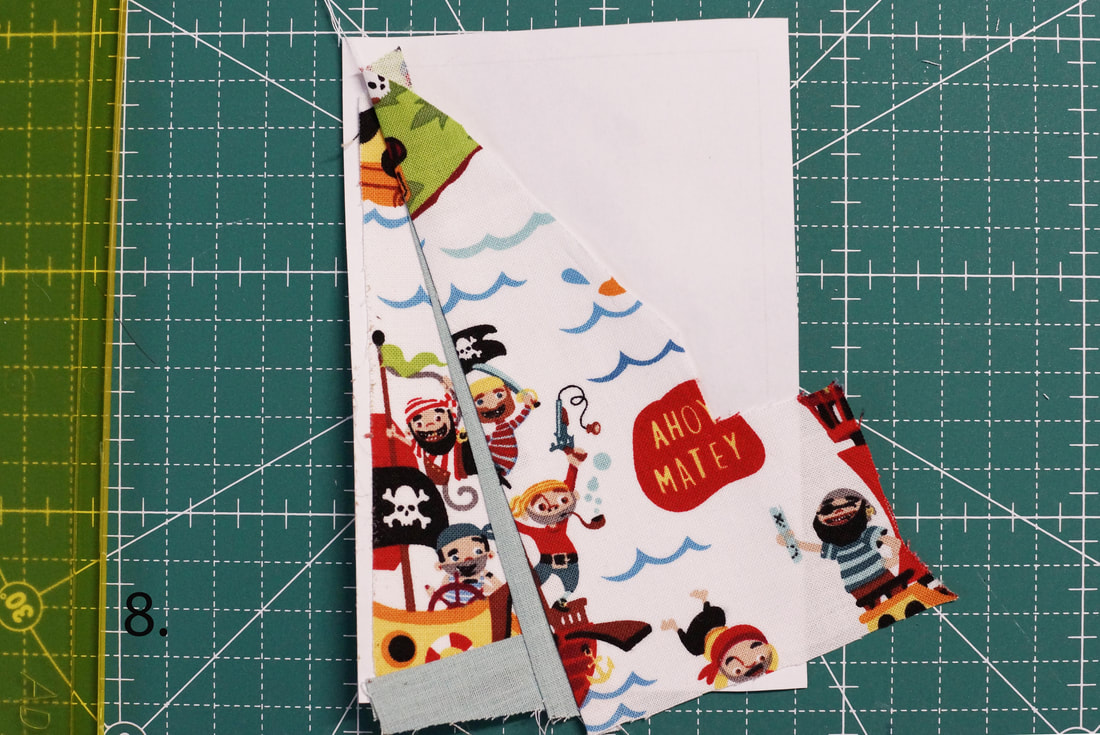
flip over fabric right sides together
7. Place your pattern segment printed side down and flip the clued(yes un-glue!) fabric backwards. Right sides together with the previous fabric. Align raw edges and he marked lines. Then sew along the line between B3 and B4.
finished fussy cut sails
8. Fold the fabric over, an its exactly where you want it to be .
Finish this segment and then all the other segments, assemble your quilt block and voila your little happy boat isn't just a happy boat, it actually tells a story. 
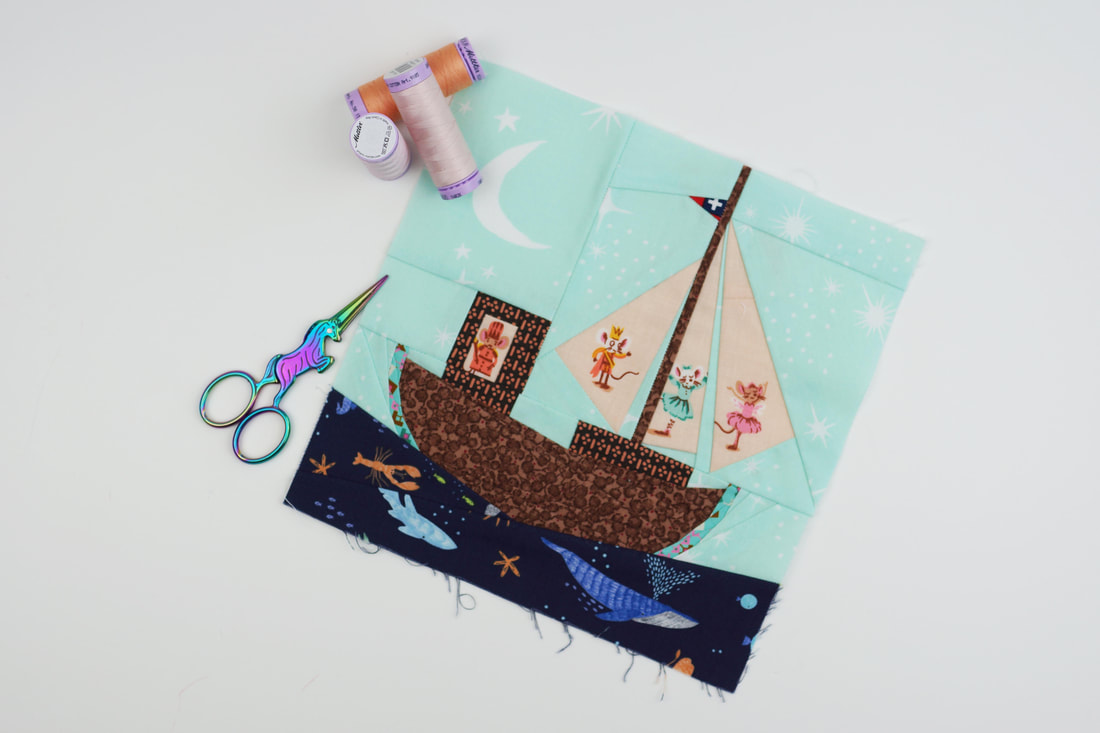
Fussy cutting in foundation paper piecing takes for some practice but it is extremly rewarding and turns a simple quilt block into a stunning make.
You find all the boat patterns including the little happy boat here. Is this something you guys would want to try? Or do you have other techniques for fussy cutting? I'm really curious so cant wait to hear from you all. Ingrid xx
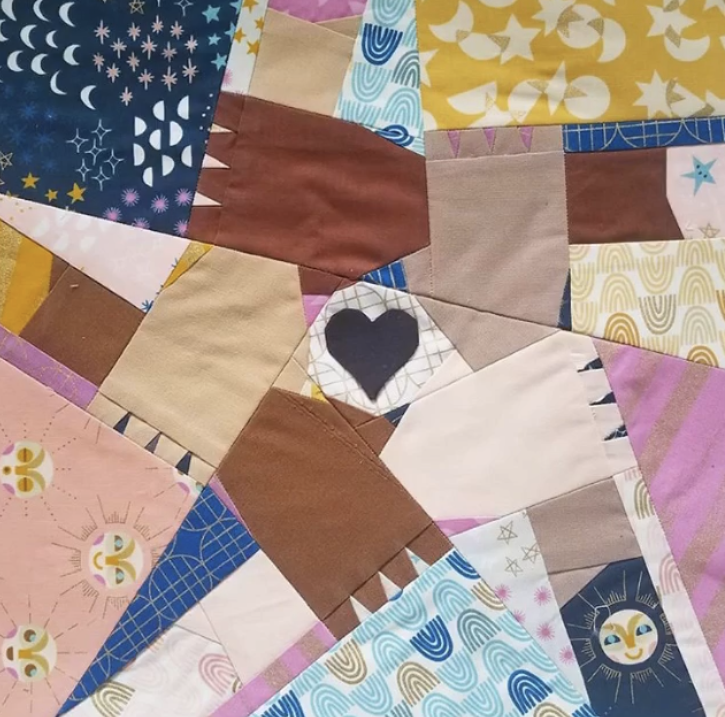
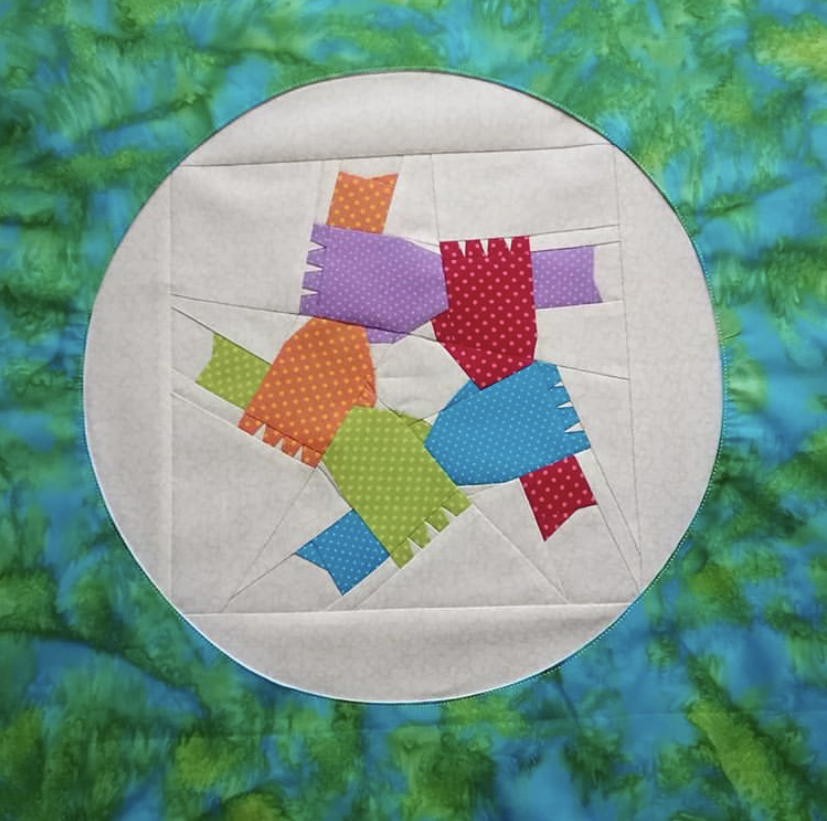
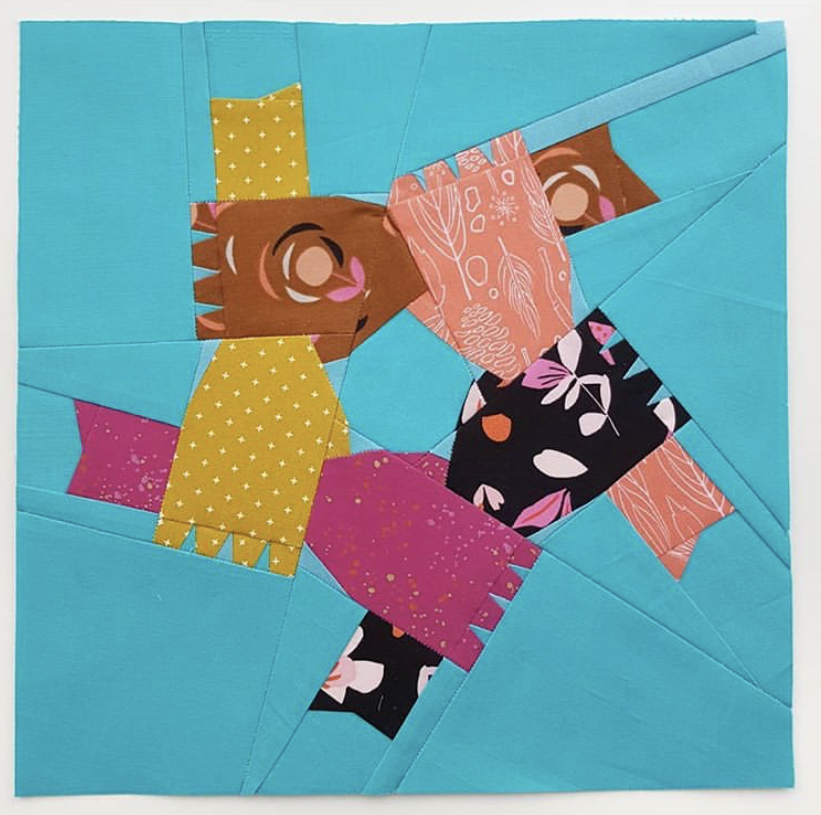
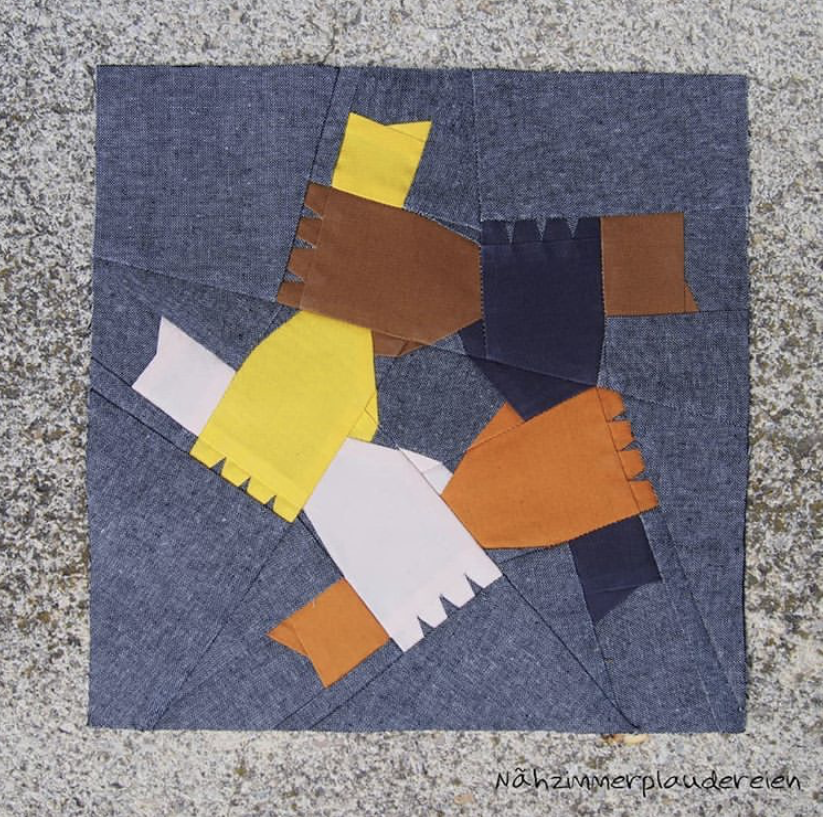
ask questions, learn and support the #blacklivesmatter movement....
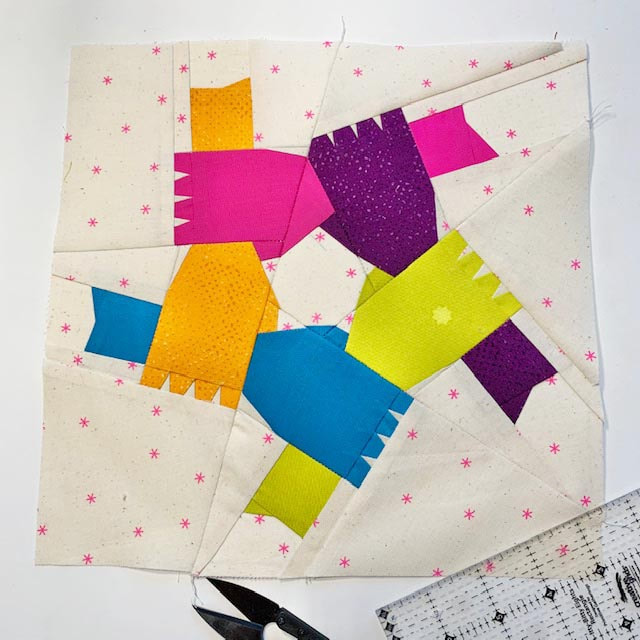
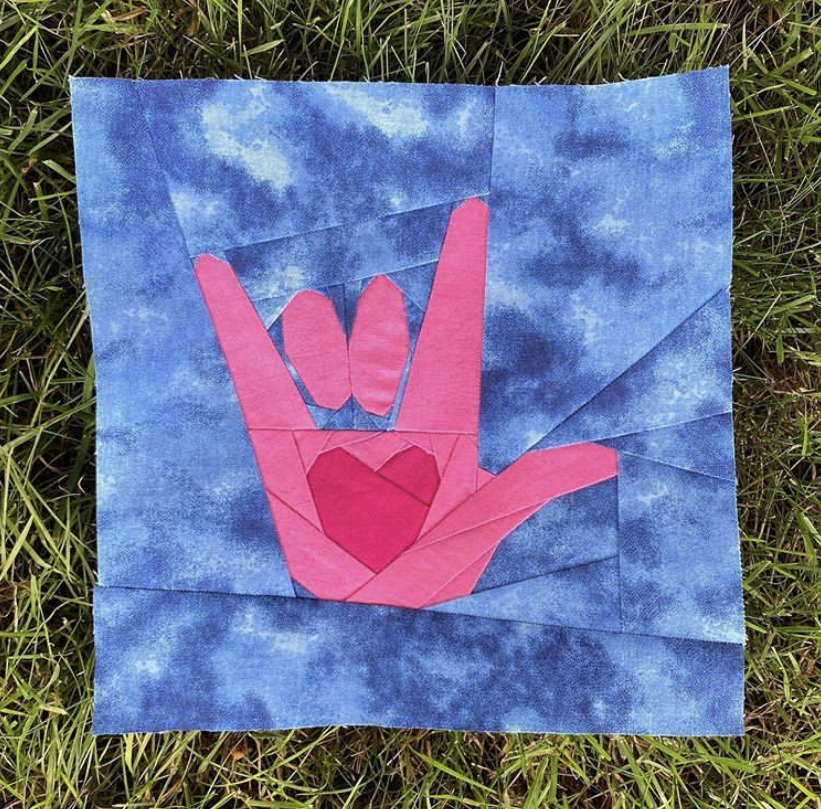
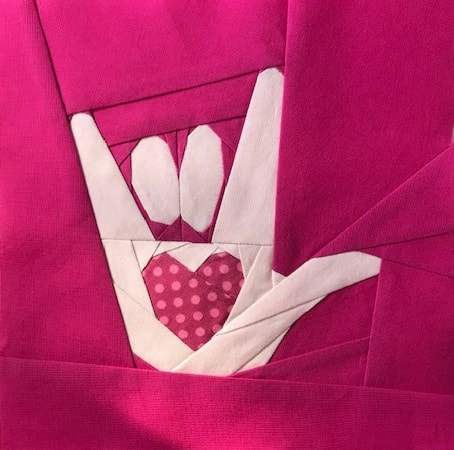
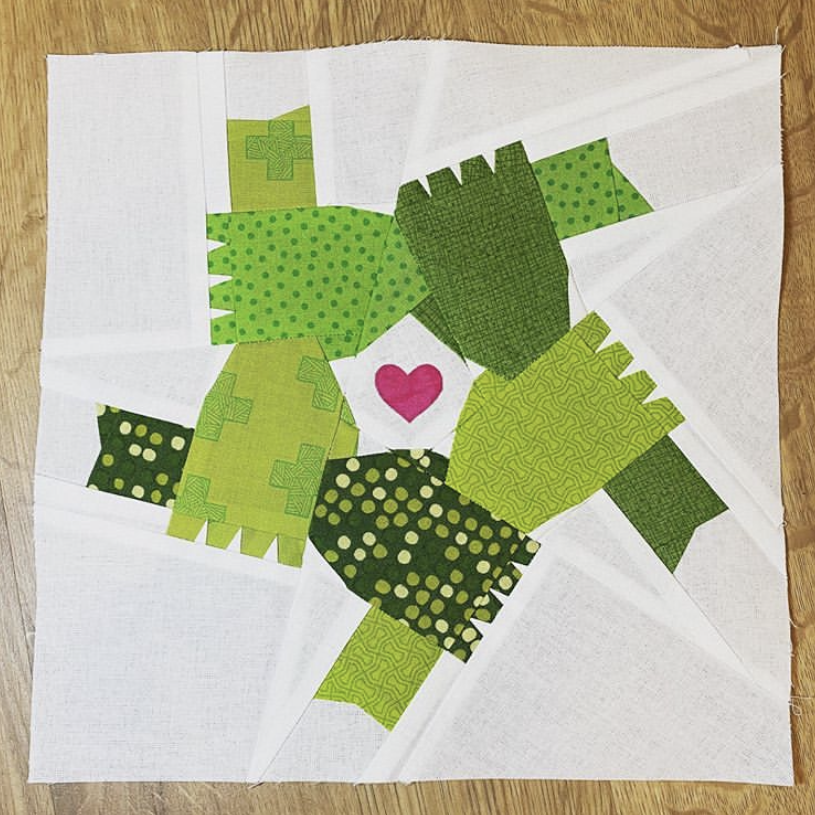
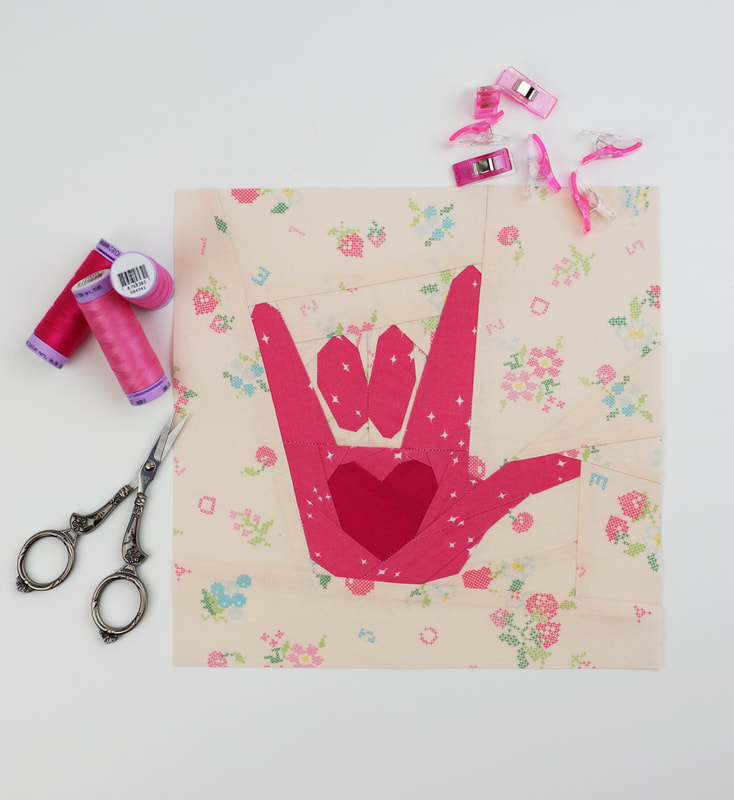
holding hands quilt block pattern
Muted and listening that’s how it started last week on Instagram.
You know you have to do something when you have that feeling in the pit of your stomach that does not let go. This past week was planned completely different. It was supposed to be colors and rainbows, fun, cute and happy as usual, but I just couldn't. The only conversation I can have right now is about racial injustice. As a family of many colors, we face racism in a lot of ways, some are very subtle others more blatant. Sometimes it's so little that you barely notice or frankly get used to it. BUT WHY? 
Why do people of color have to make the extra effort and strain themselves just to be treated the same way a white person would be treated?
I'm so saddened and shocked, AGAIN, by what’s going on in the US right now and the unnecessary and violent deaths of George Floyd, Ahmaud Arbery, Breanna Taylor and countless others before that. These are someone’s sons and daughters ….it could be ours! And no, it's not just in the US, it's here in Europe as well as in many other countries. It's my responsibility, as a mother and also with my public platform, to use my voice and help with whatever I can to be part of the solution to end racial injustice and try to make this world a better place. 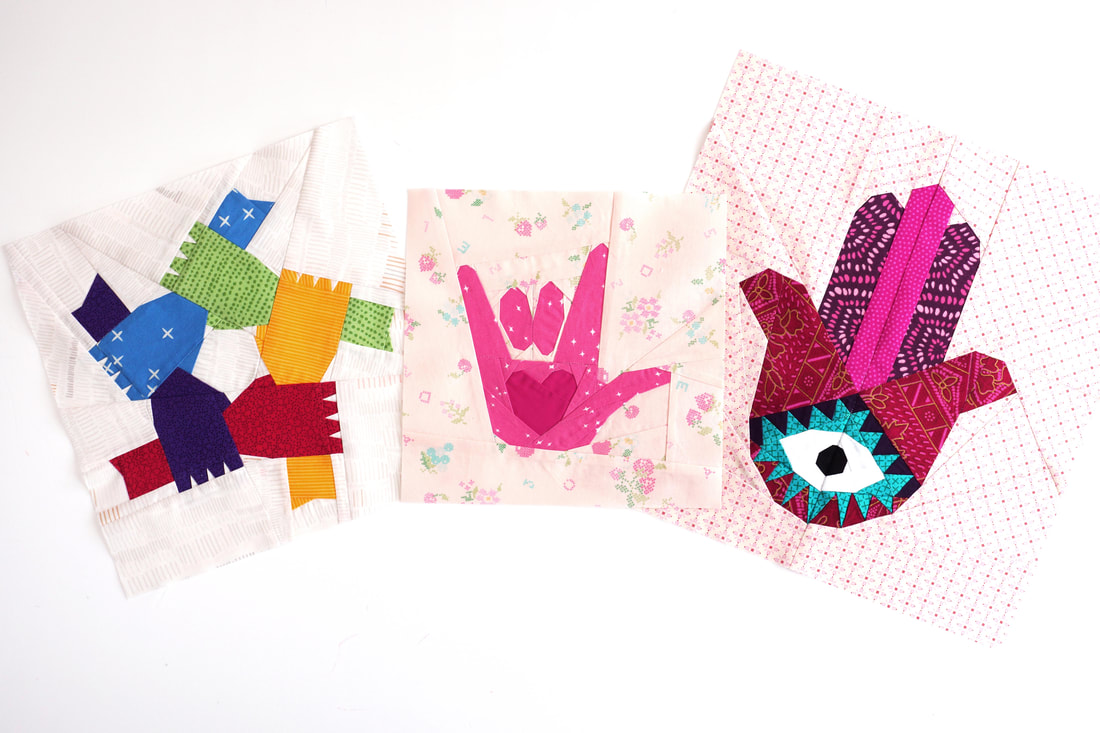
Therefore I have designed three different patterns that stand for
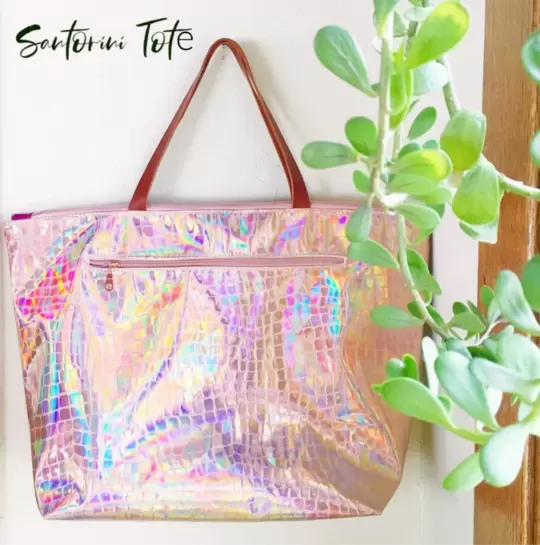
UNITY, LOVE and PROTECTION. All proceeds through June 2020 of these patterns will be donated to NAACP, the National Association for the Advancement of Colored People , it was founded in 1909. The NAACP is the US's first and largest grassroots-based civil rights organization; check out their page for more info. Also my dear friend Natalie Santini is donating the proceeds this month of her fantastic Santorini Tote to the NAACP as well.
How about sewing a Santorini Tote with one of my patterns on it and
take a stand against racism? And while you're at it, read her great blog on injustice and human rights. I will do my part by asking myself uncomfortable questions as well as listening to the community and most importantly my children. The events of last summer (BLM protests and COVID-19) saw many people rally to support Black-owned businesses. Sadly, since summer ended, people forgot to keep sharing and supporting these businesses. I just found a new article with links to more than 150 Black-owned businesses. I was so happy to see that people still care about helping these companies thrive. So there are always ways to keep supporting! And in case you need mere reasons than the obvious to support #BLM, check out this great blog, 10 Reasons to support #BLM. 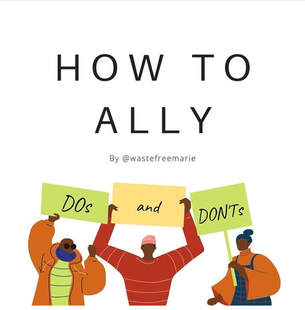
Have you ever wondered what you would've done during pivotal moments in histroy?
This is the question @wastefreemarie asked on her Instagram account. And it was such a 'OH YES OF COURSE' - moment for me! The answer is: How you act NOW and I will add to this, how you act ALWAYS! Check out her instagram for really excellent information. I think now is a great time to listen. Some examples of the beautiful work of all the pattern testers and makers online: Share your makes on social media and use #joejuneandmae so we can cheer all your beautiful work, and if you want share it here on my blog. Shop all the patterns here And to finish, I want to share a textile Artist who makes my heart sing. Her work is beyond amazing. The fabrics she uses and the expressions of her quilts are absolutly stunning. BISA BUTLER I just cannot stop looking at them...... I am looking forward to hearing from you all, and seeing your makes with these patterns. Best always Ingrid xx PS: I am super proud and happy to announce, that we collected 860,78 Euros with these patterns through the month of June 2020. I decided to personally fill the gap, to get an even 1000 $, which we donated on July 8th to the NAACP. Thanx so much for everyone who participated, you guys rock !!! xx 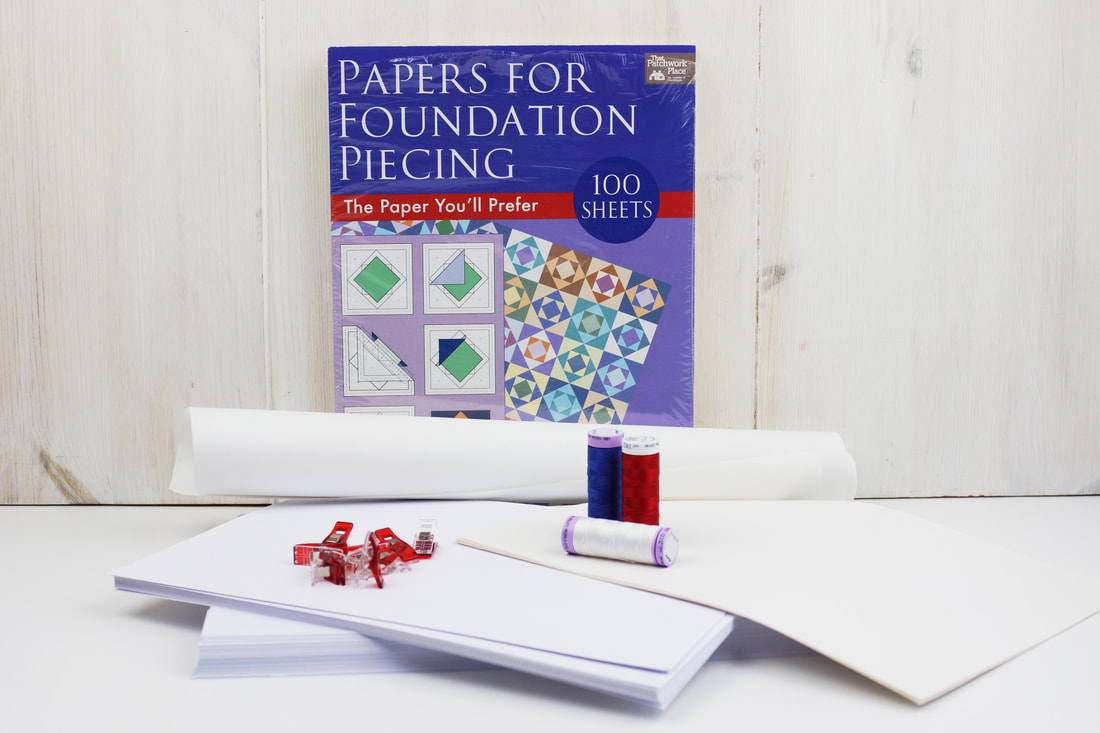
Foundation Paper Piecing
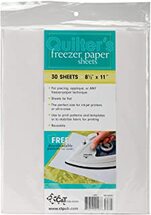
is my favorite quilting technique. And as the name says, paper is one of the main foundation piecing supplies. Foundation paper piecing is used to create very accurate stitches and lines on a design, and I loooove accuracy, I’m a Virgo after all. But for me, it is also a great method to sew a stunning quilt block in a fairly short amount of time. You get amazing results without having to sew up an entire quilt. Whether you want to make some last minute gifts, some remarkable pillowcase or table runner for your home, this quilting technique is fun and easy. If you're new to this technique it can feel daunting, but don't despair, I wrote a great tutorial on how to master paper piecing in no time. When I first tried foundation paper piecing, I did not know a thing, and I mean really NOT a thing. I had an older quilting book, and decided to make one of the quilt blocks. I hadn't heard about foundation paper piecing before nor what it was about, or what supplies are needed. The pattern asked for paper, but did not specify what kind of paper, so I just used whatever paper I had at hand. As I worked my way through the FPP world I have worked with all sorts of papers and here’s what I think: Your choice of paper for foundation paper piecing depends on: a) cost b) scale of your project c) ease of use d) whether you like to work with a fabric glue pen or not. I also talk about paper for foundation piecing in my new book 'Adorable Animal Quilting'. Regular printer paper: 
At the moment, this is my choice of paper. It’s easy to use and cost effective;
This is especially important since I am doing A LOT OF paper piecing. I can print any pattern right from my computer. And it is still thin enough to not be a headache when removing. Personal tips for the use of regular printer paper: > use regular printing paper in combination with a fabric glue pen. A fabric glue pen will be your life saver and you will never want to work without one again. > after you have joined two segments, remove the paper only from the seam allowance before pressing, that way you get nice flat seams (use a Tailor's clapper for extra flat seams) Freezer Paper:
Freezer paper works great with foundation piecing. It is easy, because you can just iron the fabric onto the paper and nothing slides off or moves, and obviously you don’t need a fabric glue pen.
It can become costly when you paper piece a lot. However, it’s a little bit thicker than regular printing paper and can get pretty bulky, especially when small pieces are involved. Because of its thickness, it’s not as easy to remove afterward. Personal tips for the use of freezer paper: > use freezer paper for blocks with large fabric areas, the possiblility of ironing on the fabric is absolutly wonderful for bigger fabric pieces. > again, definitely remove the paper from the seam allowance after joining two segments before pressing the segments. This assures that you get flat seams. (use a Tailor's clapper for extra flat seams) Foundation paper: 
It’s wonderfully thin and perfect for tracing. It can also be used in your printer.
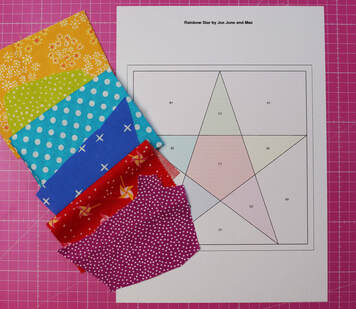
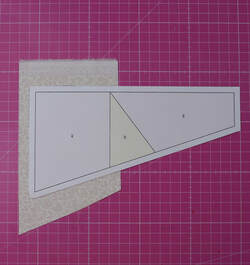
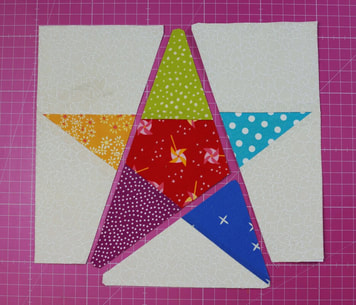
Another advantage is, that it’s very easy to remove when finished. However, it can become quite costly if you do a lot of paper piecing. And it tends to curl if ironed on. Personal tip for the use of foundation paper: > use it for blocks with tiny pieces in combination with a fabric glue pen. I personally like a little more structure and firmness in my blocks when sewing them, but if you prefer softness, this is the paper for you. > do not iron too much as it tends to curl up with heat, just very quickly and then use a Tailor's clapper or another heavy object to flatten the seams. It’s probably best to experiment with different papers, to find out which ones you like best, so what better way to do this, than with a free foundation paper piecing pattern. Happy testing ! Let me know what you think. 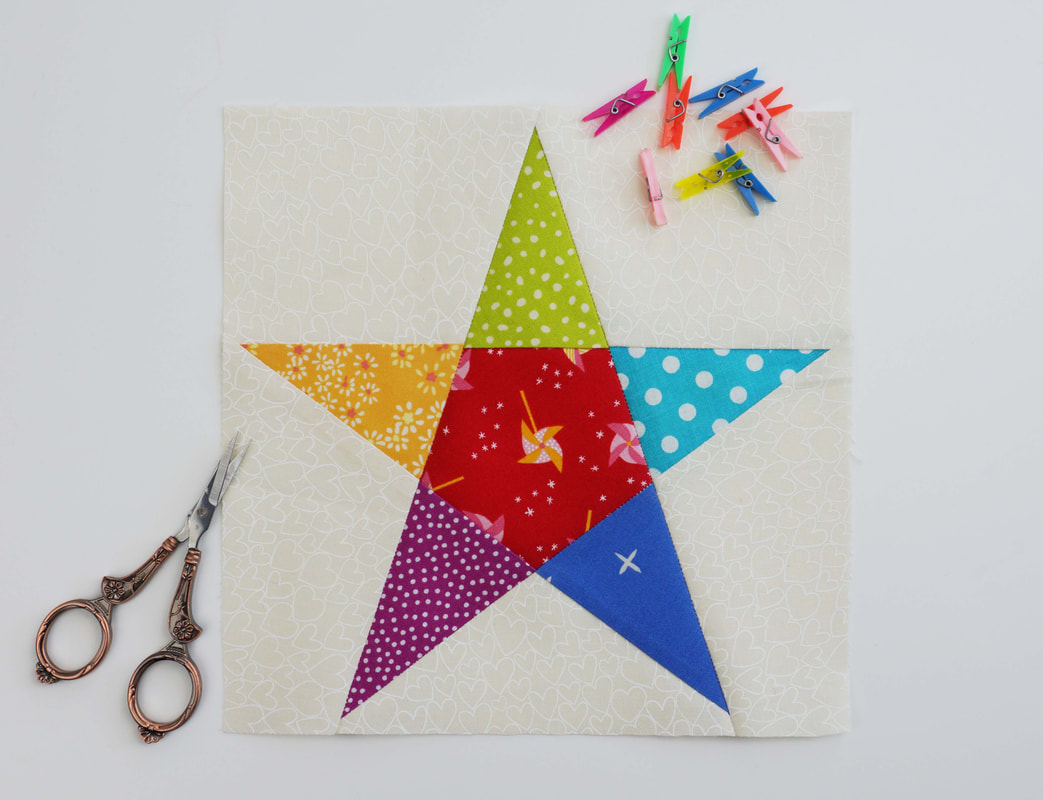 Did this happen to you before? A stunning and cute quilt block catches your attention, you read the description, and it says it's paper pieced, so you're like...... OH NO, I cant do that! But I can assure you ( Obama style ) YES YOU CAN! I've been there, and trust me confusion took over me and I thought to myself : What do they mean, it's done on the reverse side? And how do I place the paper? And why this and what that? BUT first things first: You want to master paper piecing once and for all? You dont want to miss out on all those stunning quilt blocks that are paper pieced? Then read this blog post slowly, with you pattern at hand. You can also download this free pattern here to start practicing. Or if you like this star pattern , then grab it here. First and foremost, take your time to practice now and you'll be good to go for ever. 1. The pattern the pattern usually consists of a numbered overview, with letters and numbers on it. a colored overview ( so you have some inspiration) a blank overview ( this is for you to color yourself) and your pattern segments, again lettered and numbered, Each segment features only one letter, but has several numbers, this is the sequence of your sewing. Think of your pattern as a puzzle, each segment is one piece of your puzzle. 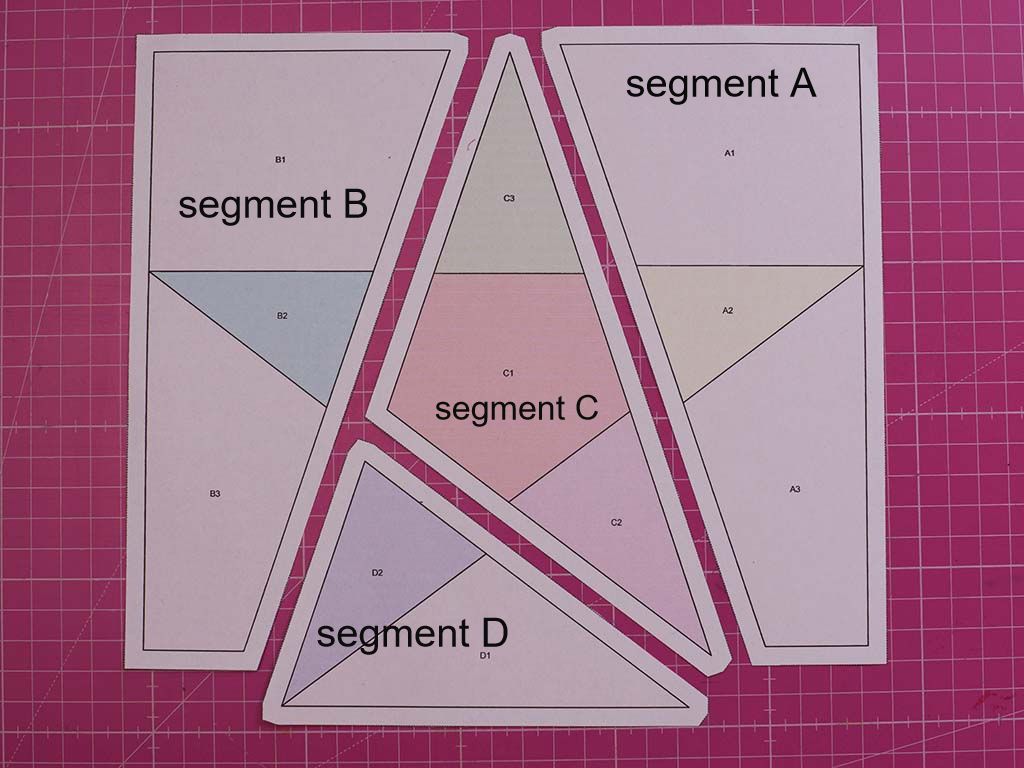 2. A few simple tips: Place the numbered overview in front of you. Cut out the pattern segments, along the dotted lines ( this is the seam allowance). Place the segments beside your pattern acording to the numbered overview. This is pretty obvious with the star pattern, but it becomes really important and comes in super handy with more complex patterns. 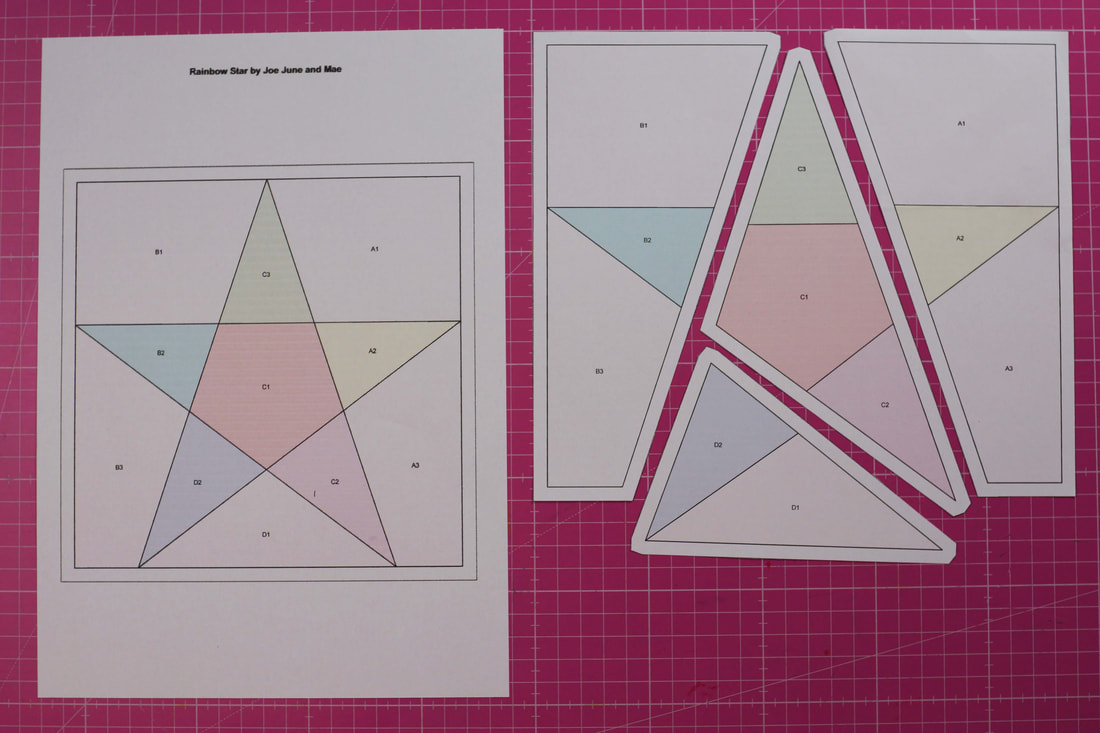 3. Reverse side or mirrored image: As I mentioned before, foundation paper piecing is done on the reverse side of your paper. This means your pattern is your sewing aid only. Not as with 'normal' patterns, where you cut the fabric according to the pattern. I think this is the most important part about paper piecing, and can't be emphasised enough. NOTE: The paper is just your sewing aid . The paper is your base where you sew on, the lines of the pattern are your sewing lines. The block will emerge on the unprinted side of the pattern. And will therefore be a mirrored image of the numbered overview.
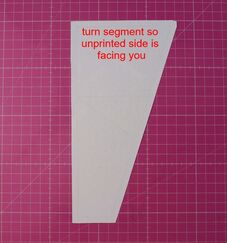
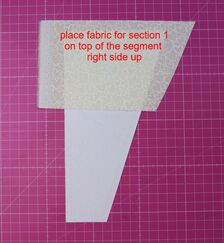
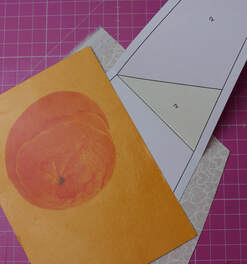
> numbered overview > finished block 4. Sart sewing It doesn't matter which segment you sew first, you want to sew them all anyways, so start wherever you want. I will start with segment A here, just because I like starting from the right today :-) > set your sewing machine to 1.5 stitches /cm or 16-18 stitches/inch this will make sure the stitces perforate the paper nicely, but are not too close, so they don’t rip the paper. This will also make it easyer to remove the paper after you finish sewing your block. > Turn the first segment over so the wrong side (unprinted side) is facing you. Place the piece of fabric for section 1 right side up, onto the paper, making sure there’s ¼ to ½ inch of fabric around the perimeter of section 1. Be generous in the beginning; once you are familiar with foundation paper piecing, you can cut your fabrics a bit smaller. > Pin or glue this fabric in place. I prefer fabric glue. Everything stays nicely in place.
> Turn the pattern segment over so the printed side is facing you. Fold the pattern on the line between section 1 and 2. ( I do this using a postcard, this gives you a nice straight and crisp fold)
> Trim fabric 1 to a ¼” seam allowance using an acrylic ruler and rotary cutter. There is a specilty ruler for this, it's called ADD-A-Quarter-Ruler , which has a 1/4" lip and gives you a perfect 1/4" seam allowance. But any other ruler will work just as fine. 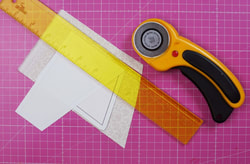 > Choose the fabric for section 2 the same way you did for section 1, making sure the fabric covers the whole of section 2 and aprox ¼ - ½ ” around the perimeter of section 2. 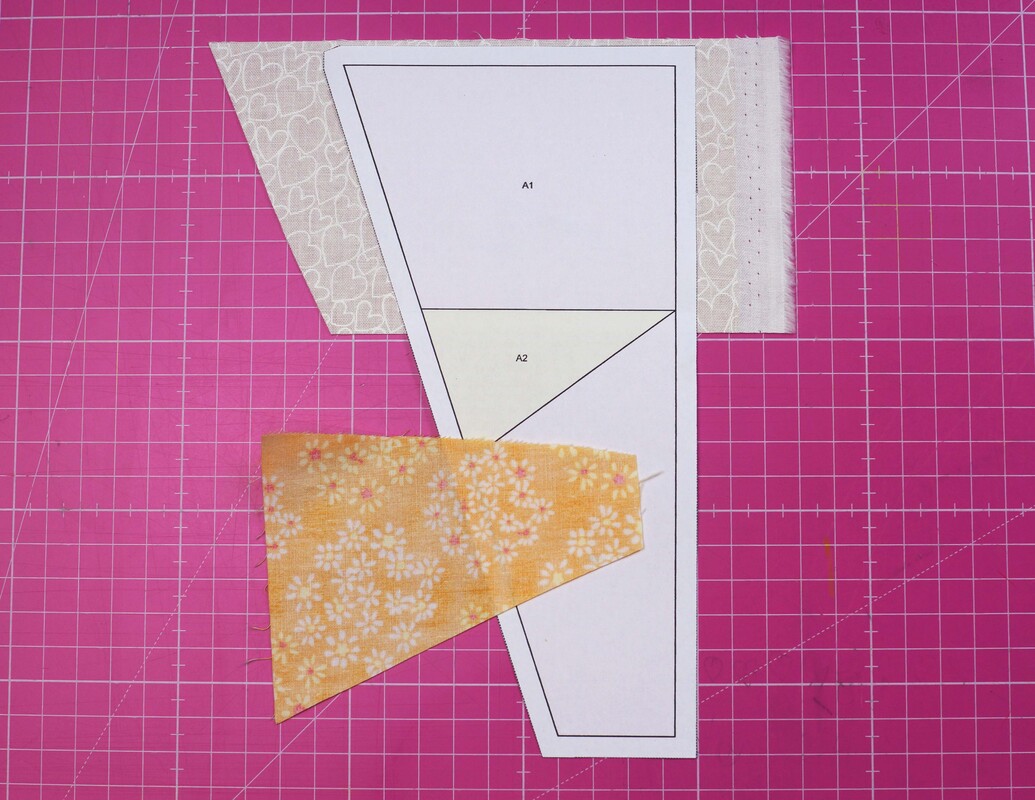 > Place fabric for section 2, right sides together with fabric 1. Aligning the raw edges of the two fabrics along the fold between section1 and 2.
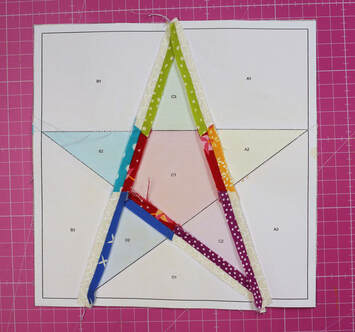
> Now, stitch along the fold between sections 1 and 2, right on the line. The more precisely you sew, the easier it will be to align your segments! If the line that’s being sewn starts or finishes at the ¼-inch seam allowance, extend that line right through the seam allowance by sewing all the way through it! 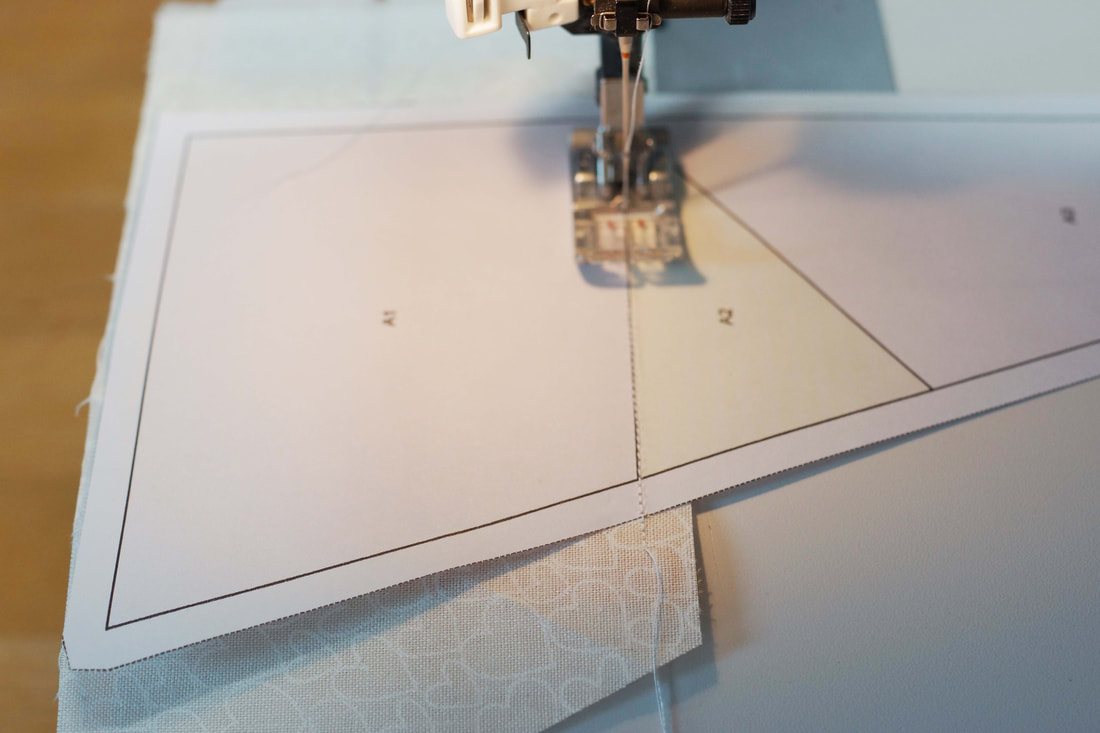 > Flip open fabric 2 so the right sides of the fabrics are showing and press with a hot iron (no steam, as this can distort your fabric and paper ). Now you choose the fabric for section 3 the same way you did for the other two. Folding now the pattern at the line between section 2 and 3 and so on. You then sew each section the same way. Adding the fabrics in numerical order, as they appear on each segment. 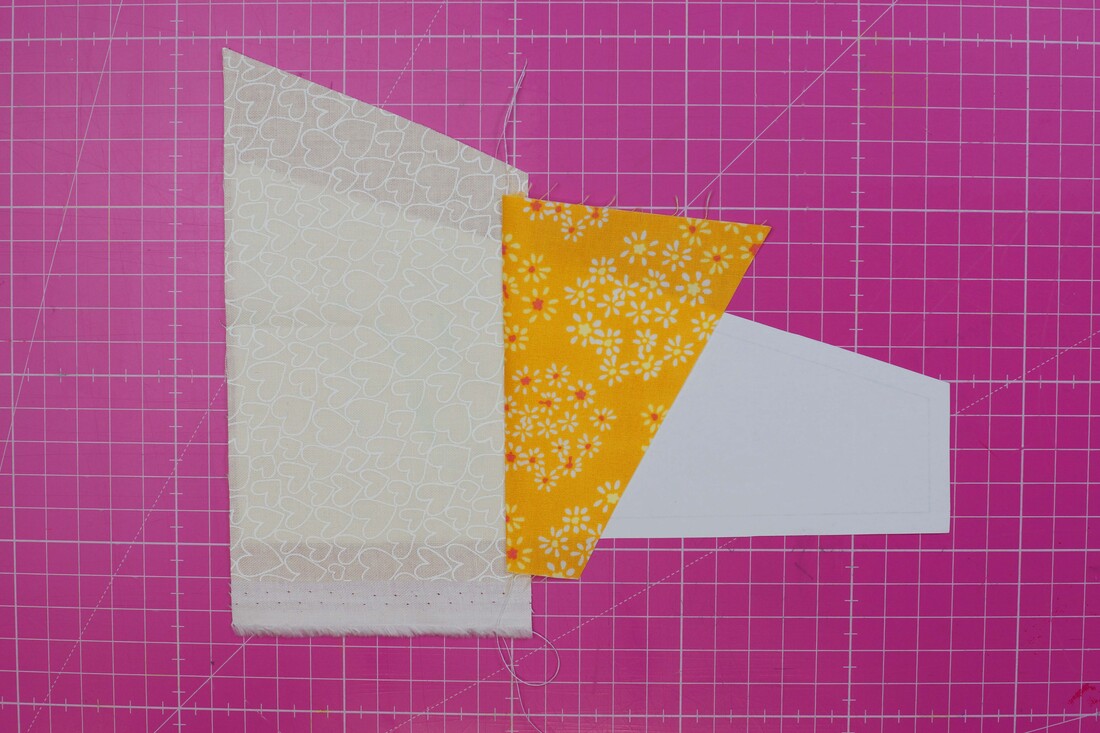 > When you're done sewing the segments, cut excess fabric along the dotted line. 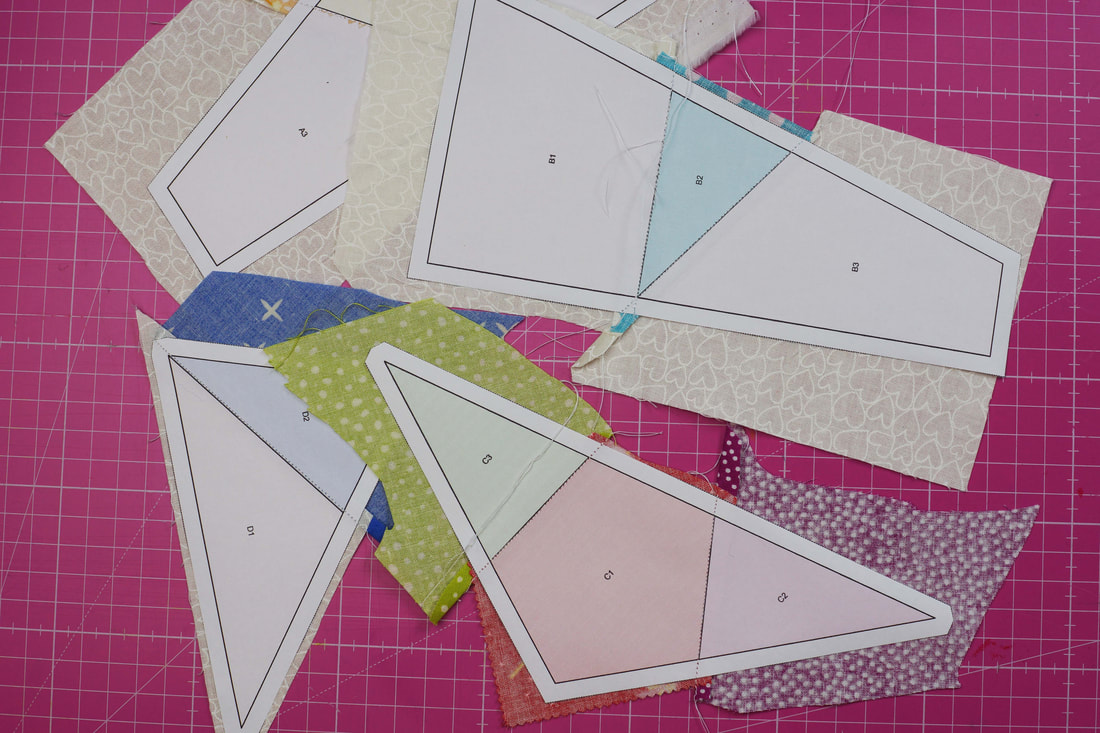 > Place the trimmed segments as they are on the numbered overview. This just makes your life so much easier when sewing the segments together. > Now sew the segments together according to the assembly instructions in the pattern.
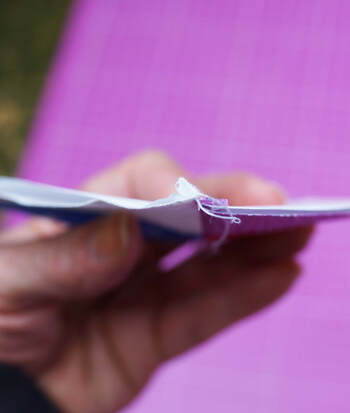
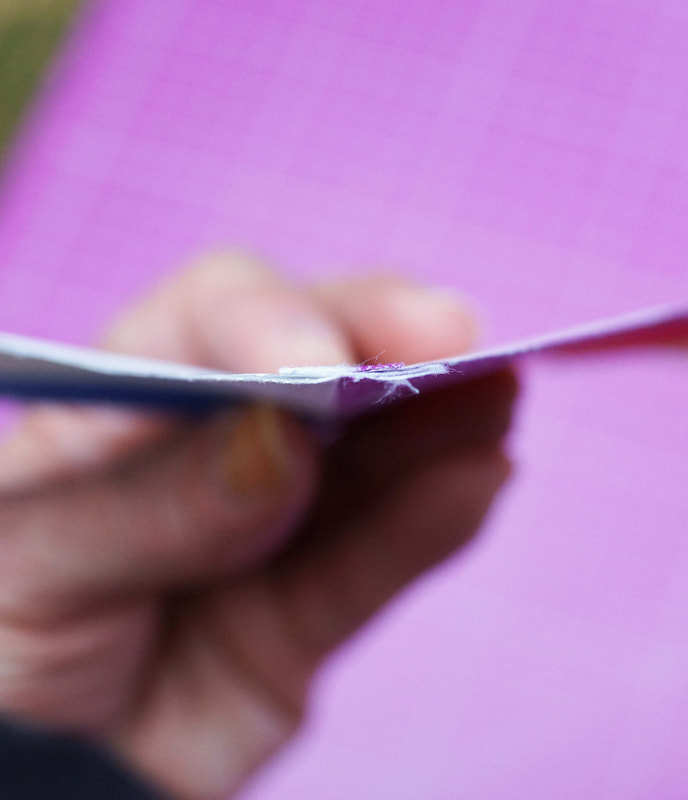
> After sewing two segments together, remove the paper only from the seam allowance and press the seams open with hot iron (no steam) as flat as possible. (This is where the tailors clapper comes in very handy , see blog post about clapper here. ) This helps reduce bulk, especially when there are several layers of fabric. It also helps keep your overall size accurate. 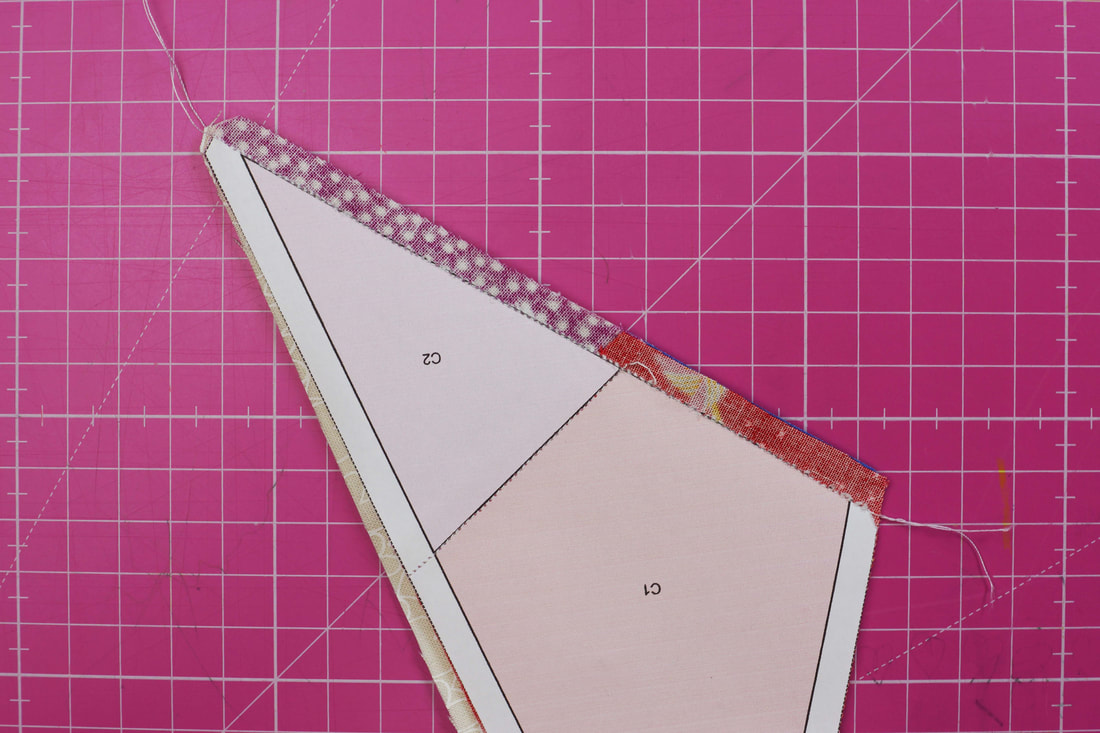
before tailors clapper after tailors clapper > After piecing all the segments, remove the remaining paper and use the iron to press your finished block.
And that's it .................. ALL DONE. You can also watch a tutorial video here. What do you think? Doable, right? You will be a paper piecing STAR in no time. 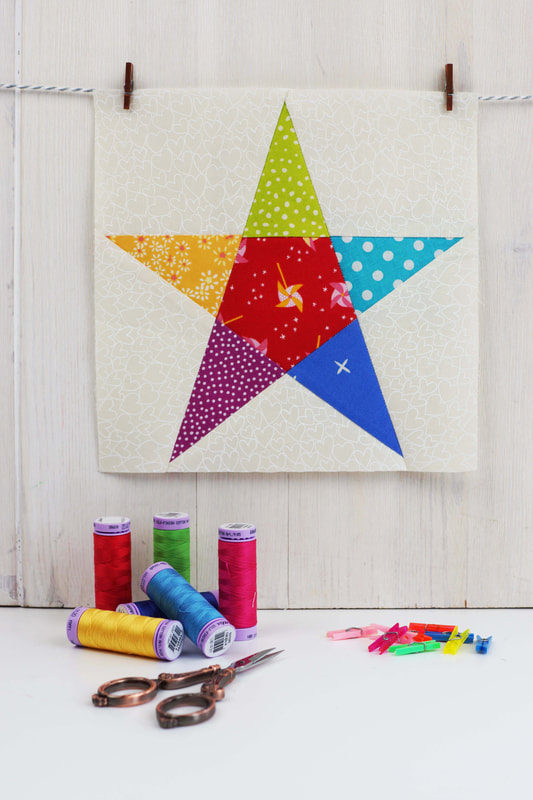 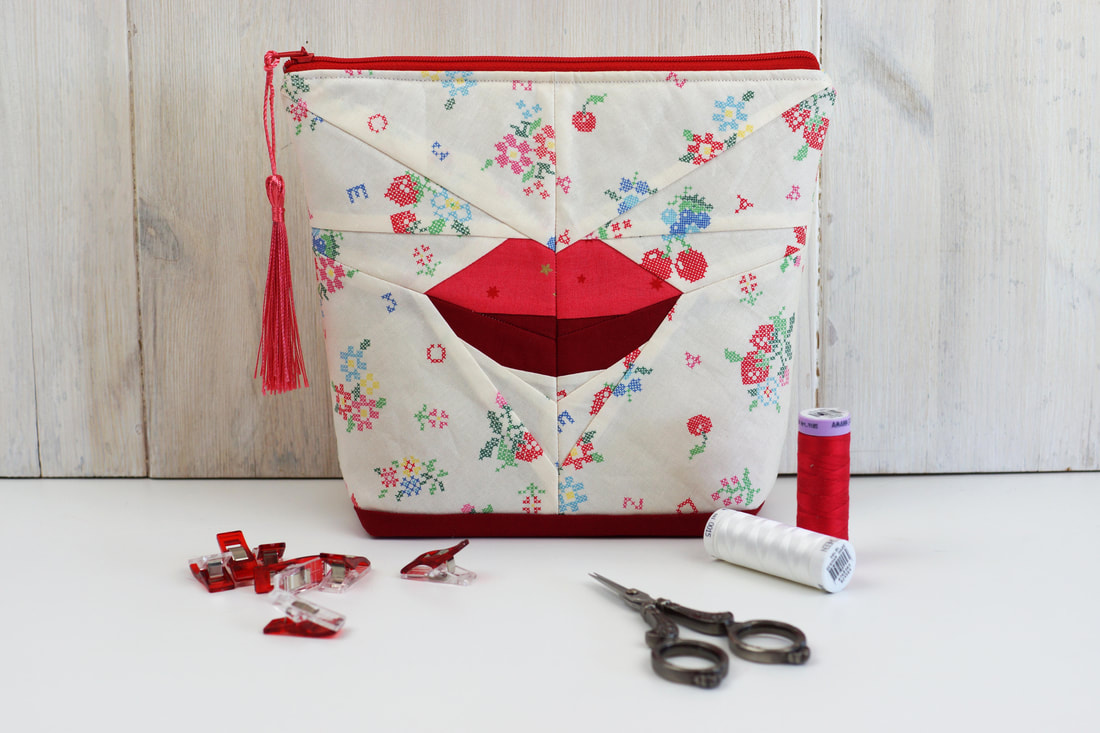
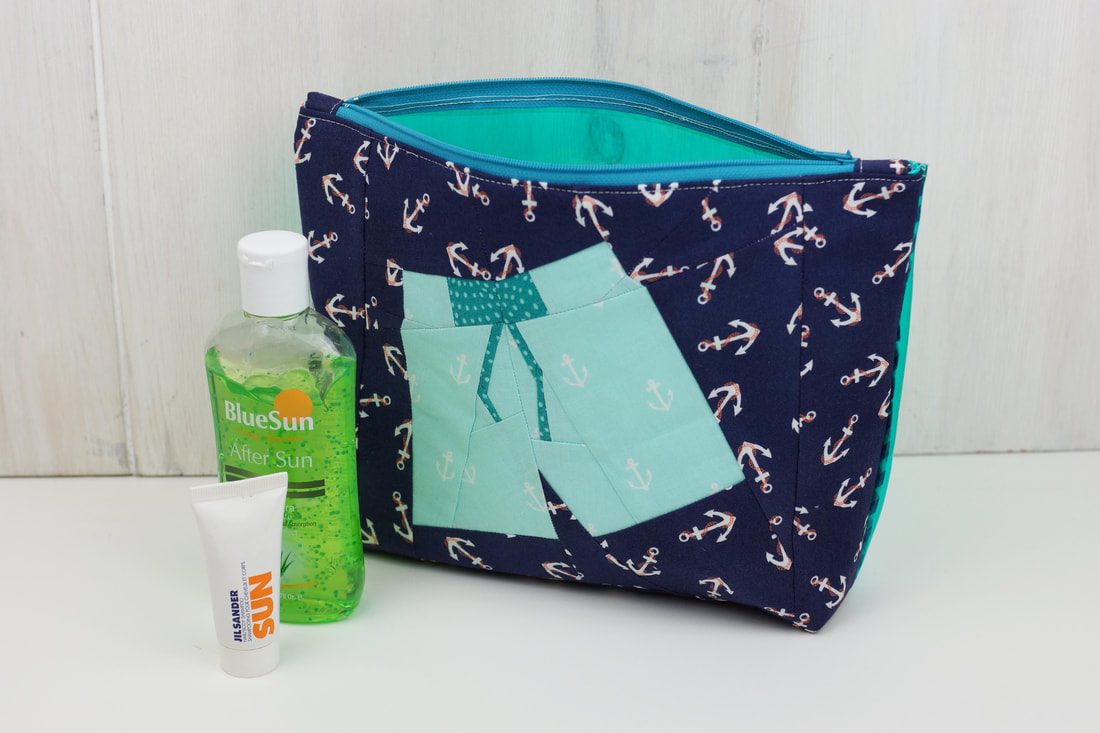
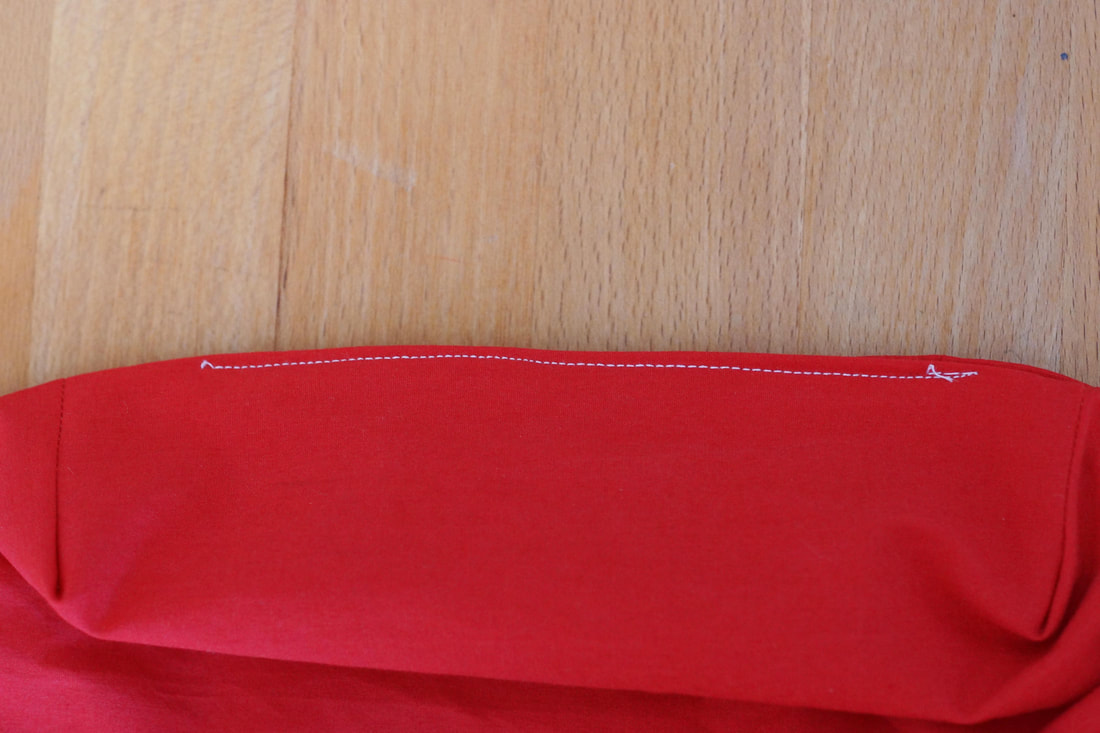
How to quickly sew a zippered pouch with flat bottom?
And a beautiful way to use the lips and/ or moustache quilt block pattern from my face mask ....... once you're masked out, like me :-) One can NOT have to many zippered pouches, it's like shoes... you can never ever have too many, right? Zippered pouches are super easy to make and you can use them for anything and everything literally all the time. I'll show you how quick and easy it is, to make one of these beauties using my lips quilt block pattern from the lips mask pattern. This pattern is kind of made for a pouch, because it has the perfect size. Fabric requirements and materials needed: - lips quilt block finished 9.5" x 7.5" - fabric for the back 9.5" x 7.5" - 2x strips of solid fabric 2.5" x 9.5" - lining fabric 2 x 9.5" x 9.5" - medium weight fusable interfacing 2 x 9.5"x 9.5" - 9 " zipper ( if your zipper is too long, check ou this post on how to quickly shorten a zipper ) - clips or pins - scissors or rotay cutter - ruler, thread and sewing machine. 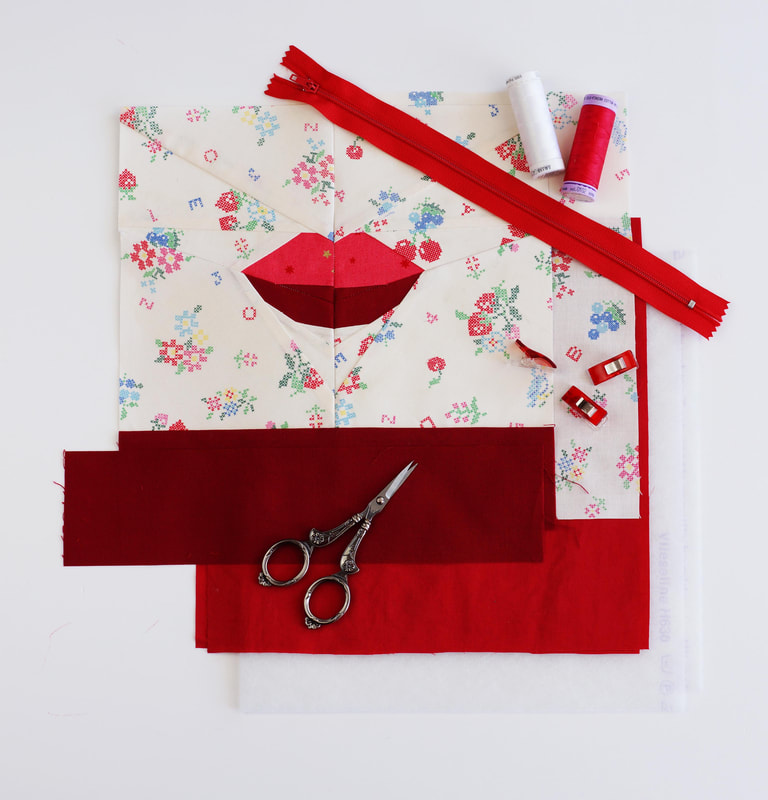
DIY ZIPPER POUCH with foundation paper piecing detail:
This completed zipper pouch measures approx. 8" at the top, 7" at the bottom and is about 3" wide at the bottom. This is a perfect size bag for make up, or sewing notions and would easily fit in you handbag . 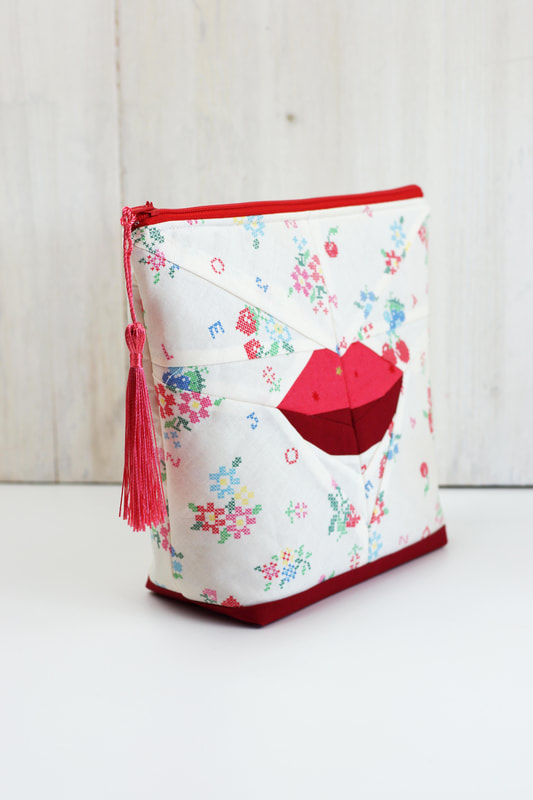
1. Sew the lips quilt block according to the pattern. It should mesure 9.5" x 7.5" when finished.
2. Cut your back fabric , lining fabric and fabric strips according to the mesurements given. 3. Stich the solid fabric strips to the bottom of the quilt block and to the bottom of your back fabric. 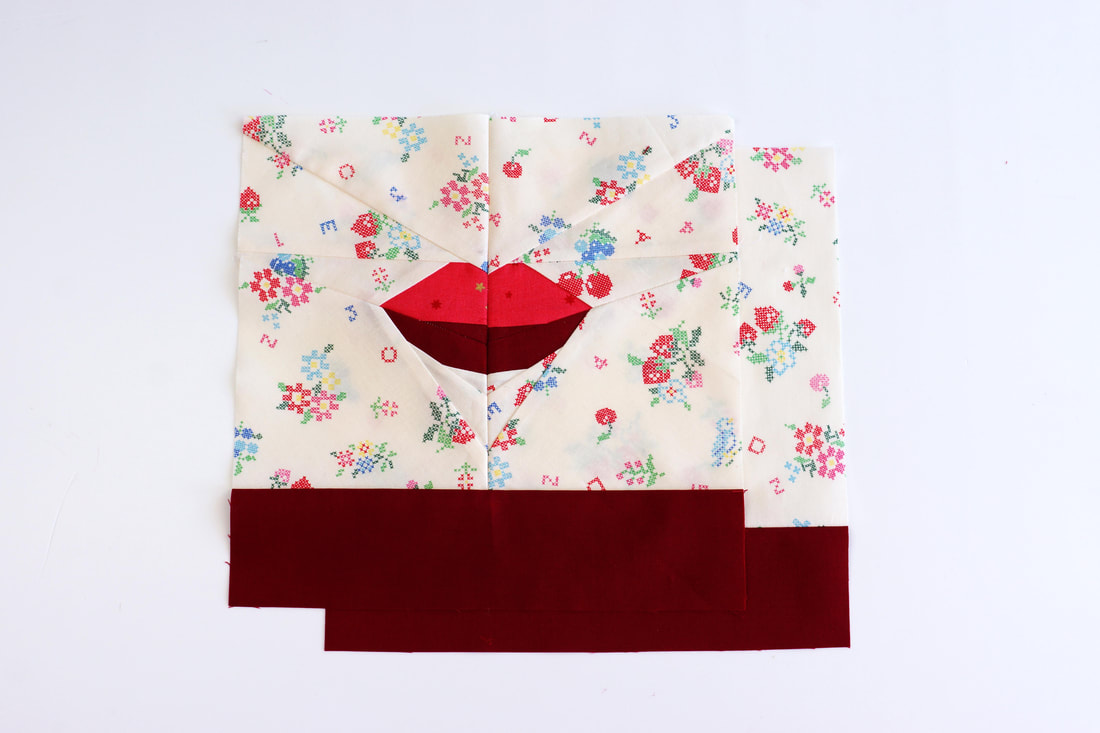
4. Iron on the fusable interfacing to your front and back panel.
5. Cut out 1.5"x 1.5" corners at the bottom of your outside panels and your lining.
This will give you your bottom corners of the pouch. 
6. Fold the corners so the edges are facing each other and stitch along the 1.5" edge.
This creates a boxed corner. Sew all 8 corners like that.
7. Attach the zipper to the front panel right side of front panel facing you and right side of zipper facing down.
Sew the zipper first to the front panel and then to the back, again right side of zipper against the right side of the fabric. 
8. Place the lining right sides together on top of outside panel and sew along top edge.
Repeat for the back. 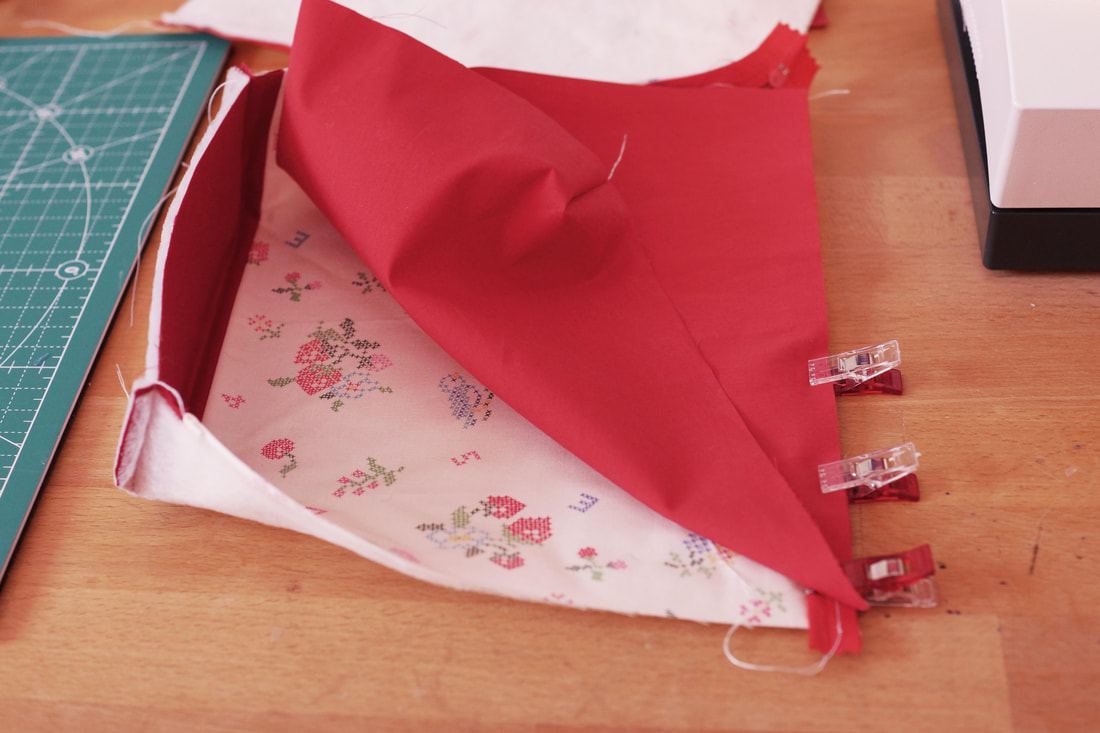
9. Optional: Stitch a top seam along the zipper from the outside,
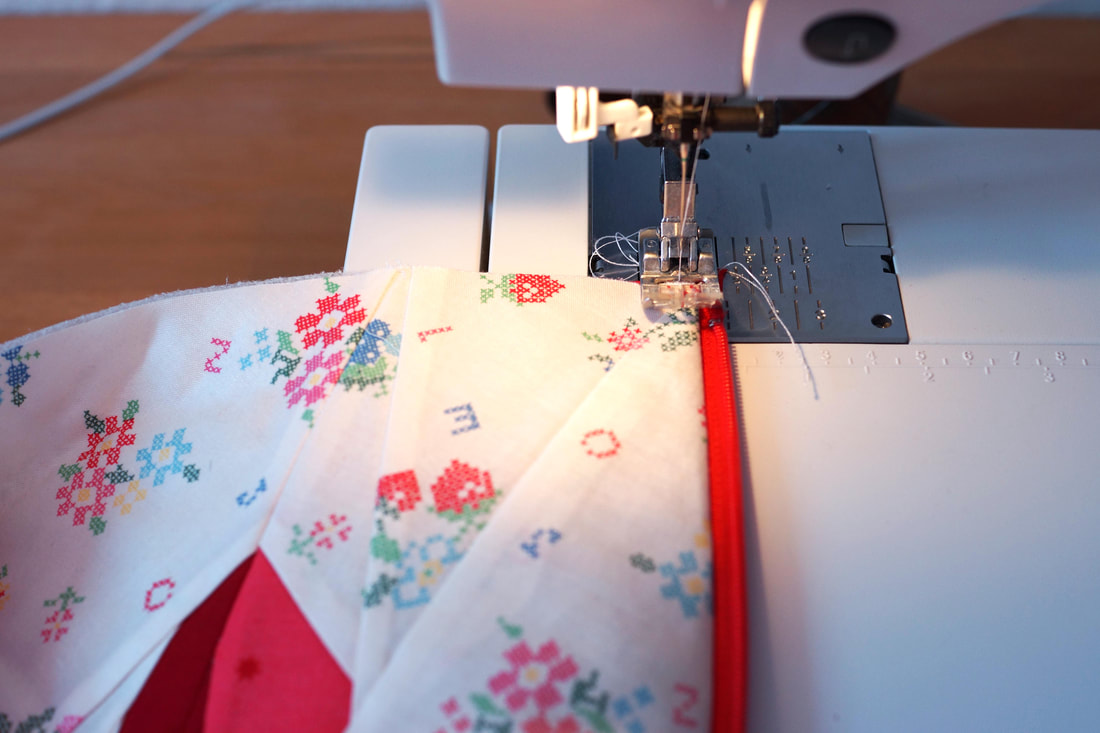
10. UNDO THE ZIPPER ! This is important for turning the pouch later :-)
And stitch all the way around the pouch , except a 6" turning gap along the bottom of the lining using a 1/4" seam allowance. 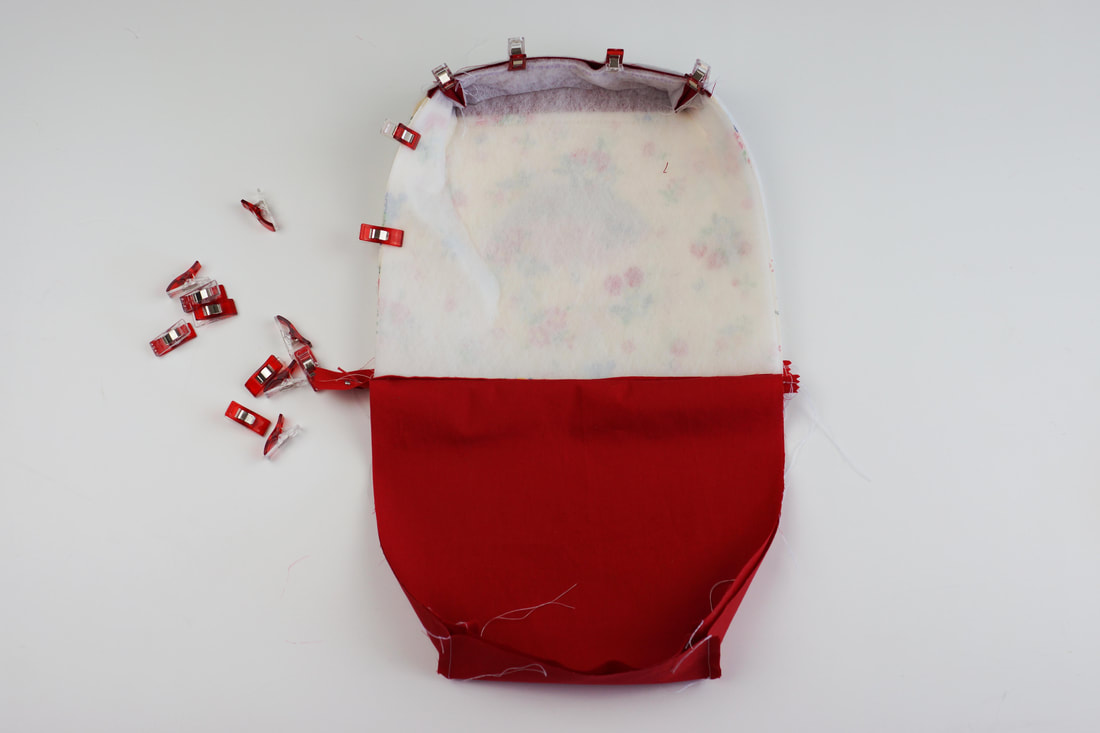
11. Turn the bag right side out. Fold the edges of your turning gap in and stitch to close.
12. Fold lining inside and..... TADAHHH :-)
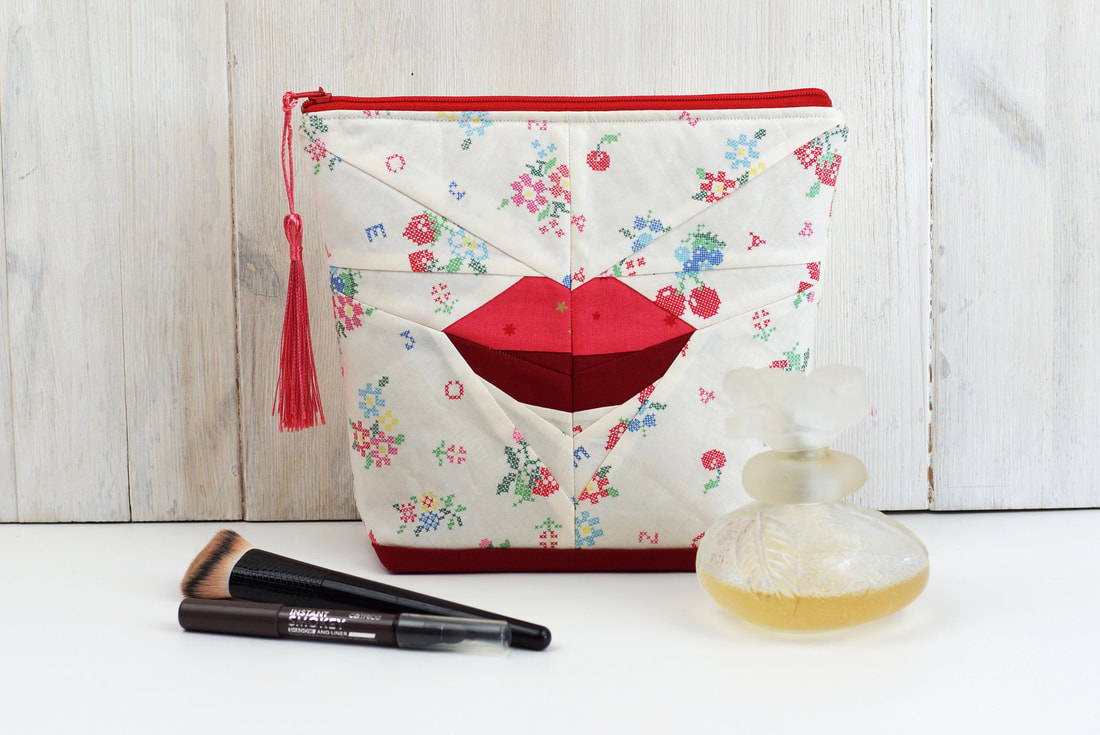
What do you think?
Btw. if you're interested in News and Coupons for future pattern releases, subscribe to my Newsletter here on my site:-) Happy Sewing!
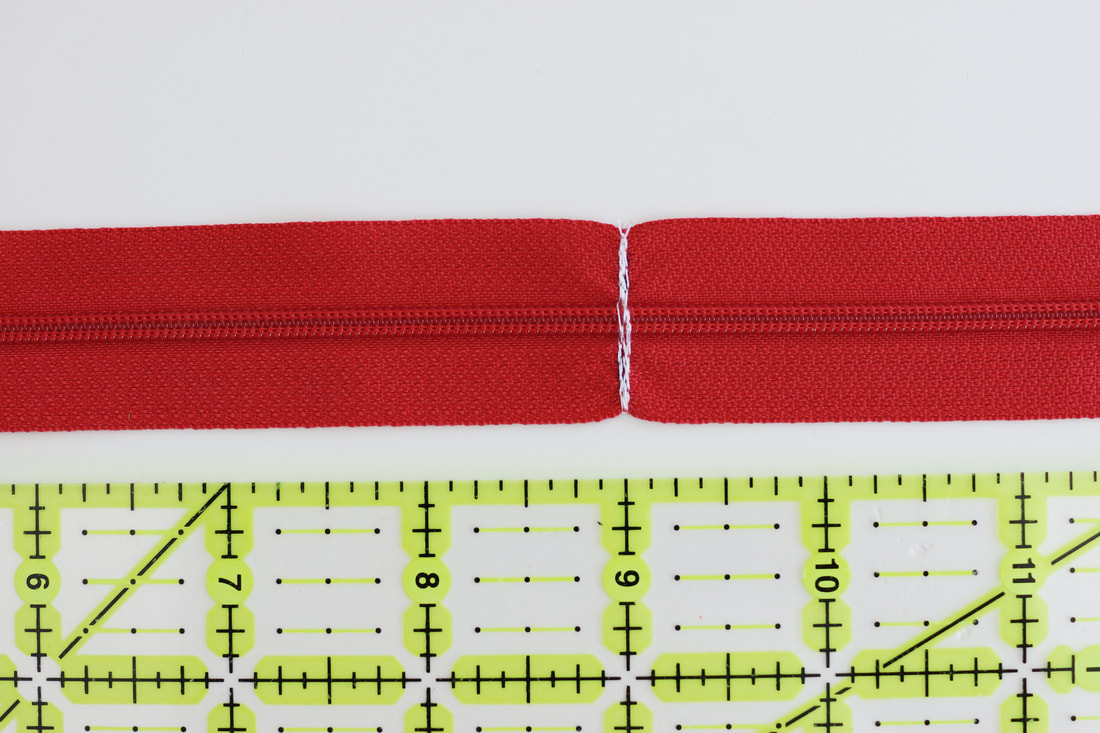
How to shorten a nylon zipper ? A super short and quick way to solve this problem.
Dont we all know the situation where we want to quickly sew a gift or project, like a pouch or bag, and we do have all the fabrics and supplies but... Oh No... the zipper is too long. Don't despair, there's an easy solution :-) 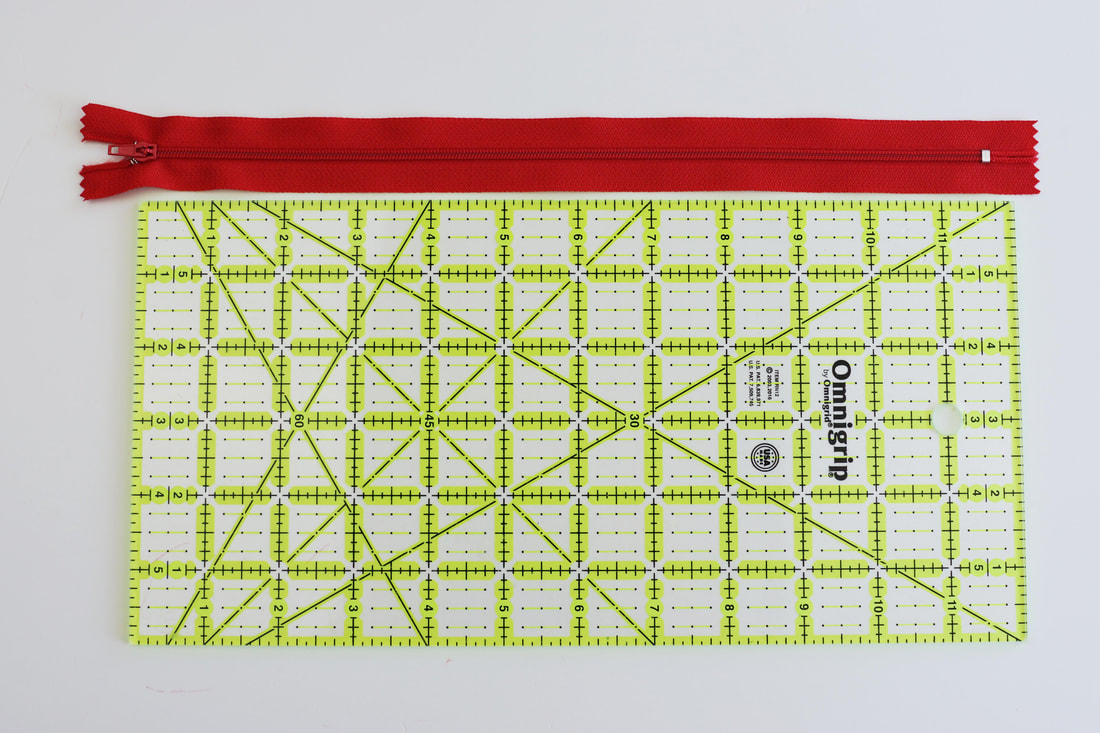
1. Start by measureing your zip and marking your needed length.
IMPORTANT: zippers are measured from the zipper top, not the zipper tape. I can not tell you how often I fogot that! The marked point is where you will be sewing your new bottom stopper. 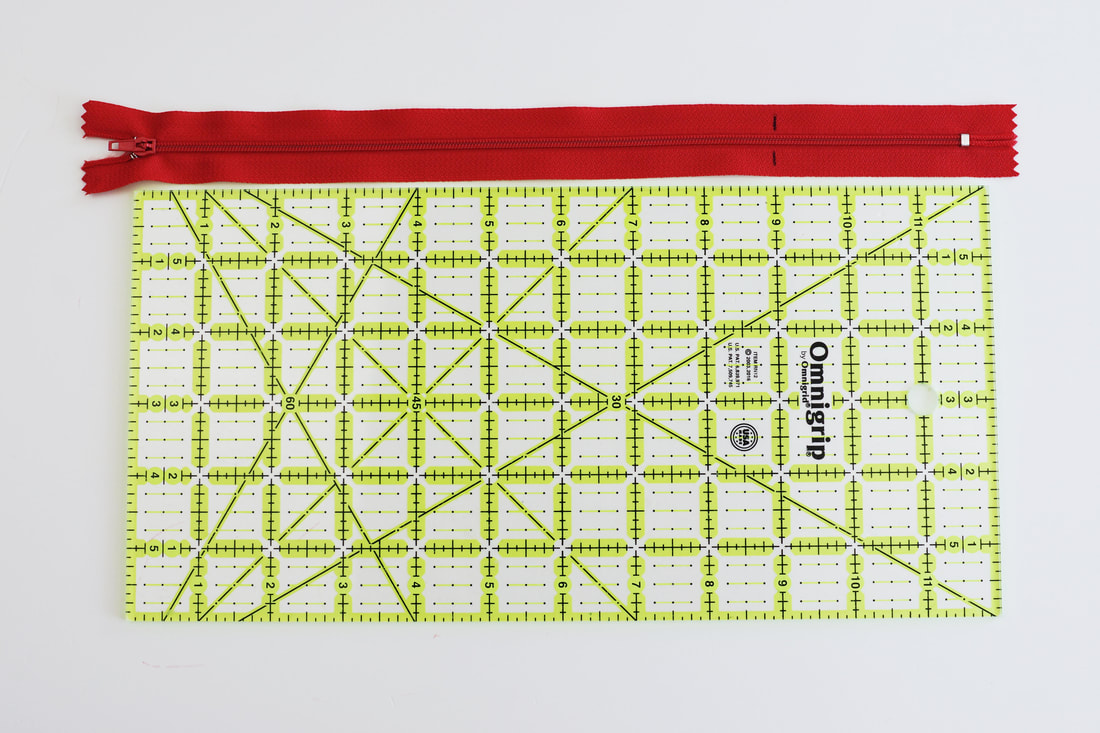
2. I usually machine stitch over the marked point a few times. But you can also hand stich over that point a few times , that does the trick just as well.
This new stopper needs to be tight and secure to prevent the zip from running off the end. Remember it's calles a 'stopper ' for a reason . 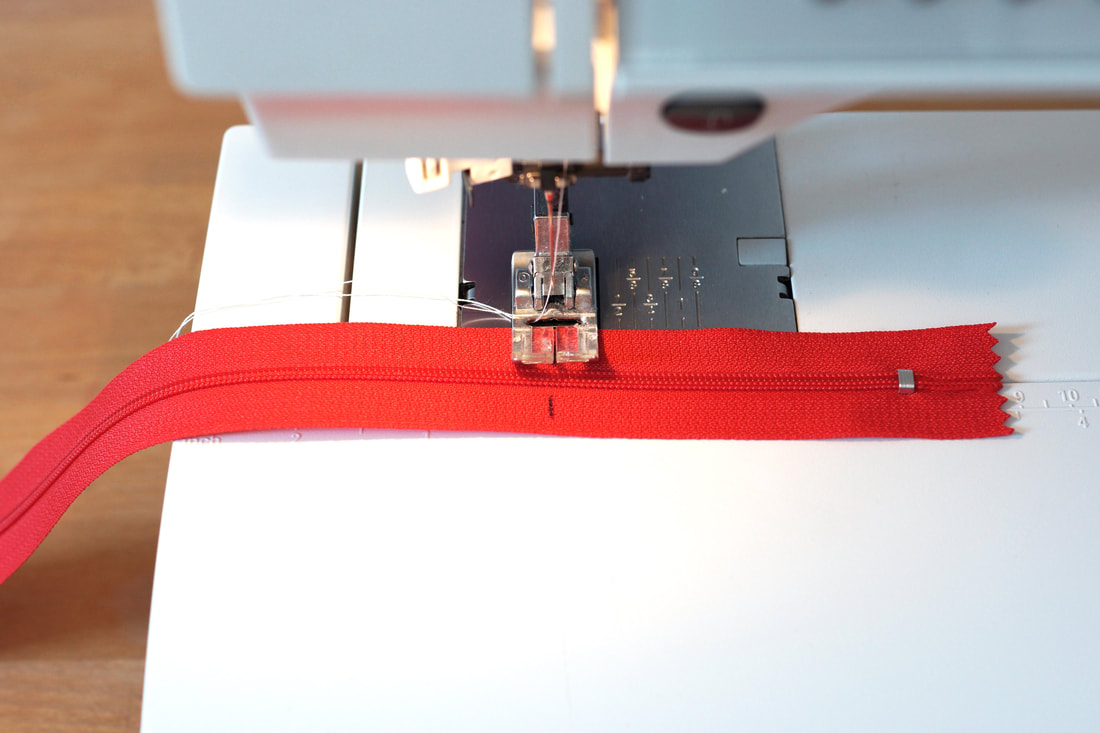
- sewn by machine - - sewn by hand -
3. Once you have sewn your new bottom stopper you can cut the zipper.
I've cut this zipper fairly short, since I will be using it for a zipper pouch. Depending on your sewing project, you cn cut it a little longer. The process is the exact the same for an invisable zipper of course. 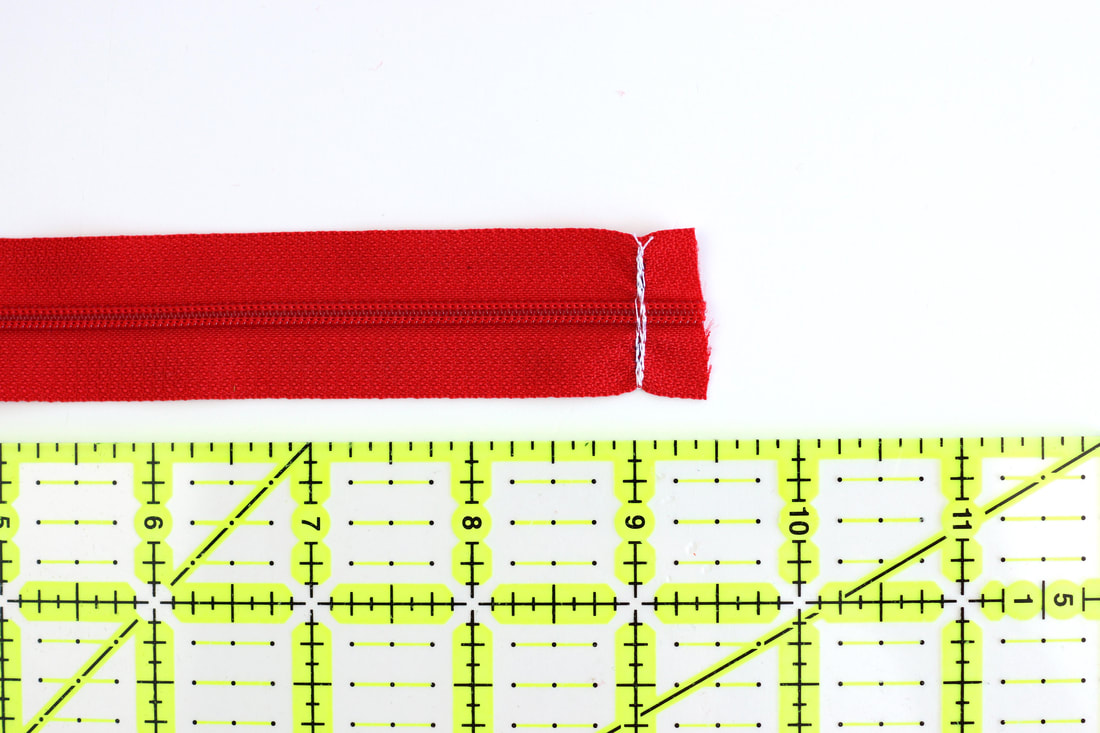
And here it is, a perfect 9" zipper for a cute flat bottom pouch :-)
If you want to sew this cute pouch, check out the blog post for the pouch here.
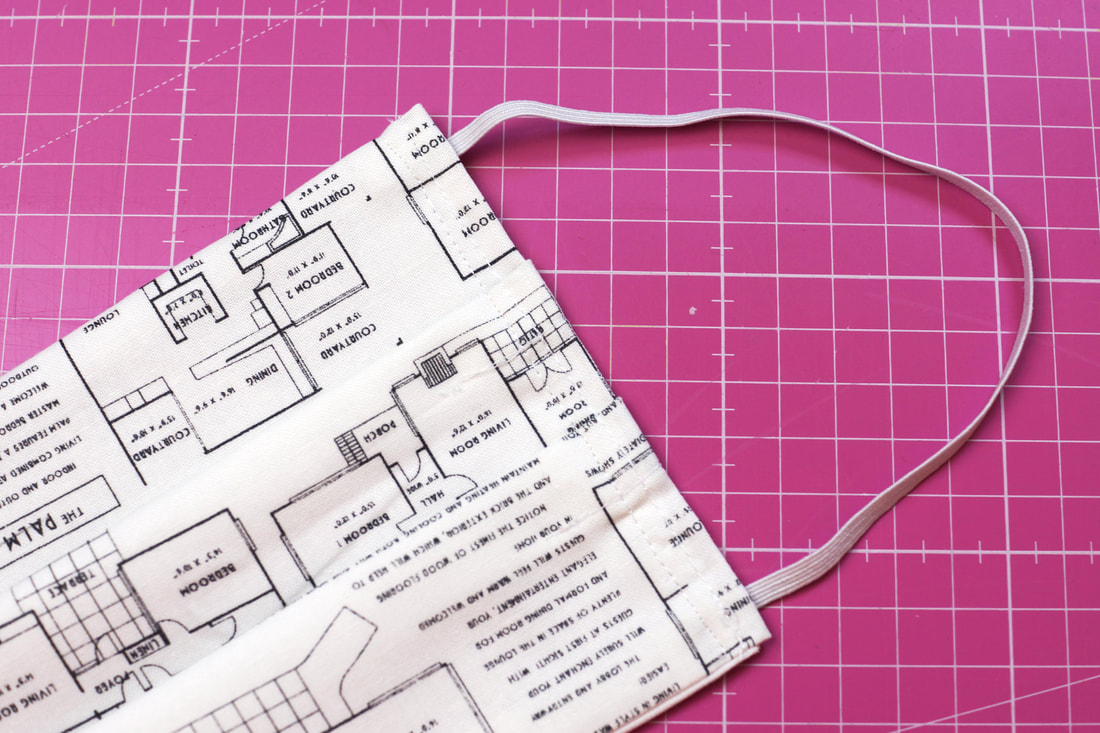
How to sew a quick and easy face mask at home?
As it becomes more and more evident that we will all be wearing face masks soon whenever we go out, I 'll show you a quick and easy way to make your own face masks. You'll probably want to make several face masks, as they should be washed frequently, preferably after each wear. This is a free face mask pattern. The CDC says homemade cloth masks can help slow the spread of the coronavirus. These fabric masks can help protect you in places like the grocery store, public transport, pharmacy and so on, where it's harder to keep a safe six-foot distance from other people. This works best if everyone wears them because people who don't have any symptoms can still be spreading the virus. 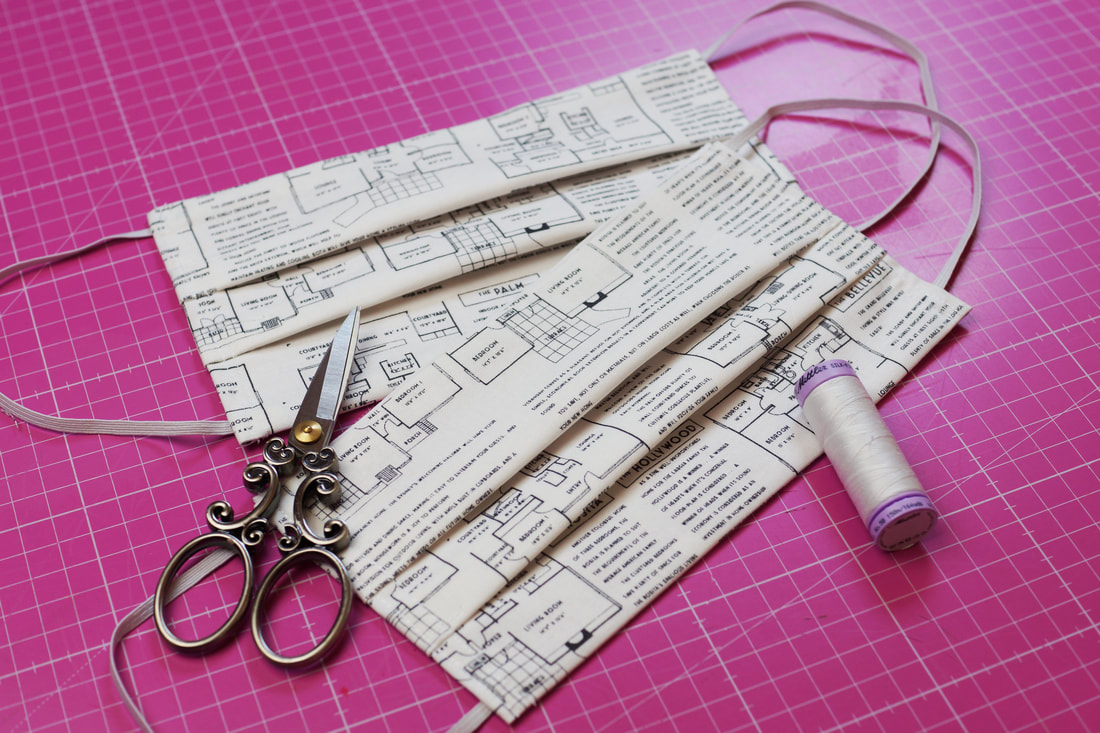
As more information about the coronavirus pandemic develops, some of the information in this blog may have changed since it was last updated. For the most up-to-date information on COVID-19, please visit the online resources provided by the CDC, WHO, and your local public health department.
Whats the best fabric to use for a home made face mask?
Researchers tested the effectiveness of a wide range of materials for homemade masks. They measured how well the materials you have in your household could capture and filter small particles. Test data shows that the best choices for DIY fabric masks are tightly woven cotton materials, such as sheets, or other cotton materials. Using a double layer of material for your DIY mask adds a small increase in filtration effectiveness. Other research found that the most effective masks were constructed of two layers of heavyweight “quilters cotton” with a thread count of at least 180, or had a thicker and tighter weave. As I am a quilter, and have a ‘small’ selection of quilters cotton in my home, this pattern is made with quilters cotton on the outside and cotton sheet as a lining. This face mask pattern has 2 layers of cotton fabric. Fabric and material requirements:
Men/ large : Outside fabric: 10”x 7,5” Lining fabric: 7”x 7,5” Elastic band approx.: 2 x 9” if you’re using cotton ties or ribbon, you need 4 strips of approx. 15”-18” length. If the ties are too long, just cut them down to the size you need. Women/ medium: Outside fabric: 9”x 7” Lining fabric 7”x 7” Elastic band: 2 x 7,5” Children/ small: Outside fabric: 8”x 6,5” Lining fabric: 6,5”x 6,5” Elastic band: 2 x 7” 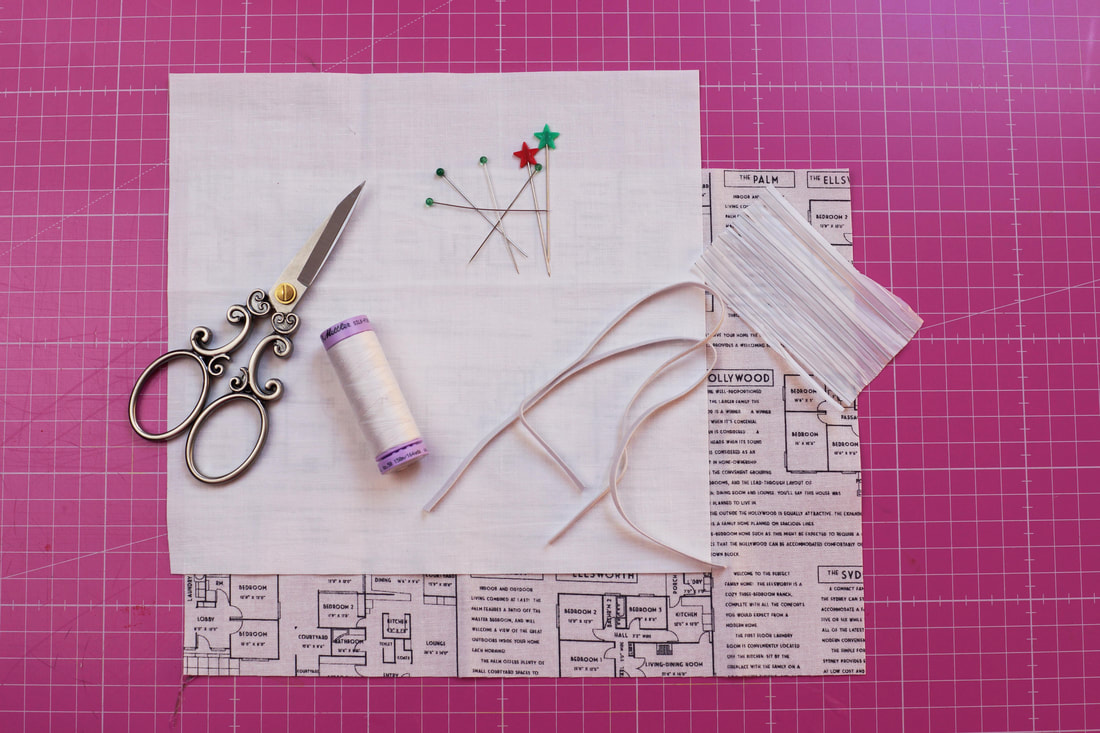
Cut the fabric and elastic depending on the size you want to sew.
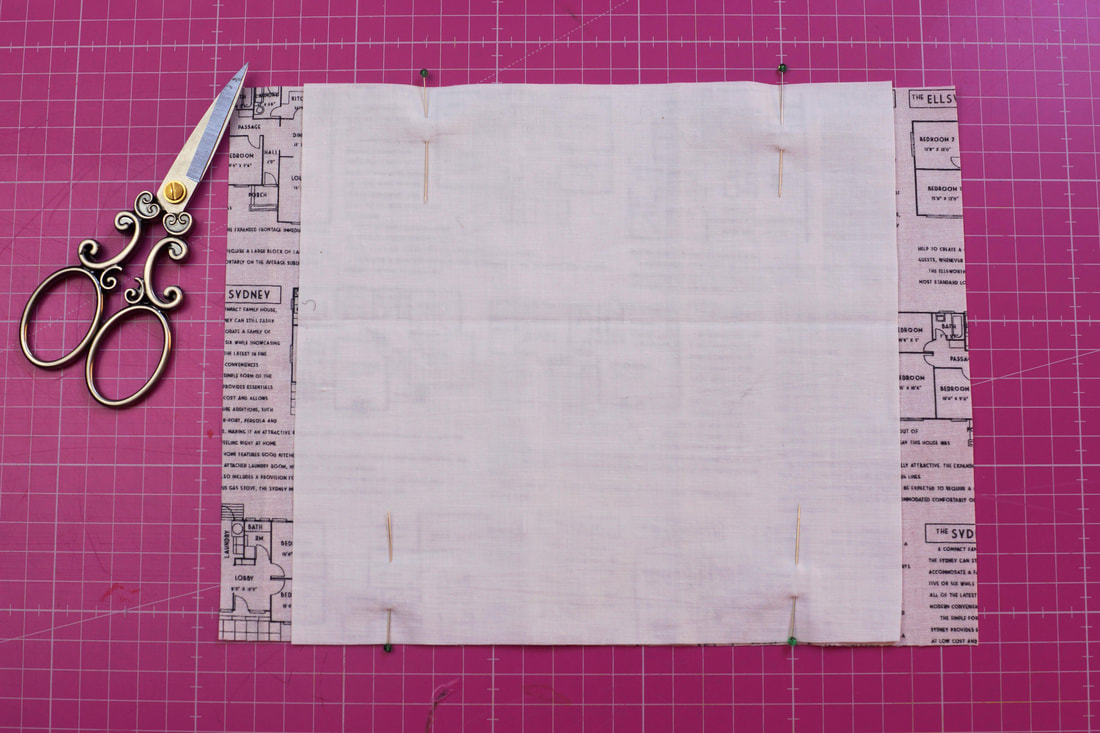
Place your fabrics right sides together leaving a 1" seam allowance on each side.
If you want, pin or clip in place.
First you sew one seam about 1/4" from to edge. ( If you used pins or clips, you take them out now)
Then place the wire centered between the two layers of fabric against your seam. Fold the fabric back right sides together and sew a second sean about 1/8" from the previous seam. 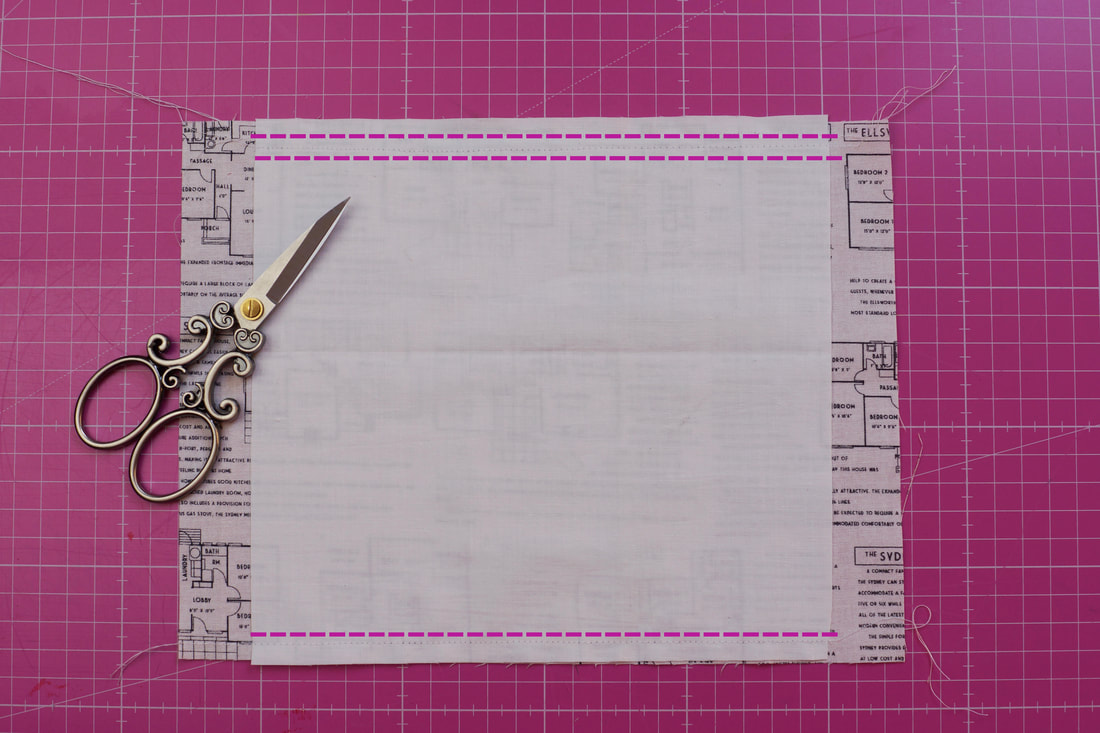
Then sew a third seam, again with a 1/4"seam allowance, along the bottom edge.
When you're done sewing, turn the face mask right side out and iron the seams.
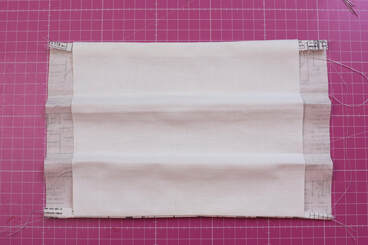
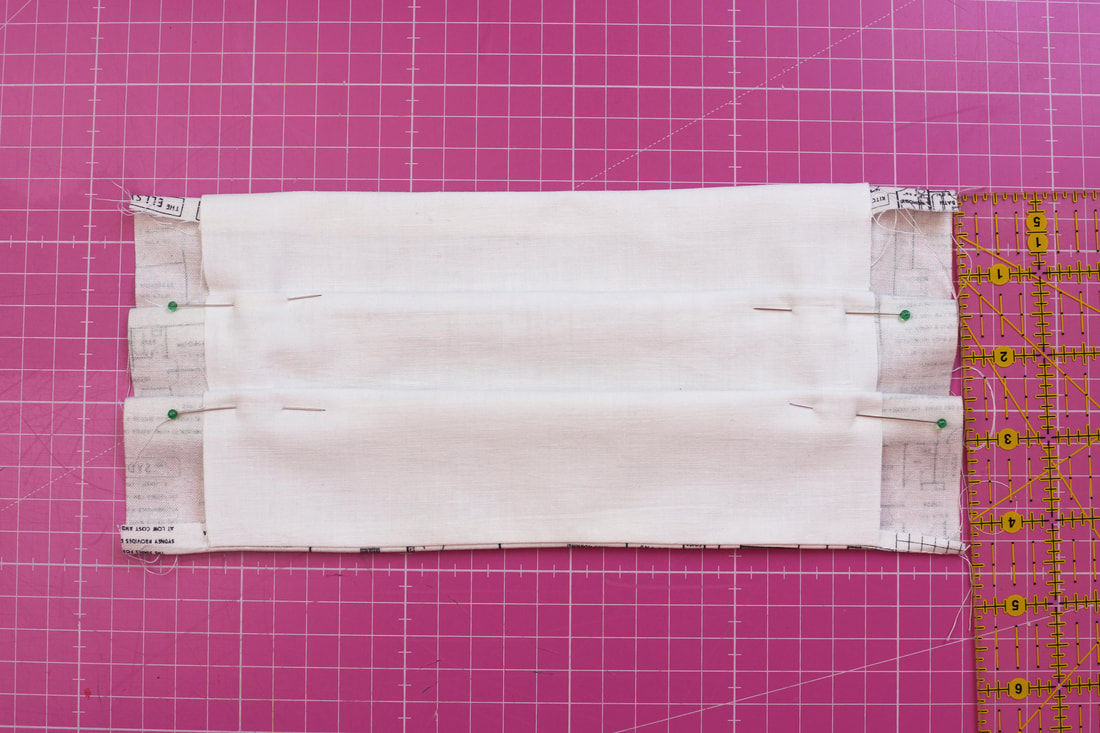
Fold 2 evenly-spaced 1/2" pleats. Pin or clip in place and sew to secure. the width of your mask should be about 4" for the large mask ( 3,5" for the medium mask and 3" for the small one.)
Fold over the seam allowance at the sides twice 1/2" and pin in place.
insert eleastic , or ribbon or cotton tie as shown above. In case your ribbon or cotton tie is too thick you can just attach it on top as well.
With a 3/8″ seam allowance, sew each side of the facemask with two seams. Backstitch over the elastic or fabric ties to secure them.
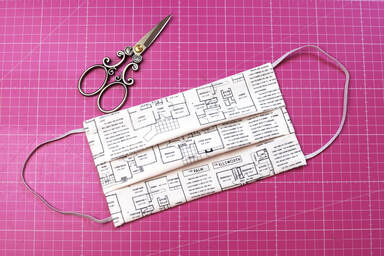
And there it is, all done :-)

I made two of these masks for my husband and son,
Guess ( from the fabric used :-)) what kind of work my two men are doing? happy guessing :-)
Are you looking for something fun ?
How about these two beauties? Fun face masks for Mr. and Mrs :-) You can shop the pattern here. 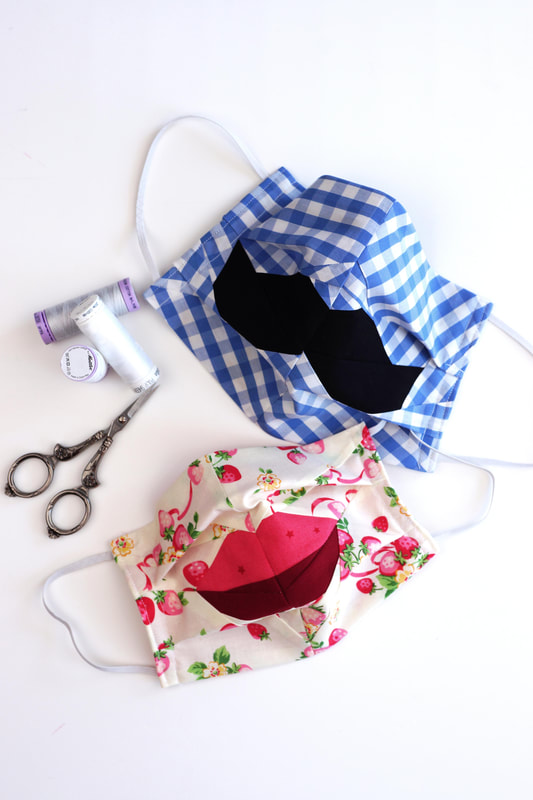
|

Author
Ingrid Alteneder Archive
March 2022
Categories
All
|


 RSS Feed

|
Visit us at
|