
|
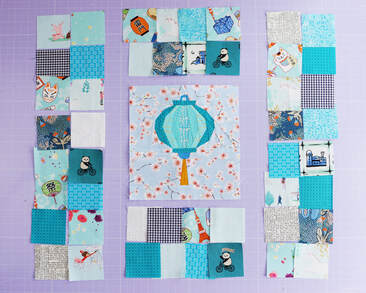
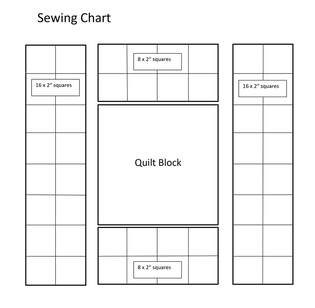
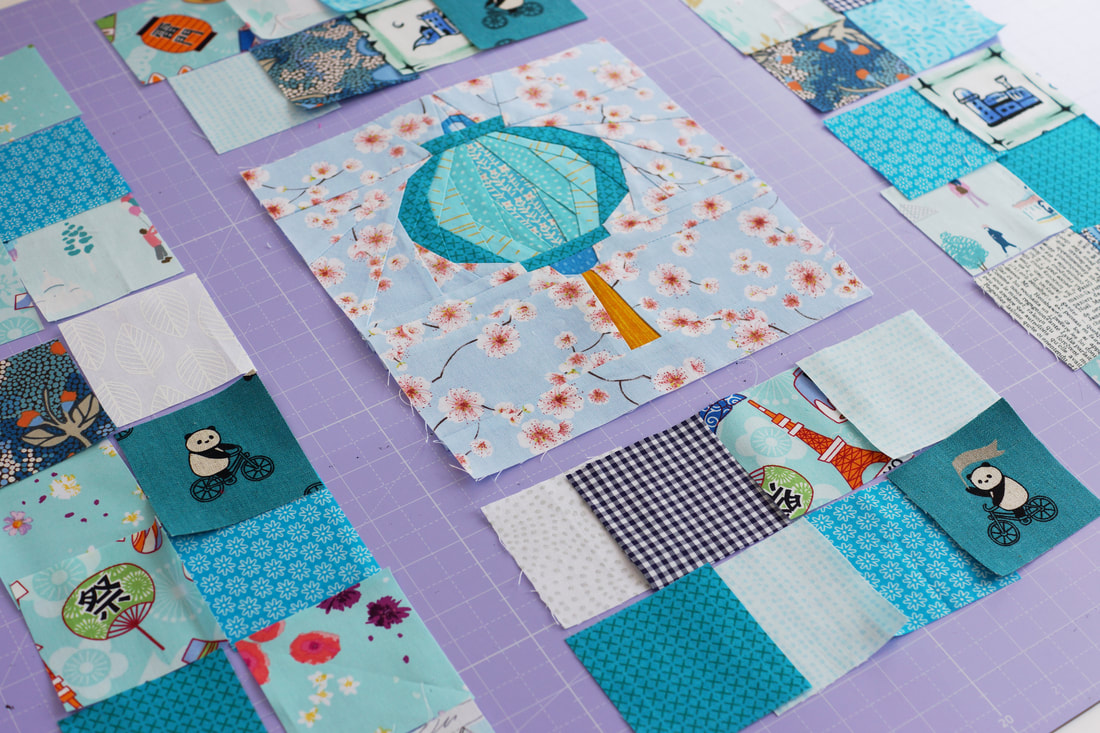
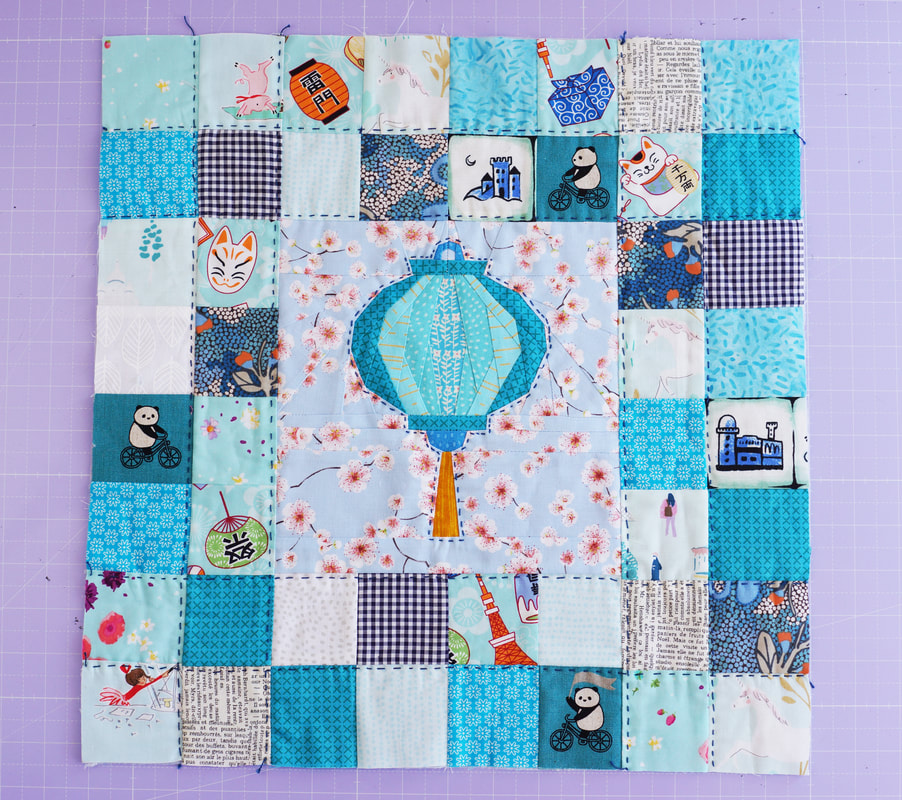
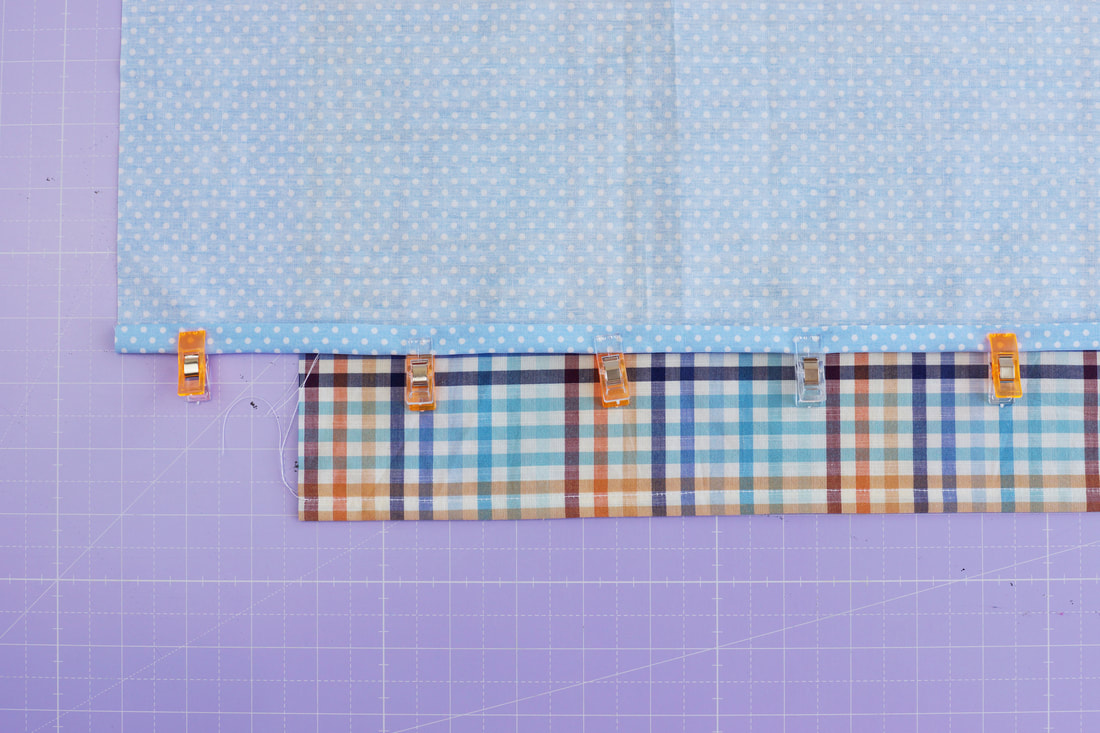
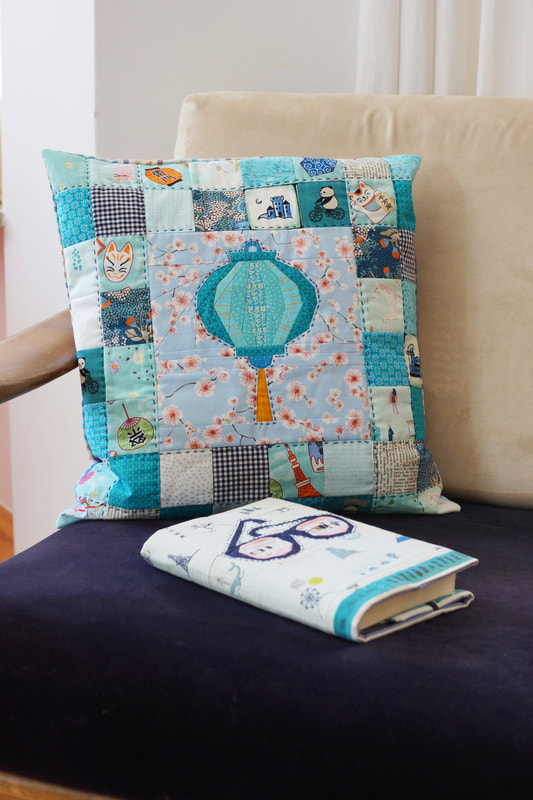
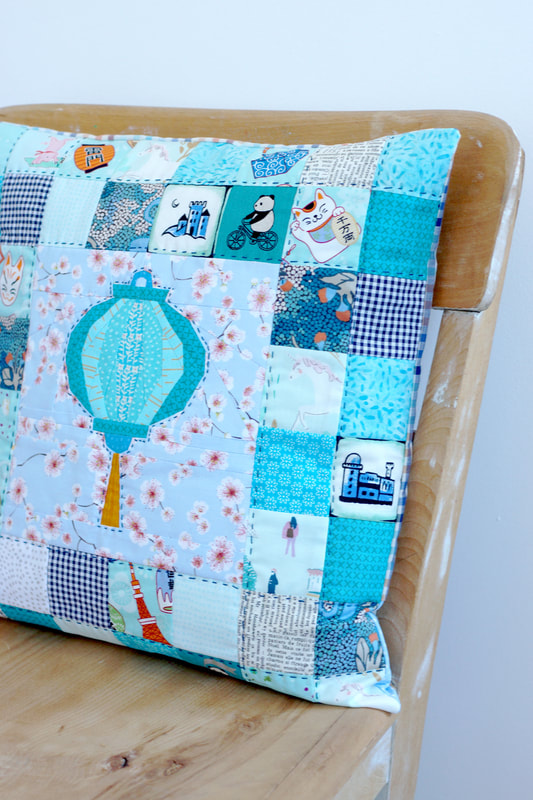
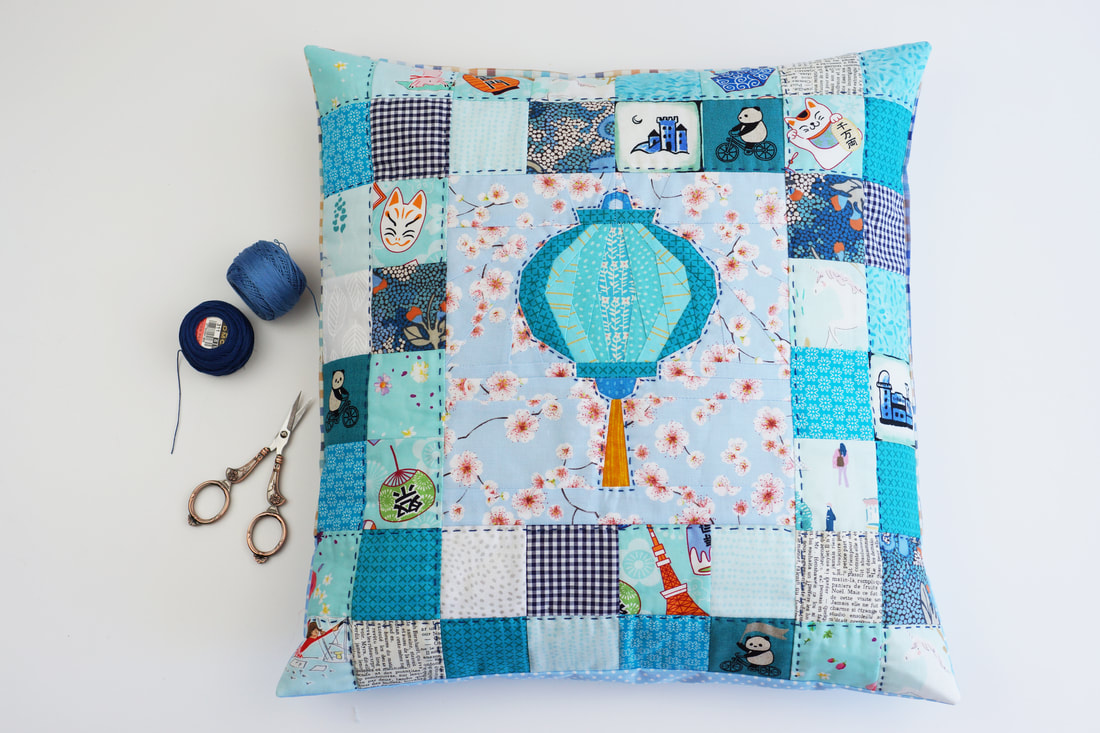
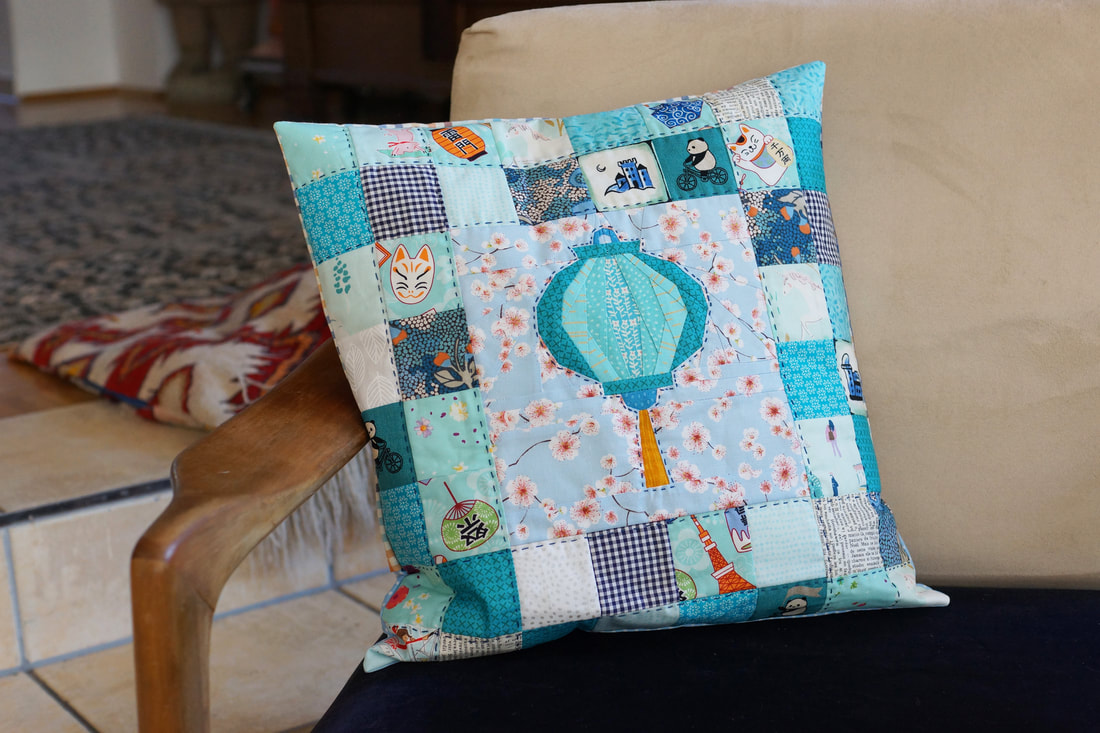
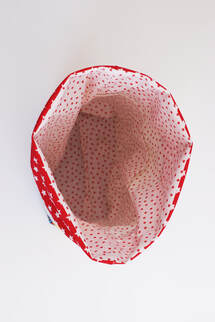
Pillowcases are easy and fun, and the perfect way to redecorate your home without having to invest a lot of money. Everybody that knows me personally, has seen, that I am a tiny bit of a color freak and also like to rearrange and redecorate things in my home. Especially seasonal changes, from spring to summer, fall and winter/ christmas. My patio and garden get a makeover every year. I love different 'looks' and love to play with fabrics and colors. 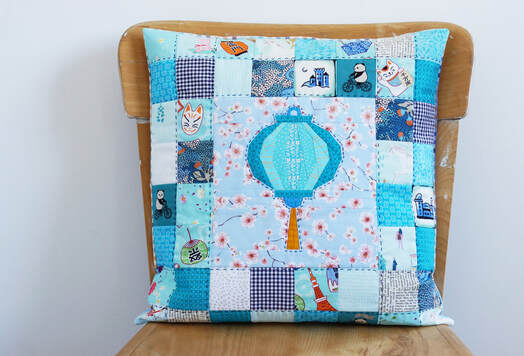 stunning quilted pillowcase I designed my Chinese Lunar New Year pattern series back in January but I think this series works all year around. Especially the lantern patterns are perfect for any patio decor. These are extremly easy and quick to make. And yes, the paper lantern pattern is easy to follow as well. Materials needed: - a 8" x 8" quilt block , paper lantern or any other ( 8 1/2" unfinished) - 48 2 1/2" squares ( the squares you cut will be 2 1/2" so they are 2" finished) - two pieces of fabric for the back 13" x 17" - low volume fusable batting 17" x 17" - thread and needle for handquilting if you decide to do that. Seam allowances are 1/4" unless mentioned otherwise. 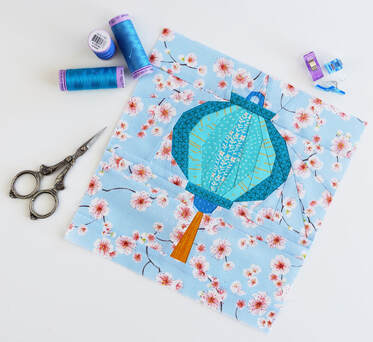 This is the quilt block that I will use for this pillowcase it's the 8" x 8" version of the balloon paper lantern pattern.
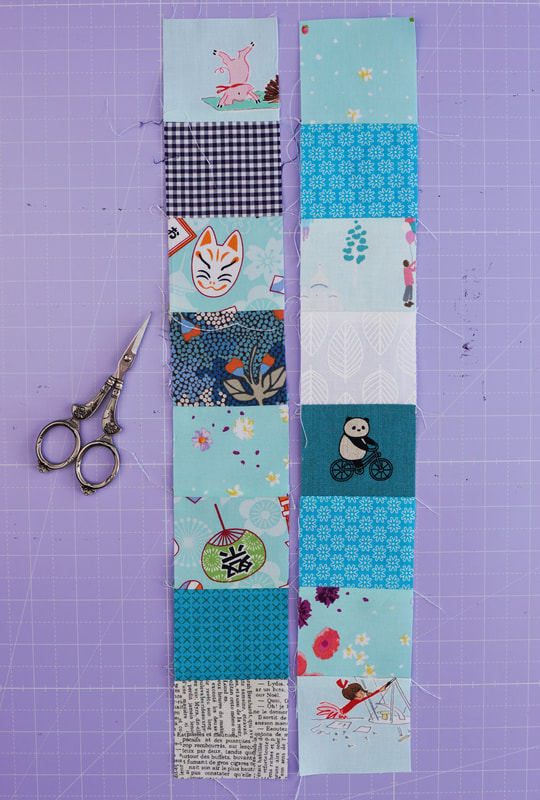
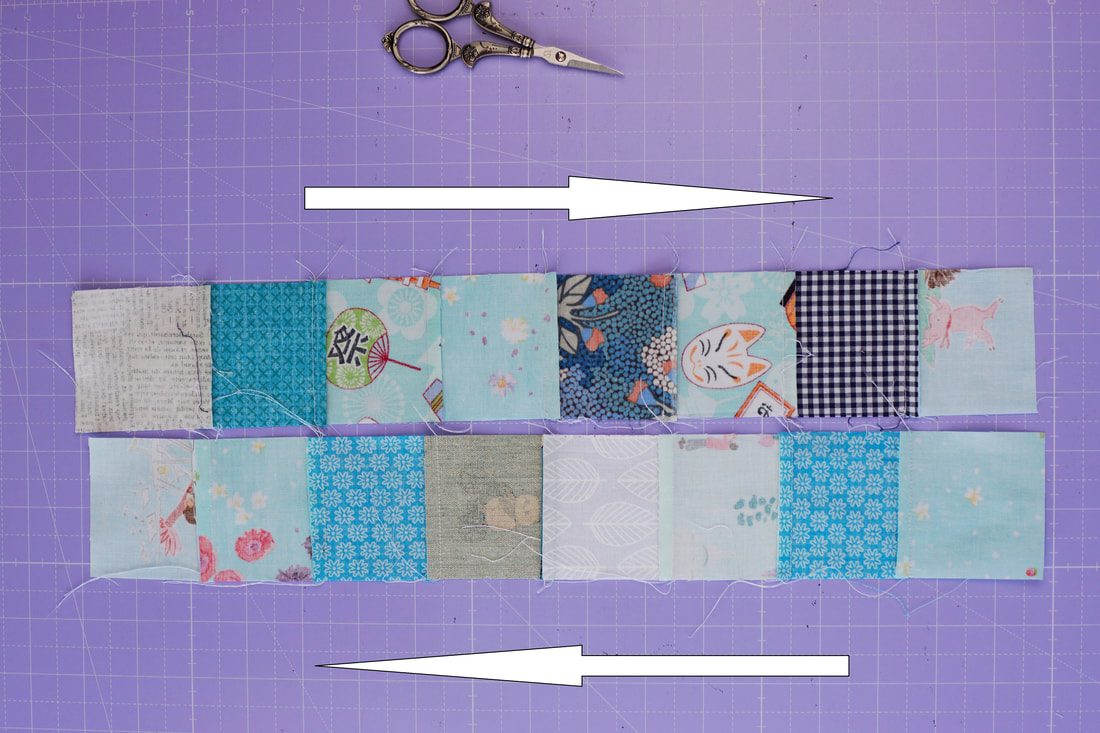
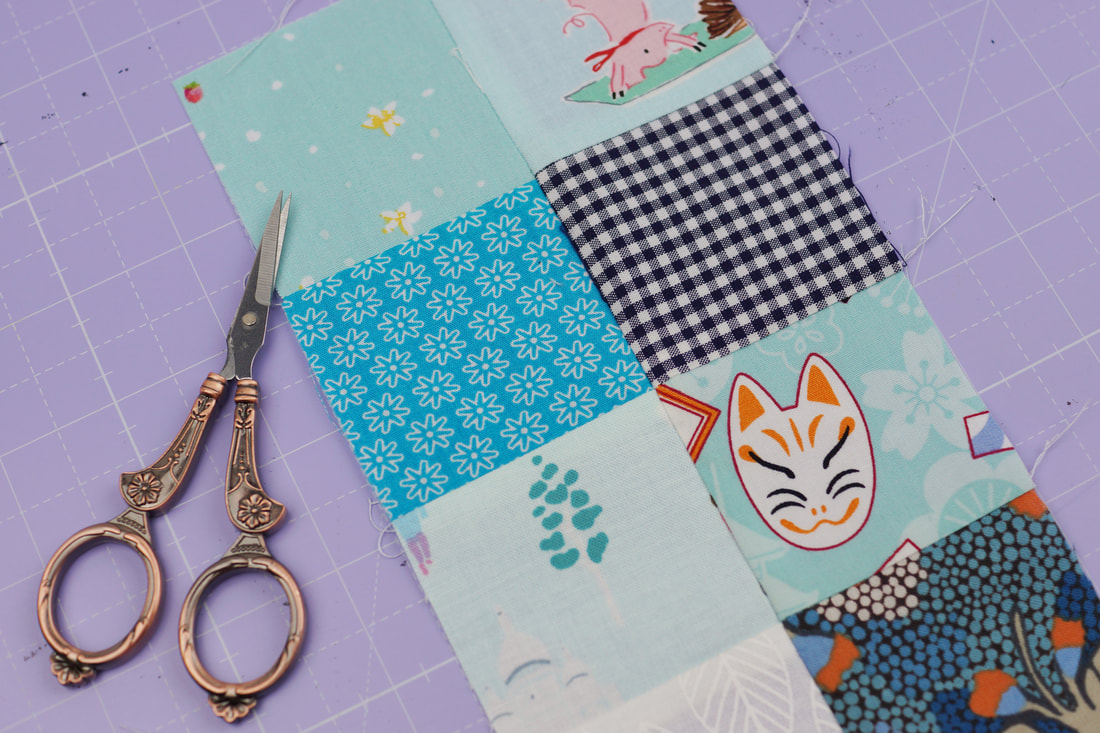
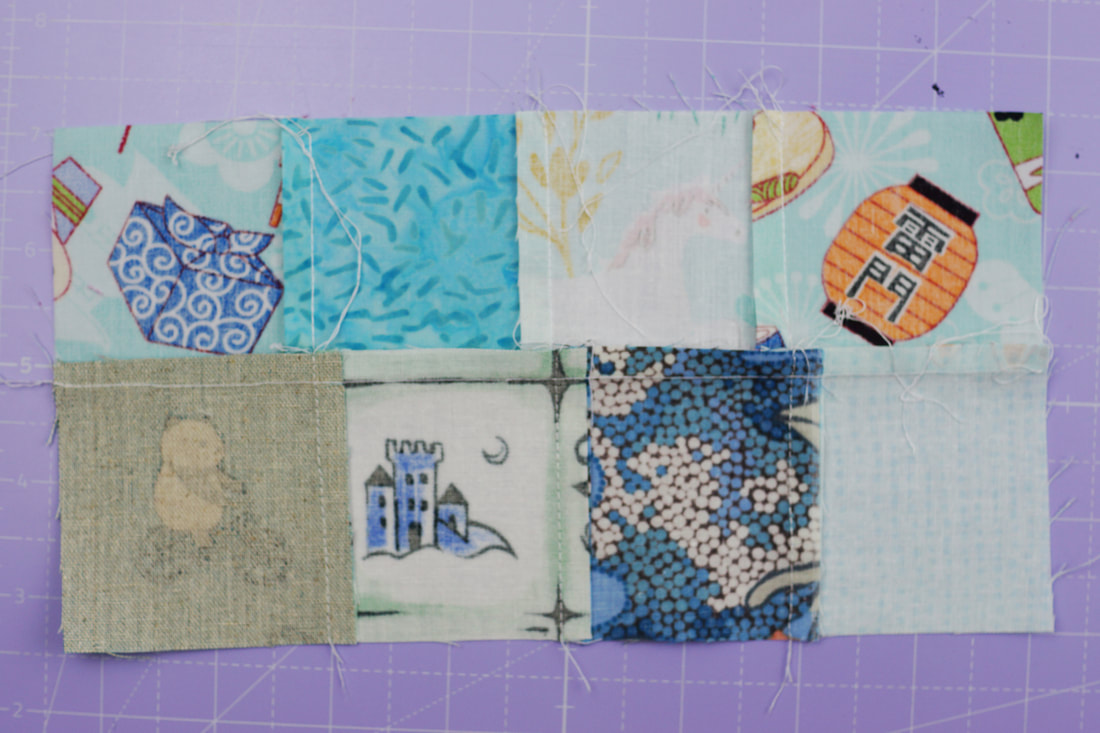
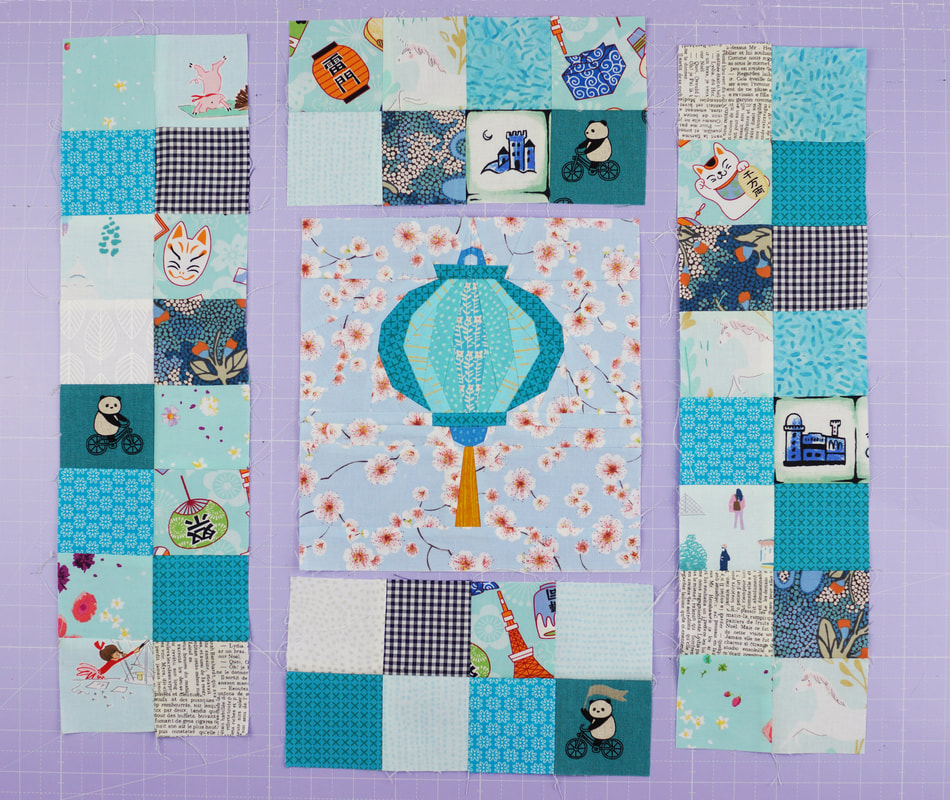
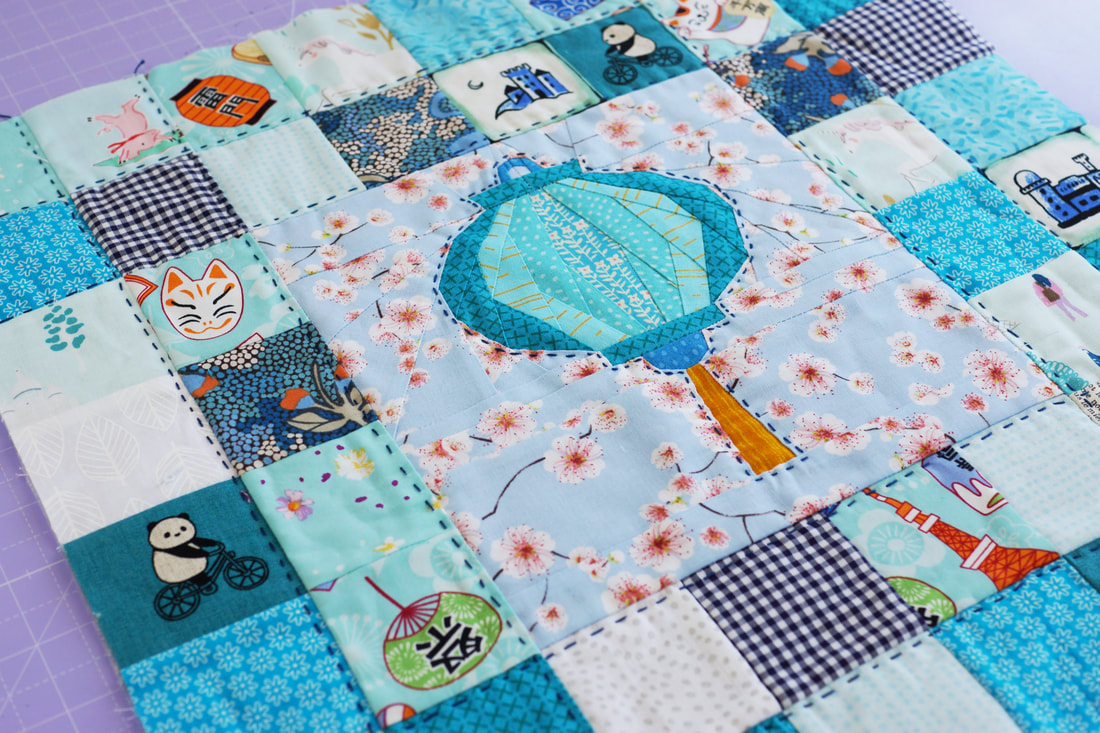
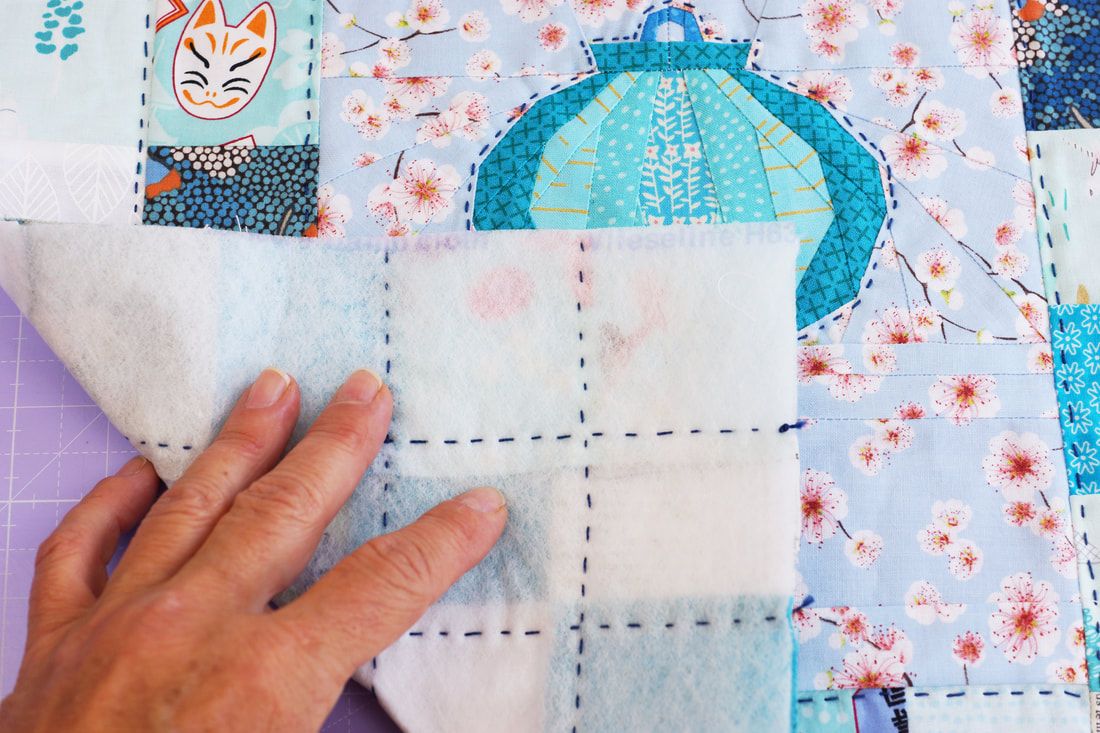
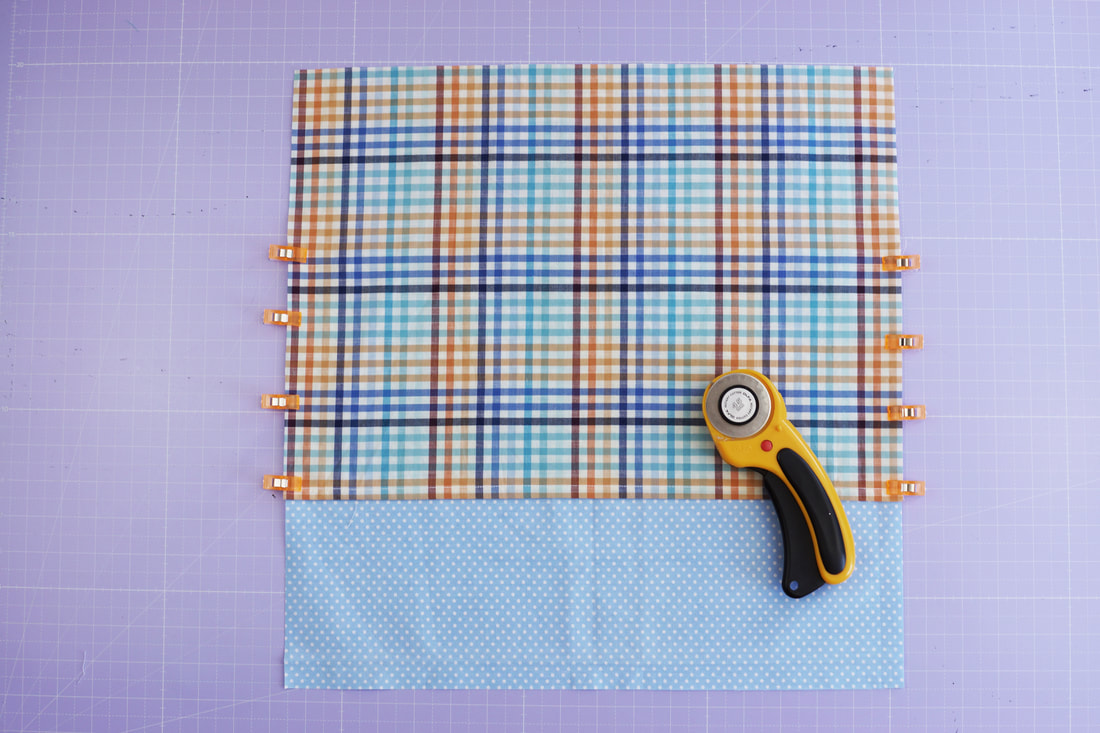
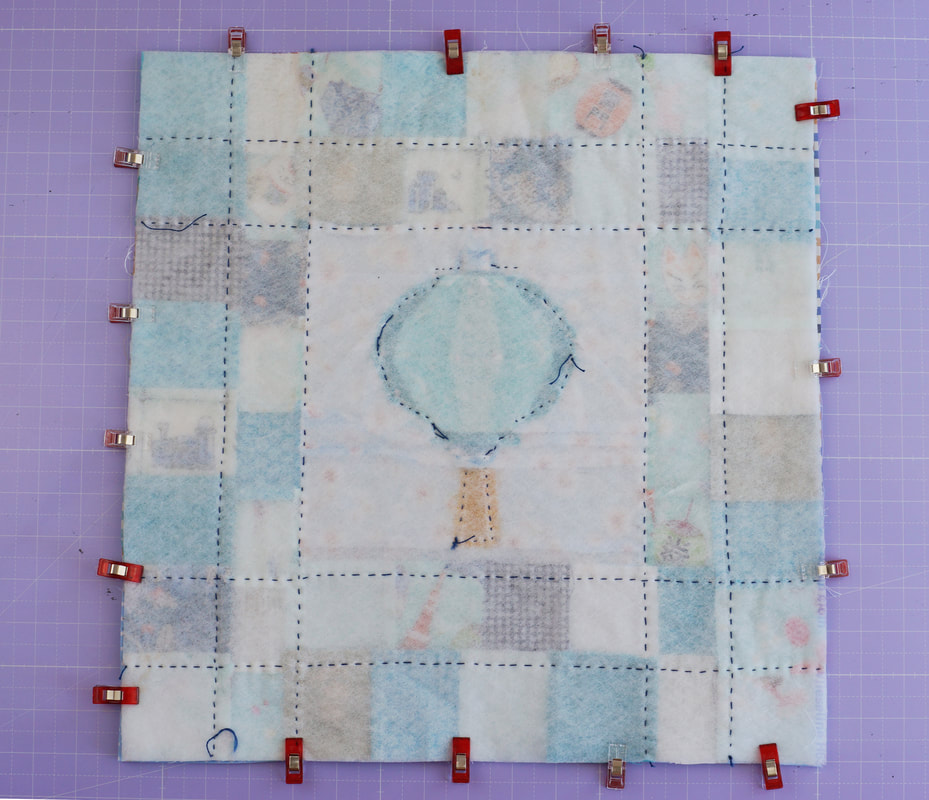
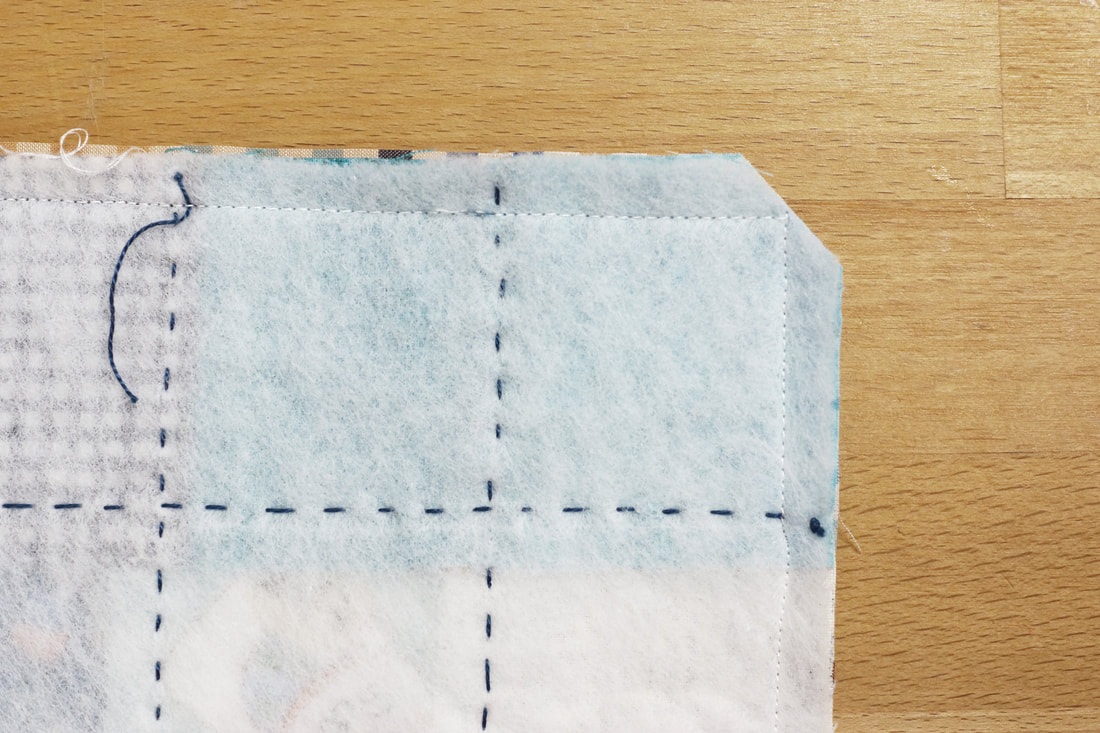
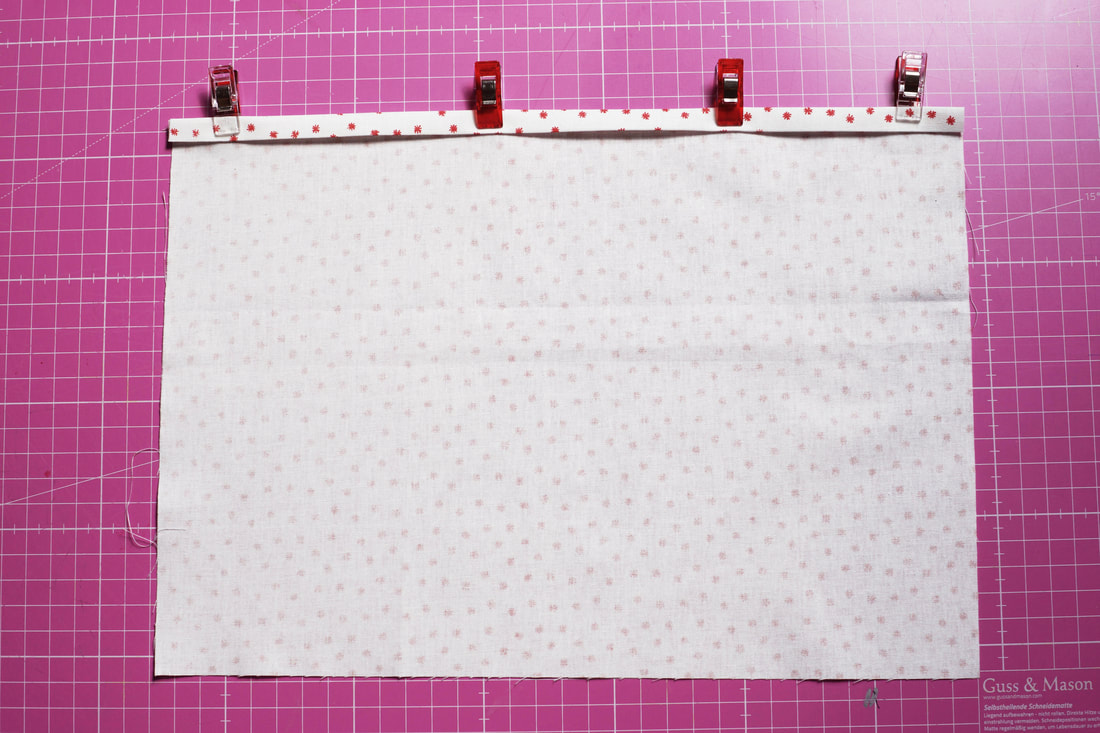
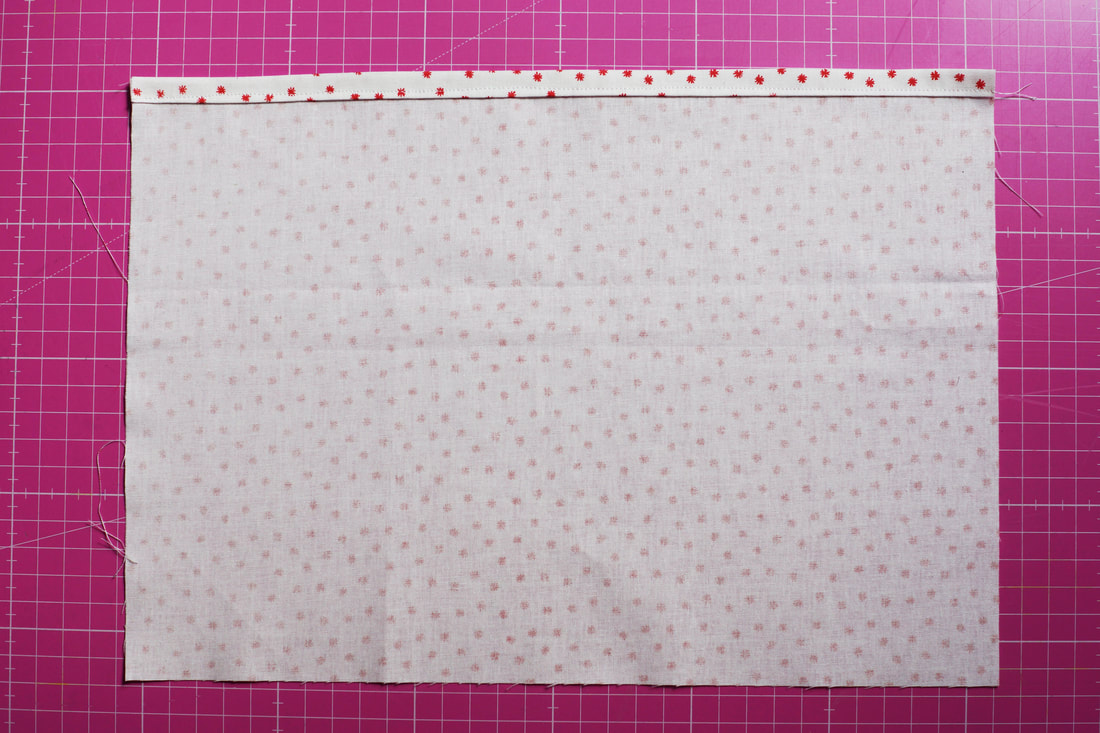
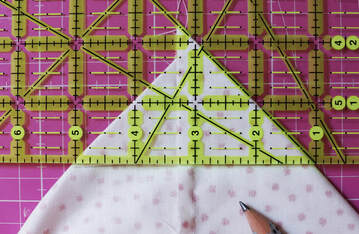
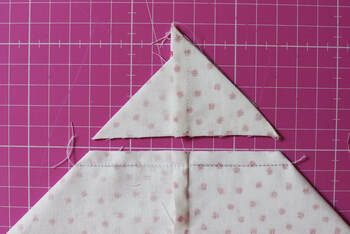
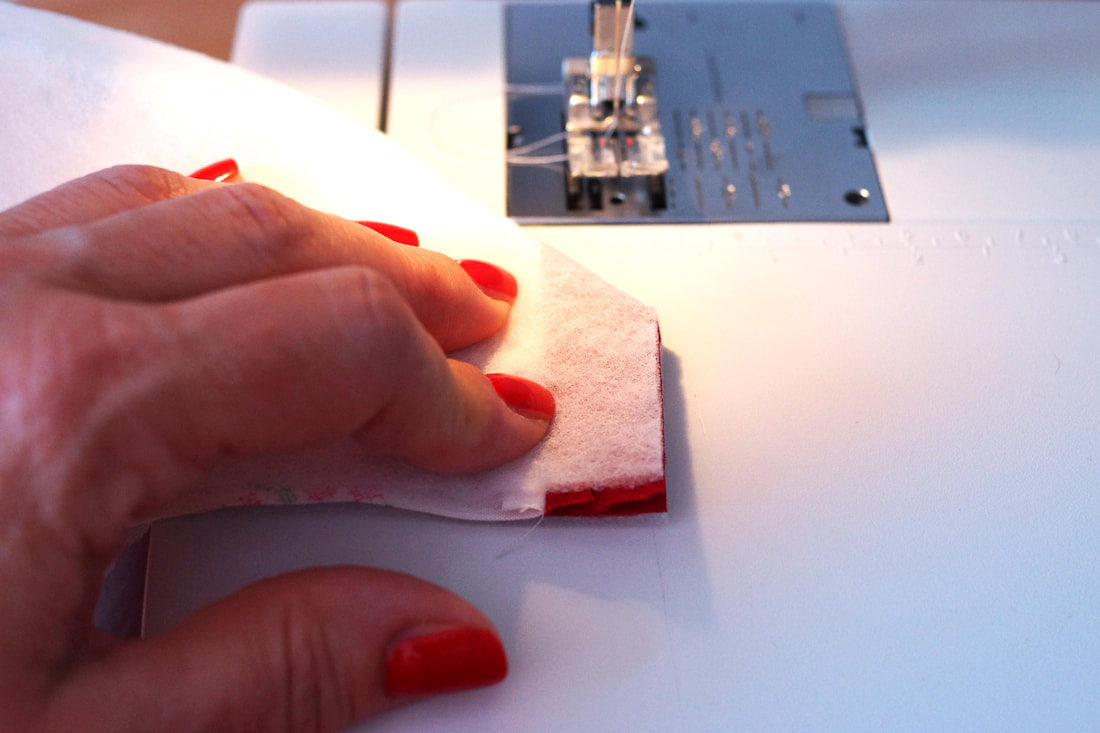
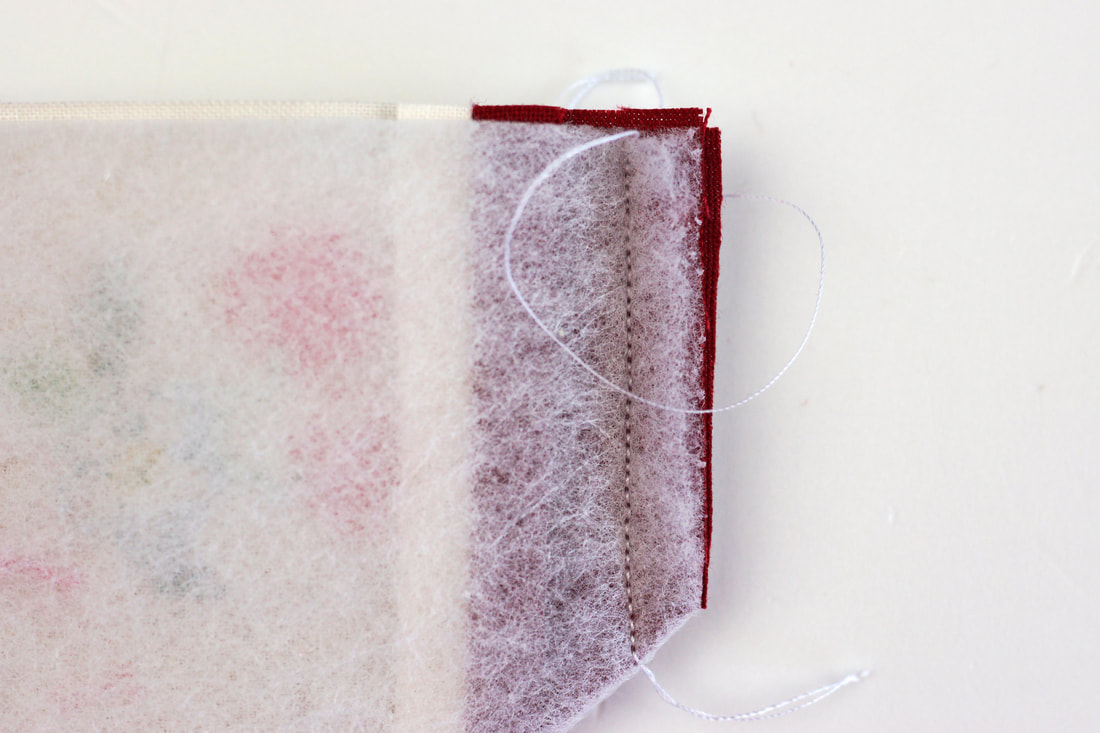
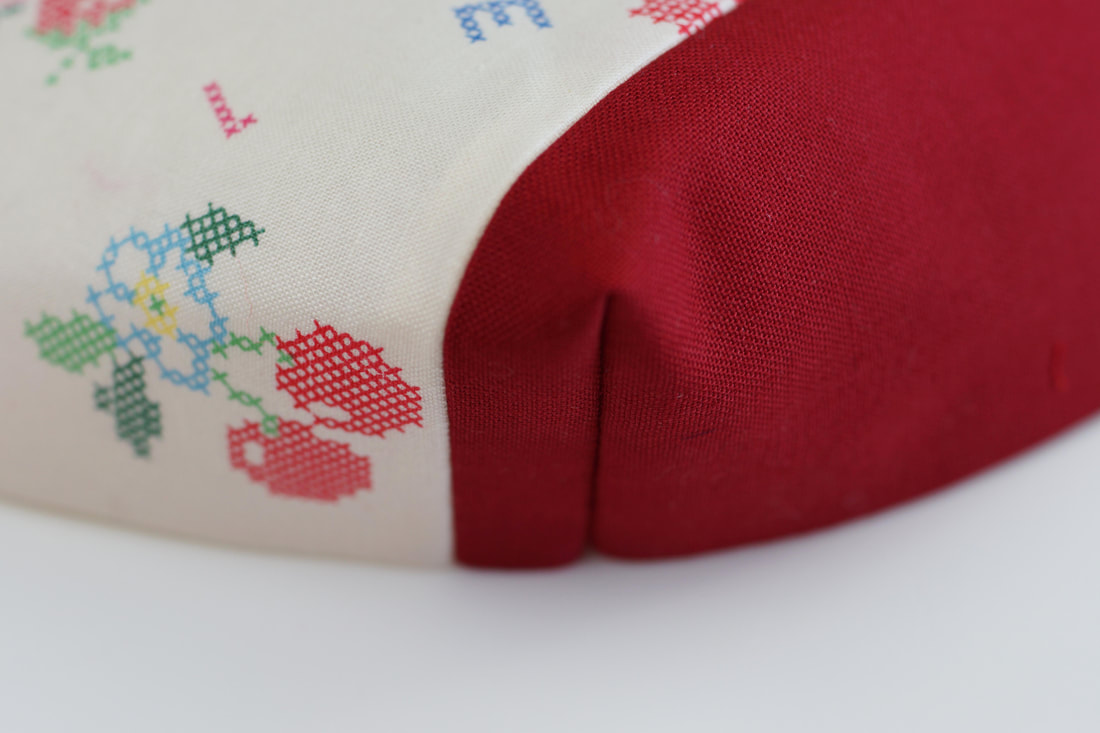
1> Place your squares around your quilt block the way you feel they will look good ( photo 1) This is a fab way to use up your fabric scraps and do some cute fussy cutting. Then sew together those squares. 2> I usually sew them into strips first and then join the strips.( photo 2 ) 3> Your can either seperate your seam allowances and press them each seperatly, or press the seam allowances in opposite directions before joining your fabric square strips. This is really easy and quick. (photo 3) You press one strip in one direction and the other in the opposite direction, this will help with nesting your seams and having accurate corners and matching points. 4> Nesting your seams is the easyest way to get accurate matching seams. if you pressed your seam allowances into opposite directions, this is quite easy. The seams sort of fit together automatically ( photo 4) 5> Sew the fabric strips together into four blocks . 16 x 2" squares sewn into two blocks to the left and to the right of the FPP quilt block. And 8 x 2" squares sewn into two blocks to the top and bottom of the paper lantern quilt block. 6> Join the 2" squares blocks with the foundation paper piecing quilt block. First attach the top and bottom 8 x 2" blocks to the paper lantern quilt block . Then you add the side panels of 16 x 2" squares to either side of the FPP quilt block. Press the seam allowances and iron on the fusable batting. Now is the perfect time to do some hand quilting if you want. You could also quilt some straight lines with your sewing machine, or machine quilt the entire pillowcase top. This is how I hand quilted this top, some 'straightish' lines and just one line of stitching around the paper lantern. 7> To make the back of the pillow, place one of the 13"x 17" fabric rectangles wrong side up, fold over the long edge ½” twice, press, clip and stitch in place. Repeat this to make the second one. Align the backing pieces, right sides up and raw edges aligned. The hemmed edges should overlap aprox 6". Trim to 16 1/2 " x 16 1/2" same size as pillowcase top. Clip the backing in place and machine baste ⅛″ from the edge on both sides. Have I mentioned, I like to recycle fabric? There are soo many beautiful fabrics out there and they do not belong in the garbage. Especially cotton woven fabrics such as shirts, sheets, douvet covers etc. My husband used to work in the fashion industry as well and still has tons of awesome shirts that are of great quality, so I use them as backings or linings for all sorts of sewing projects. ( here as well) 8> To finish the pillowcase place front and back right sides together and stitch these two together along the outer edges. Cut off the corners as shown in Photo 3 at a 45° angle. this gives you nice and crisp corners for your pillow. Turn inside out and VOILA..... Here it is all done and pretty :-)
What do you think? Especially pretty with the quilted book cover right?
7 Comments
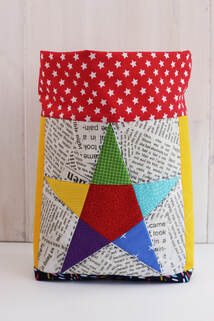
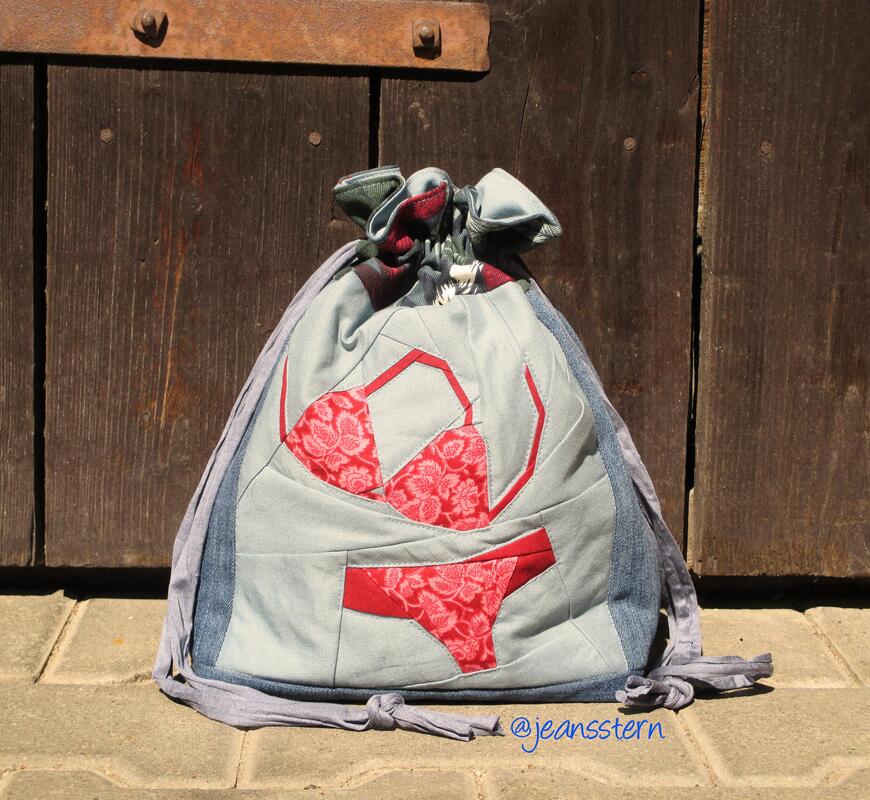
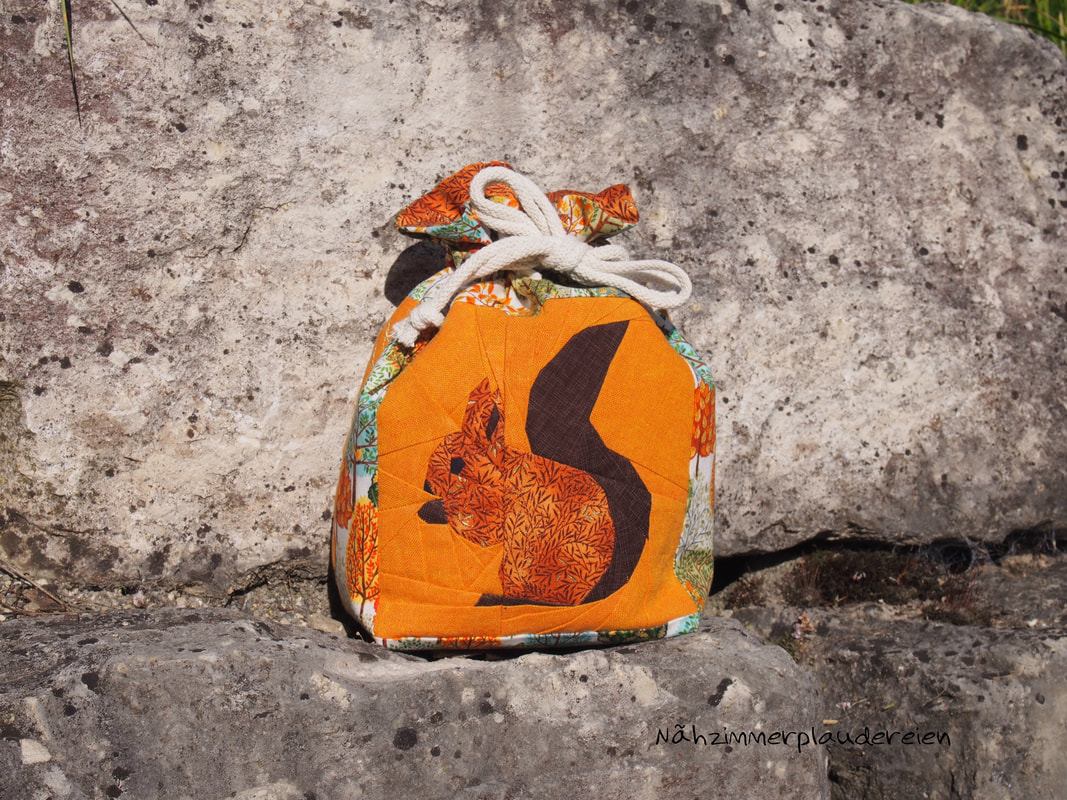
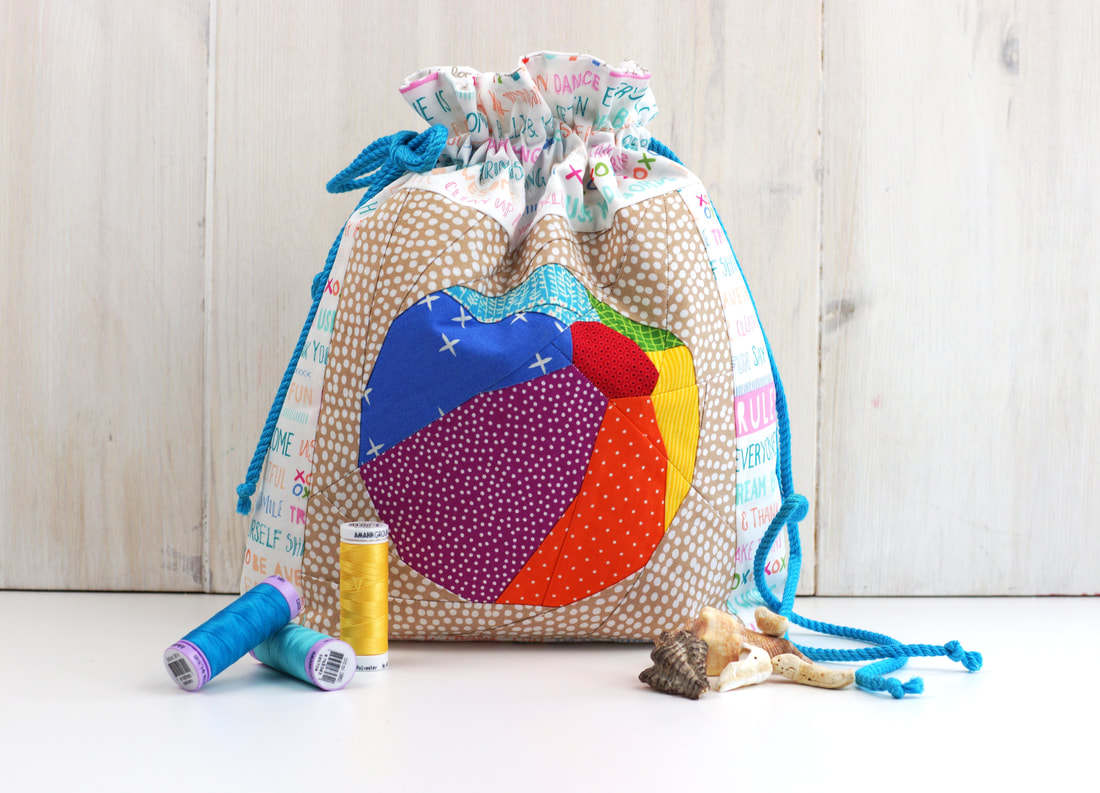
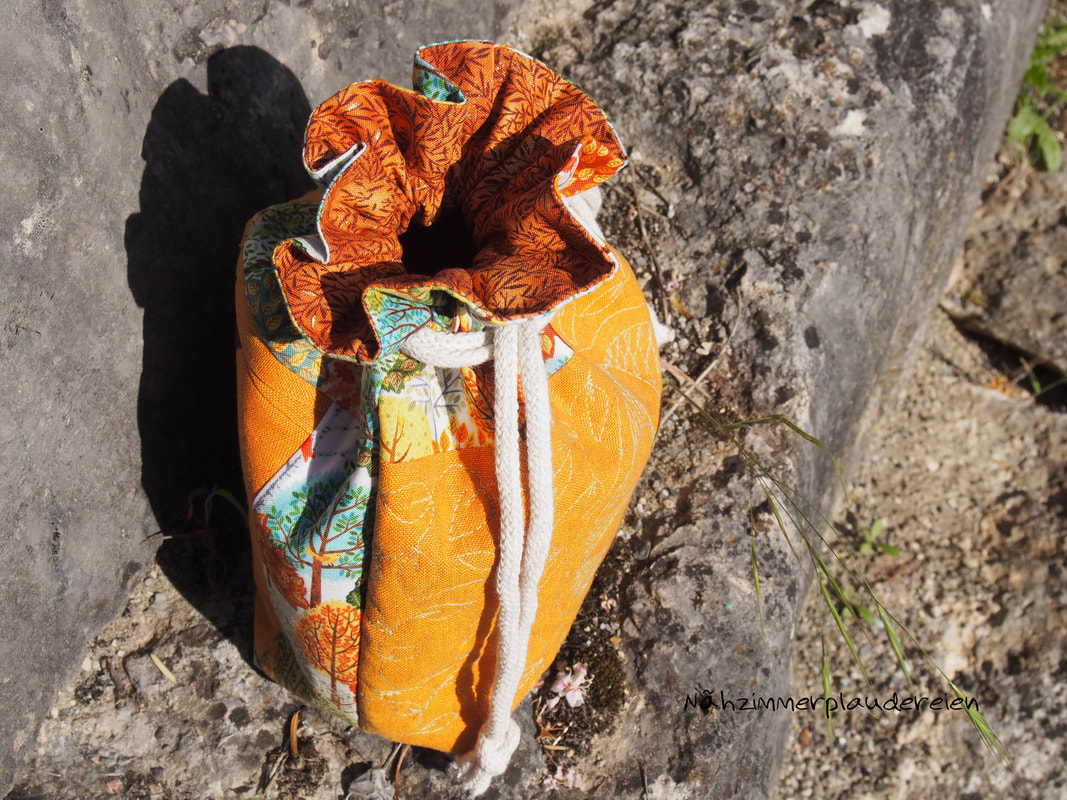
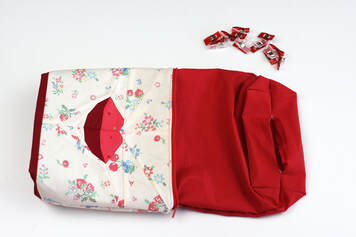
How to easily sew a simple, quilted drawstring bag with a paper pieced quilt block?
And there's a bonus: it's lined and with inside pockets. 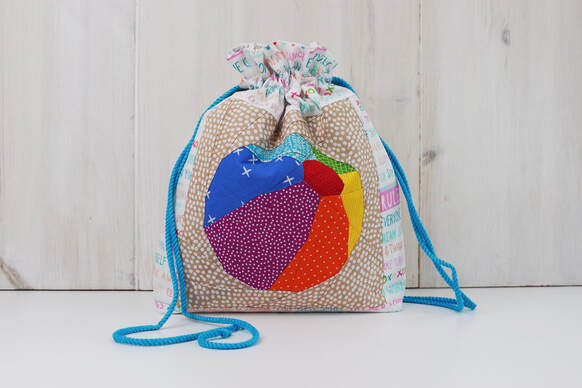
beachy summer drawstring bag
I mean seriously is there such a thing as too many drawstring bags?
I am sure we all agree ............ ABSOLUTLY NOT :-) You can use them for everything and everywhere. Use them for gifts or as storage, as a cute little decor, you name it. So let me show you how to sew a drawstring bag with any one of my quilt block patterns. 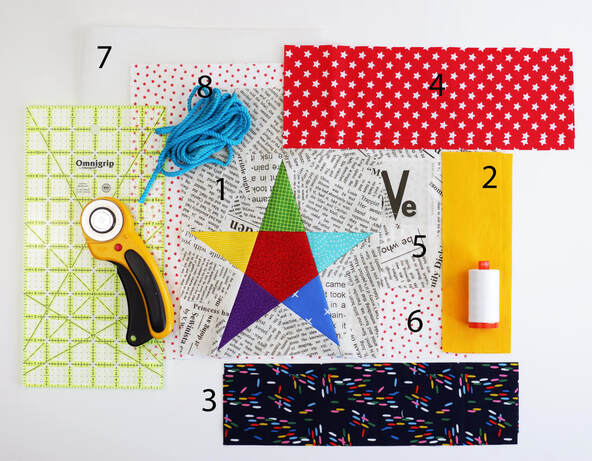
Fabrics and materials for a drawstring bag
Finished bag size : 9.5" wide, 11" high and 4" deep at the bottom
(Size small if you’re using a 6"x 6" quilt block: 7" wide, 8" high and 3" deep at bottom) Fabric/ Materials needed: (all measurements are width x height) > 1 1 FPP quilt block 8.5" x 8.5" (beach ball) (6.5"x 6.5") > 2 2 strips of fabric on each side of the FPP block 2.5"x 8.5" (2 1/4"x 6.5") > 3 2 strips of fabric for bottom panel 12.5"x 3" (10"x 2.5") > 4 2 strips of fabric for top panel 12.5"x 4"(10"x 4") > 5. 1 piece of fabric for back 12.5"x 8.5" (10"x6.5") > 6 2 pieces of fabric for lining 12.5"x 14.5" (10"x11.5") > 7 Fusible interfacing 1 piece 12.5"x 22" (10"x 17") > 8 2 pieces of rope, ½" twill, or ½" fabric tie (I used blue rope) 40" each. (30") > Optional: Inside pocket 1 piece of fabric 12.5"x 10" (10"x 7.5") Before you start: Read through the instructions, thats always best so you get a feel of the sewing beforehand. Seam allowance is always ¼" unless mentioned otherwise. One more note: The quilt block sizes are 8"x 8" ( 6"x 6") finished, they are 8.5"x 8.5" ( 6.5"x 6.5") unfinished. 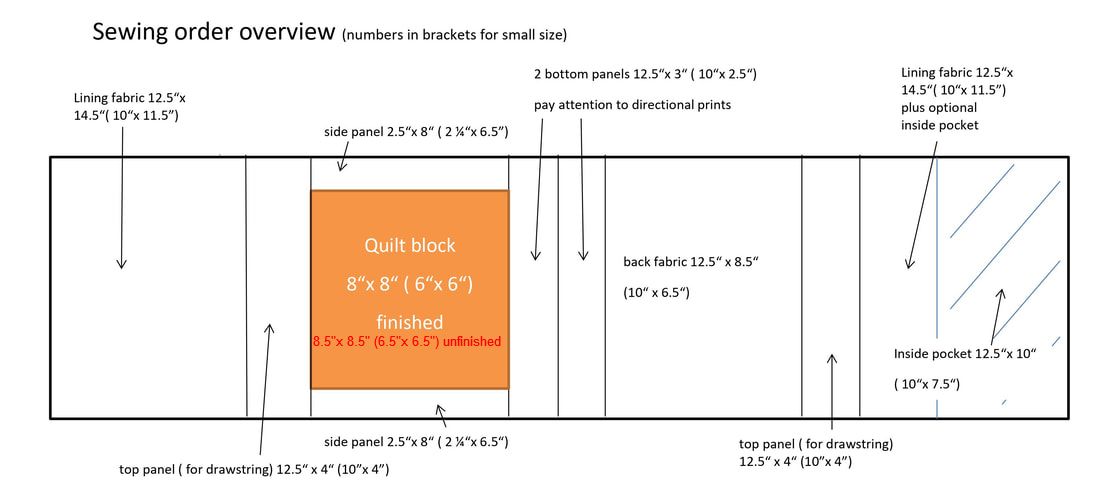
INSTRUCTIONS:
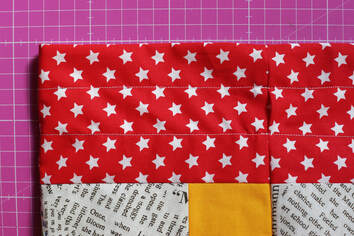
1. Lay out your pieces of fabric as shown in the chart above, and sew them together into one long piece. Start with sewing the two side strips (2.5"x 8.5") to the quilt block, then add the other pieces of fabric in the order above. Order from left to right: Lining, top panel, quilt block with 2 side panels, bottom panel, bottom panel, back (exterior), top panel and finally lining again. Press seam allowances open. 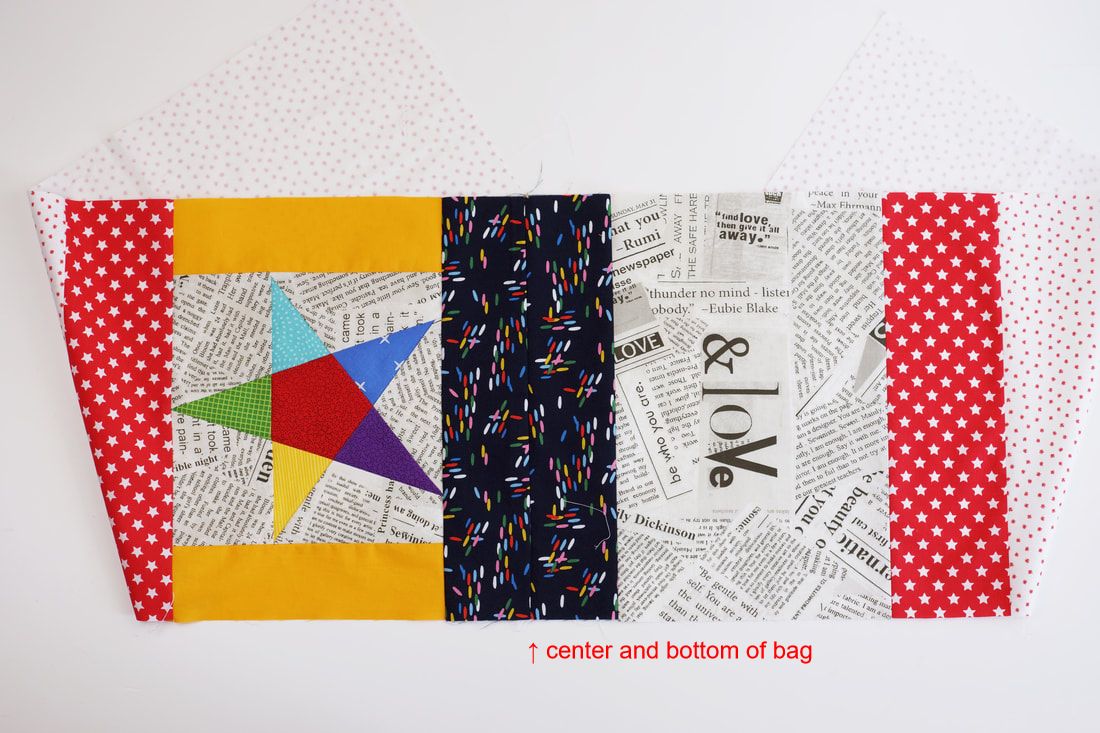
all the pieces sewn into one long strip of fabric
Here you see the whole long piece sewn together.
(I folded the lining pieces under for the photo.) Make sure you place directional prints with the 'top' of the print facing towards the top of the bag ,towards the drawsting- and lining pieces. The bottom of the drawstring bag is at the center of the bottom panels. 
fusable interfacing ironed onto the outer fabric of the bag
Interfacing gives your bag more structure and stand.
Iron on the fusable interfacing. Use interfacing only on the exterior main pieces. If you’re using it on the 4" drawstring panel, your drawstring might get caught in the material and it will not let you tie your bag as nicely. I measured the interfacing a little bit generous, so trim it down to where the drawstring panel starts. 
hand quilting the quilt block
Now you can quilt the front and/ or back outer fabric panel to your liking.
I would recommend to only quilt the paper pieced block and/ or the back fabric block. Not the bottom part or the drawstring panels. The bottom will have boxed corners anyways. And it’s best to leave the drawstring panel plain, as any stitching might interfere with the drawstring. I love hand quilting, so I decided to just stitch around the star. I will leave the back without Quilting, since the fabric with the letters is pretty busy as it is. But in general straight line machine quilting would look really nice on a less busy pattern. Plain lines, squares or diamonds always enhance solid fabrics.
If you’re adding an inside pocket fold over the 12.5" ( 10") side of the inside pocket
fabric ¾" twice and clip or pin in place. And sew along the clipped edge. 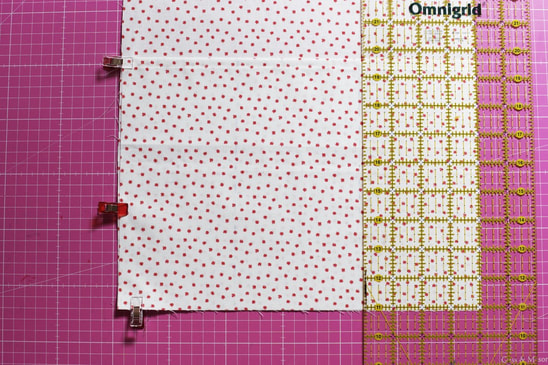
Place the pocket fabric panel onto the backside lining panel. Wrong side of pocket fabric
against right side of lining panel, matching the raw outside edges . Clip or pin in place. Draw two vertical lines 4"(3" for the small bag) from the outer edge with a water soluble pen or fabric marker. Then sew along those lines, backstitch at the beginning and at the end. These will be your three inside pockets. If you’d prefer two inside pockets, draw just one line in the middle and sew along that line. This gives you two inside pockets. 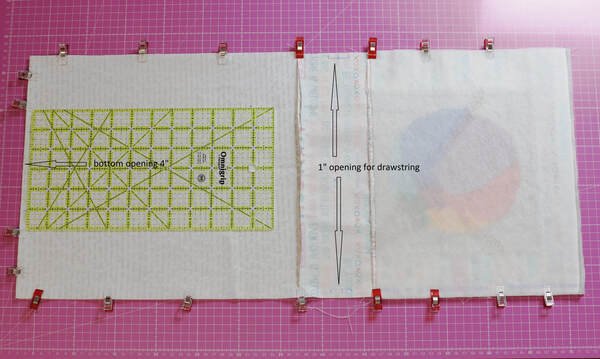
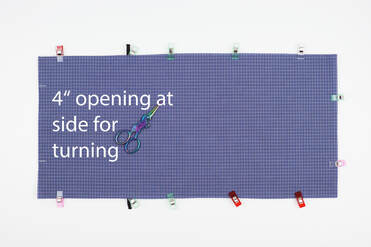
Fold your sewn strip in half, right sides together, matching the lining ends.
Clip or pin along the raw edges in place, matching up each seam and clipping or pinning the matched up seams. Leave a 4" space at the center of the bottom end of the lining, this is your opening for turning the bag later. 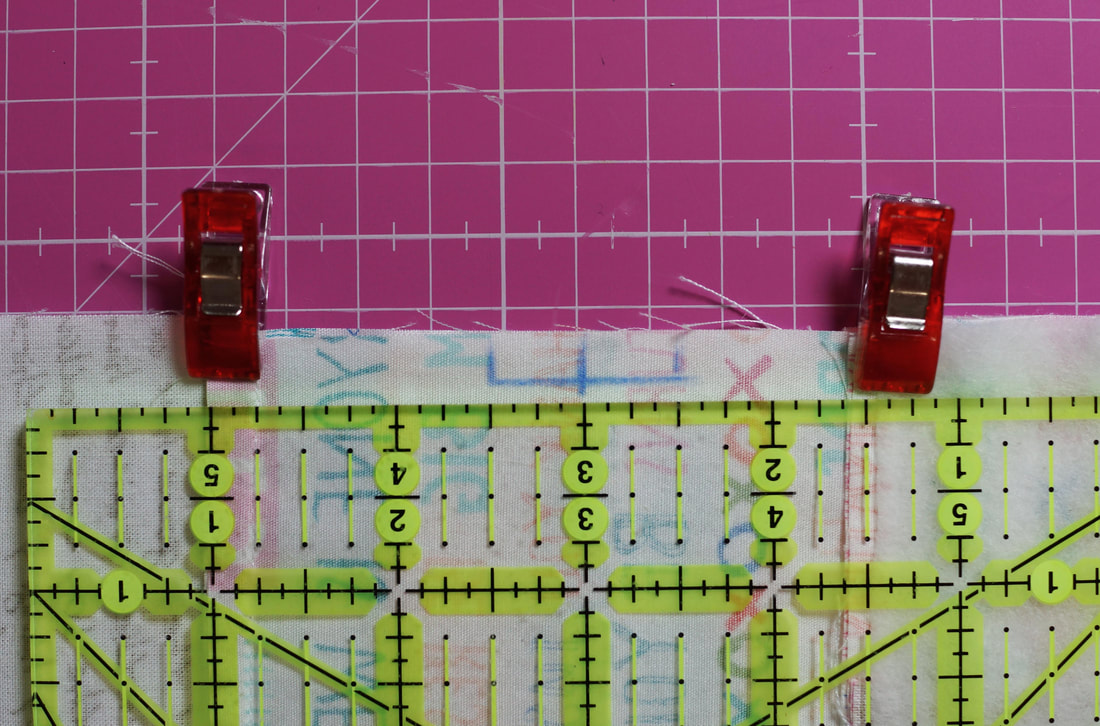
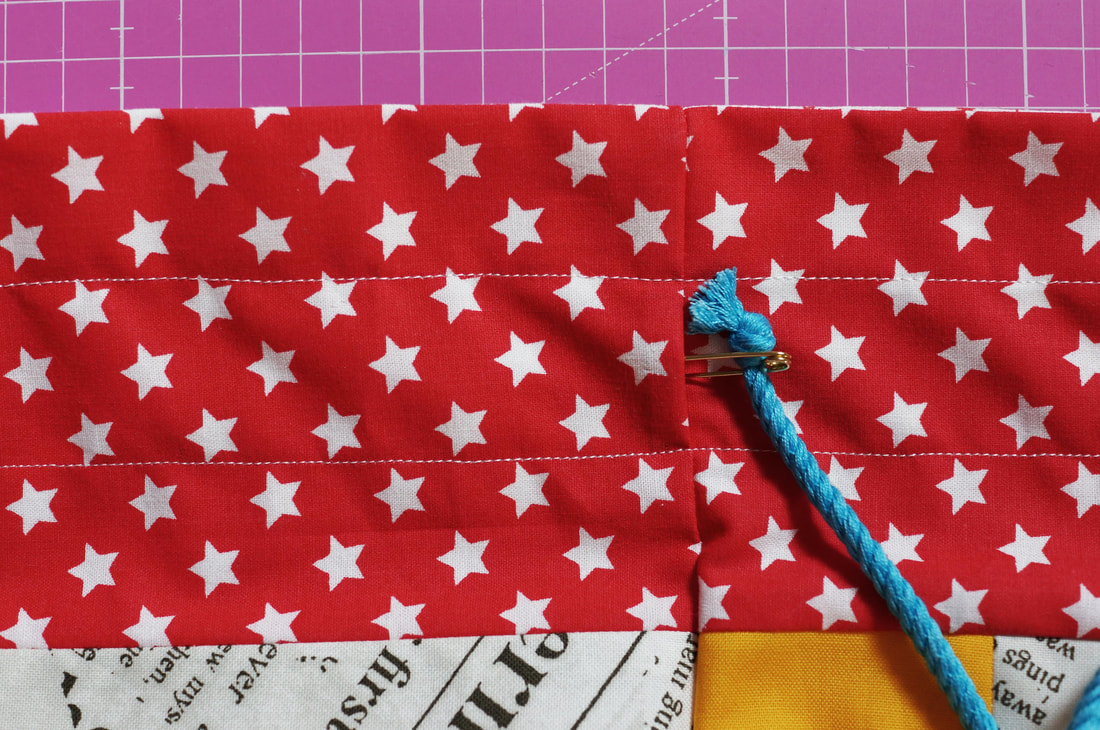
mark the center of the panel for the drawstring opening
On both sides, of the drawstring panel mark a 1" opening in the center of the panel.
First mark the center of the panel and then mark ½" to both sides. This gives you small 1" opening sections on both sides, these will be left unsewn, creating the opening for the drawstrings. Then sew along the three open sides. Do not sew between the 1" opening you marked on both sides or the drawstring panel or the 4" opening at the end of the lining pieces.
For a flat bottom of your bag, you need to box all four corners of the drawstring bag.
Two corners of the lining and two corners of the exterior fabric. Starting with flattening the corner, the seams, bottom seam and side seam should be on top of each other. Then measure 2" (1.5"for the small bag) from the top corner with an acrylic ruler and draw a line across with your fabric marker or a water soluble pen. Stitch along that line and trim off the corner, leaving a 1/4" seam allowance. (Repeat this for all four corners) 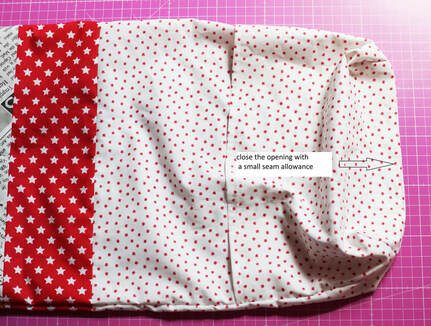
close the opening with a small seam allowance
Turn your bag by turning the pieces right sides out, pulling through the opening in the
lining. Push out the corners nicely. Press the lining opening under 1/4"and stitch closed with a small 1/8" seam allowance.
Fold the lining into the exterior of the bag. Press along the top edge.
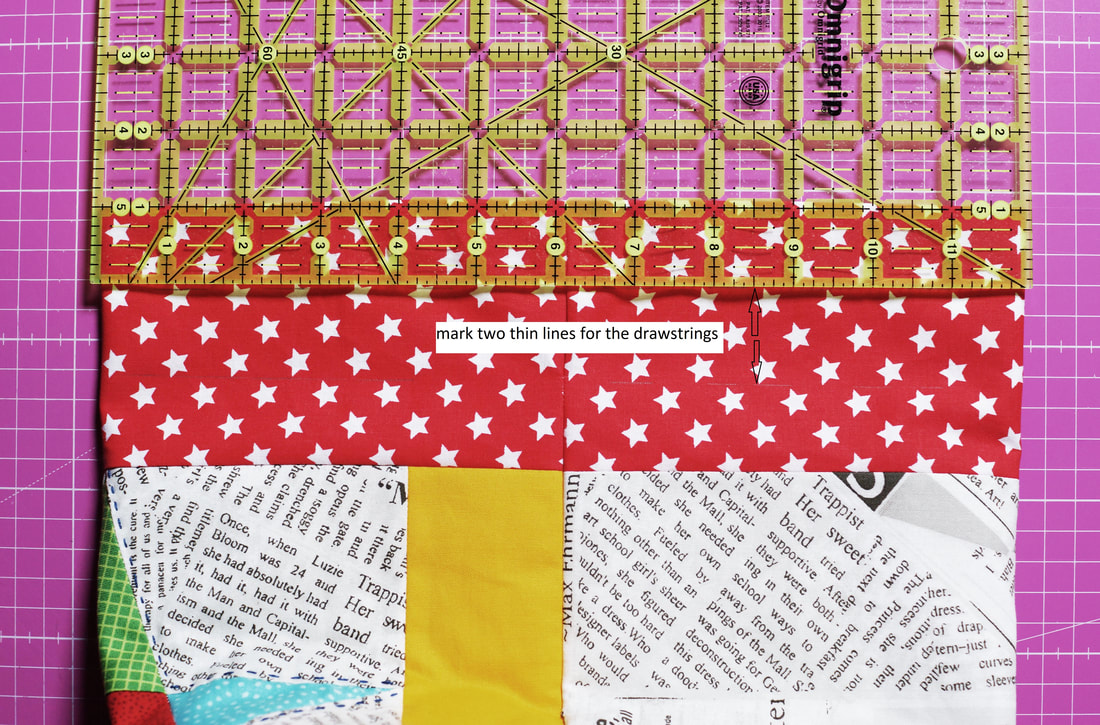
Mark two thin lines onto the drawstring panel with a fabric marker or a water soluble pen.
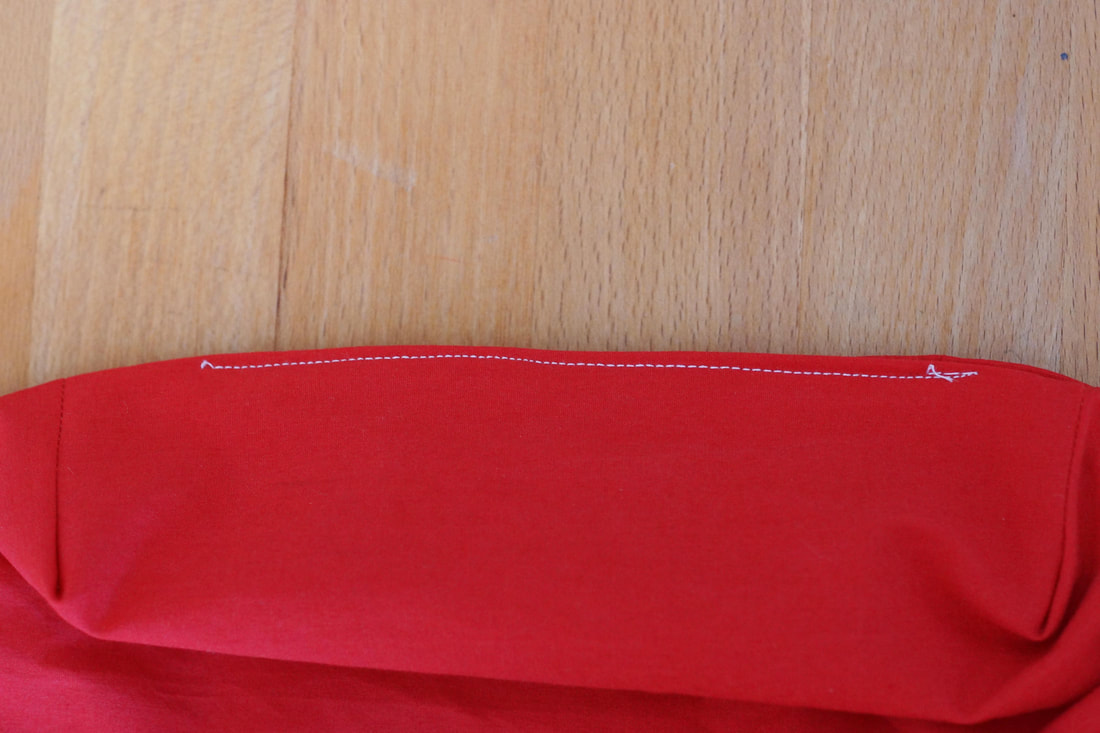
One line at the top of the 1" opening for the drawstrings, and a second line at the bottom of the 1" opening for the drawstings. Mark those line all the way around the top of the bag. This will be your drawstring casing. Sew along those two lines all the way around the bag.
Attach a safety pin to one end of your rope, ribbon or fabric tie.
Insert the safety pin into one of the side openings. Work it through, pulling it all the way back around the whole bag and out the opening where you started. Even out your the ends and tie them into knots seperatly or together. Repeat with the other tie, starting at the opposite side opening. 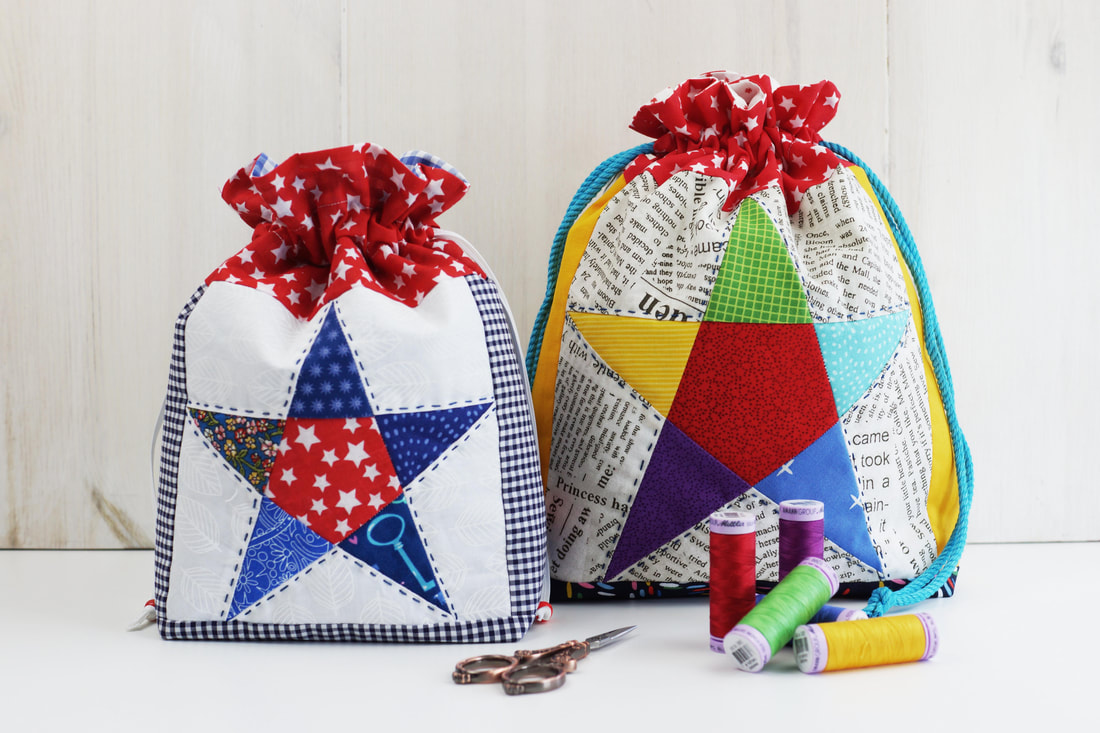
Aaaaaand YAAAAAY..... all done.

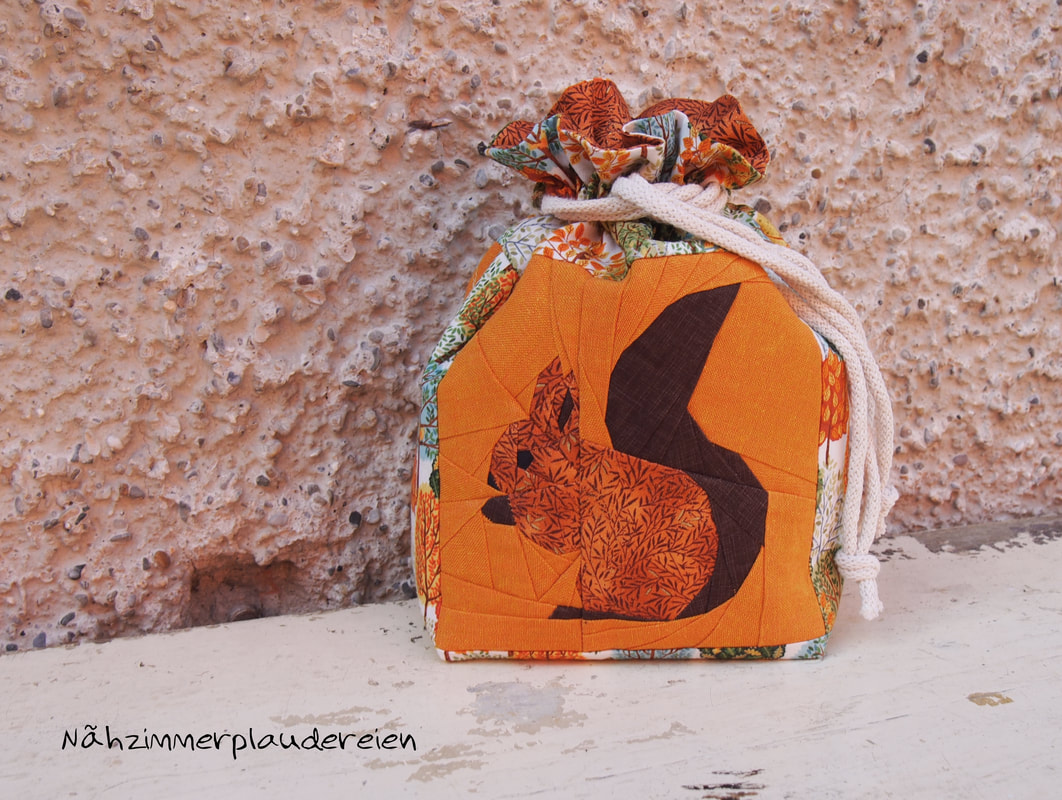
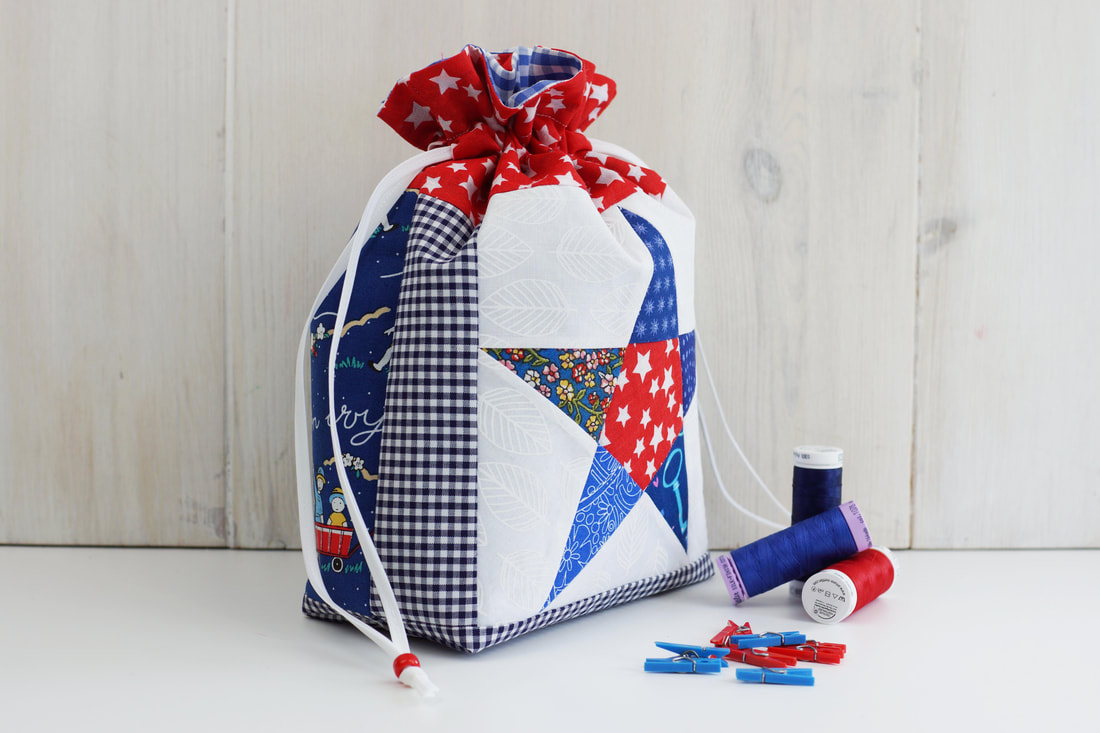
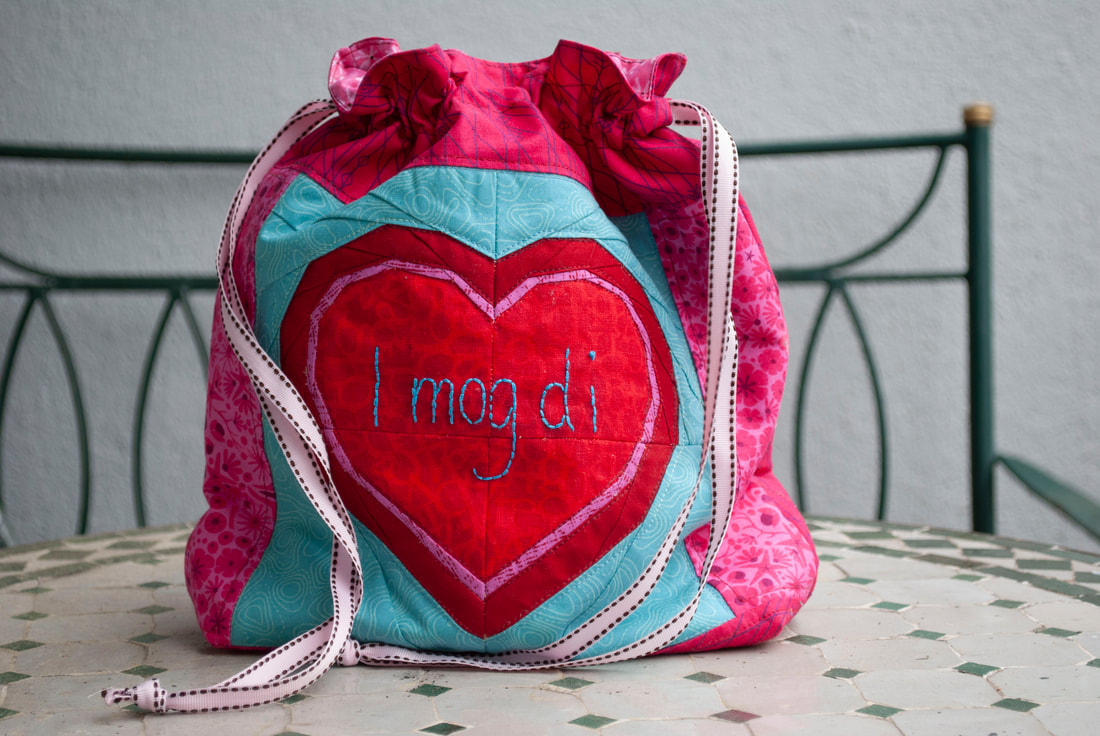
And here are some more inspirations on this bag, with all sorts of blocks from my small collection of quilt blocks ....
Share your makes on social media ... use #quilteddrawstringbag so I can cheer your creations, and if you want I can share them here on my blog. 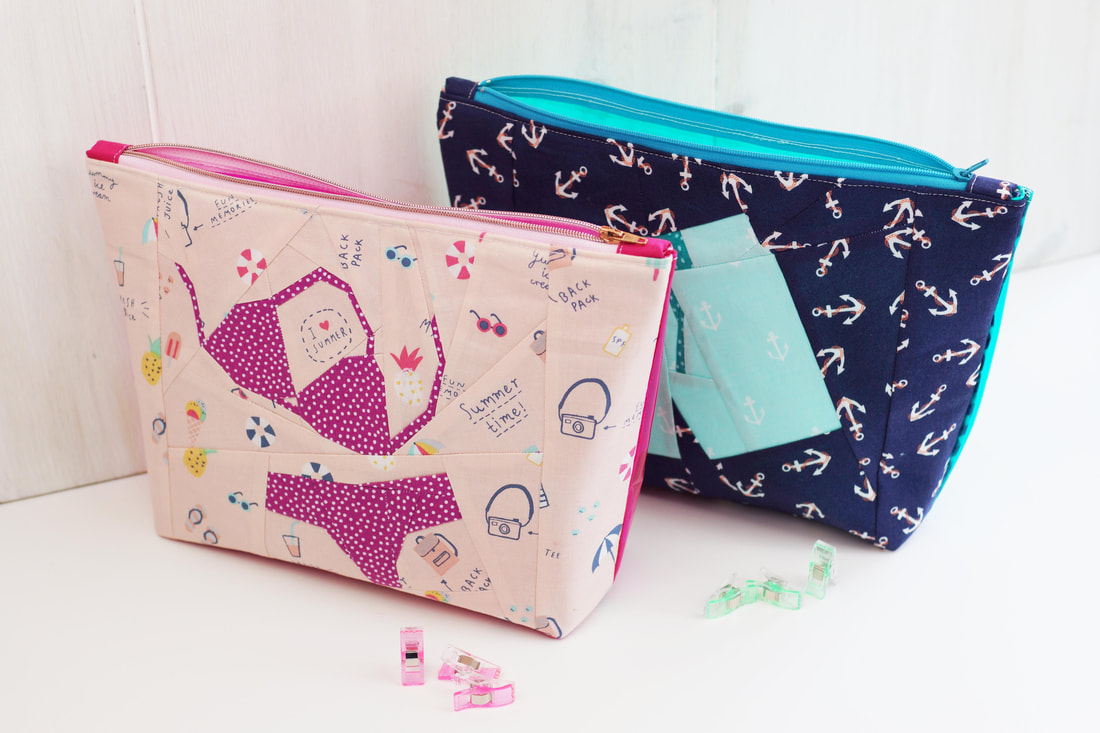
#twopiecepouch
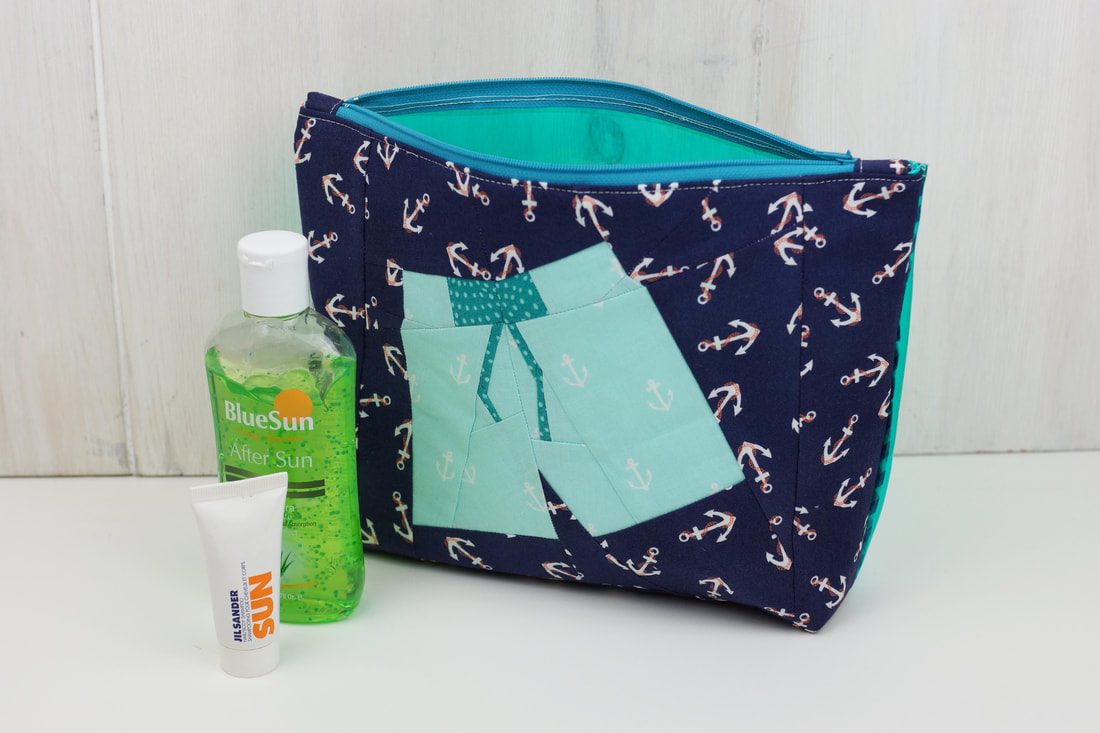
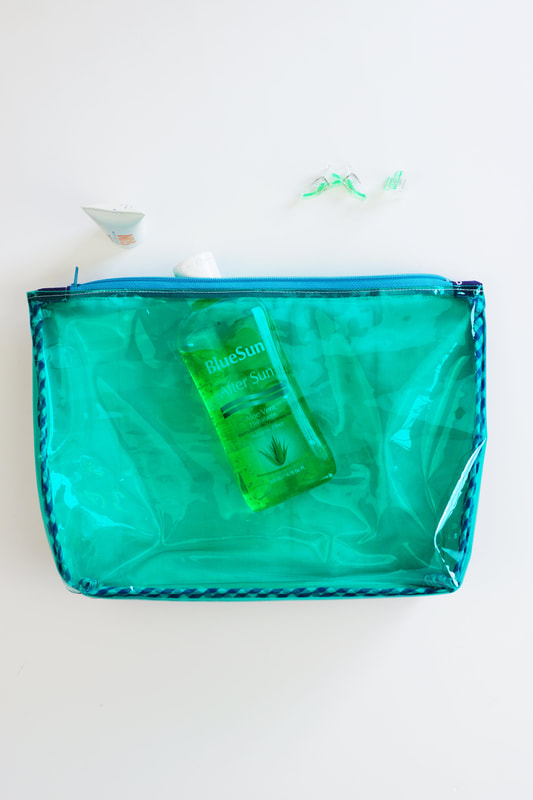
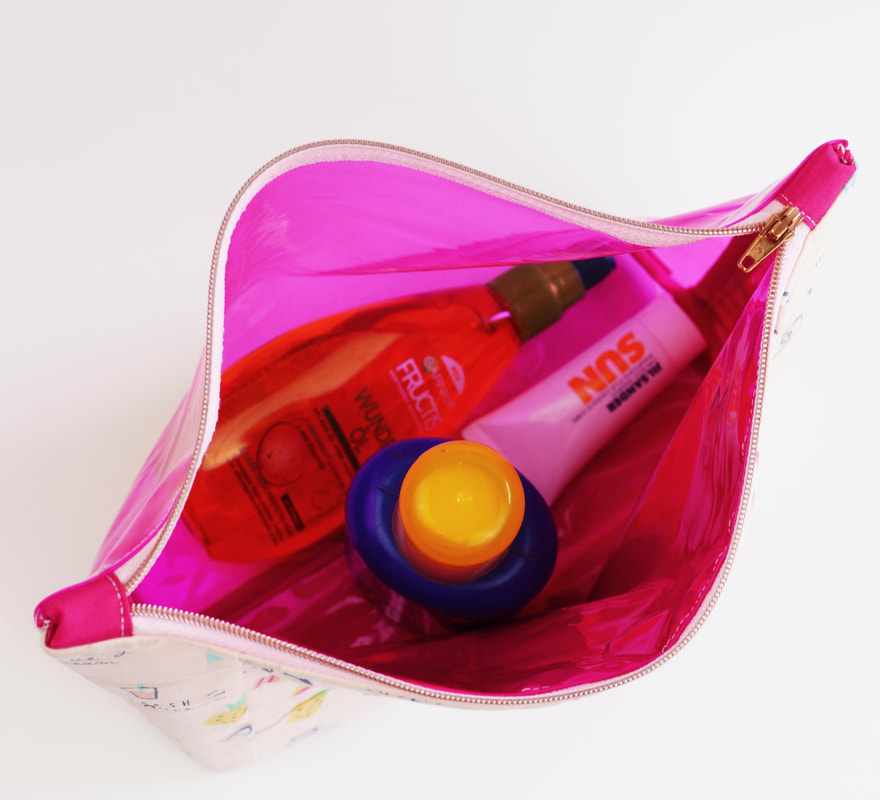
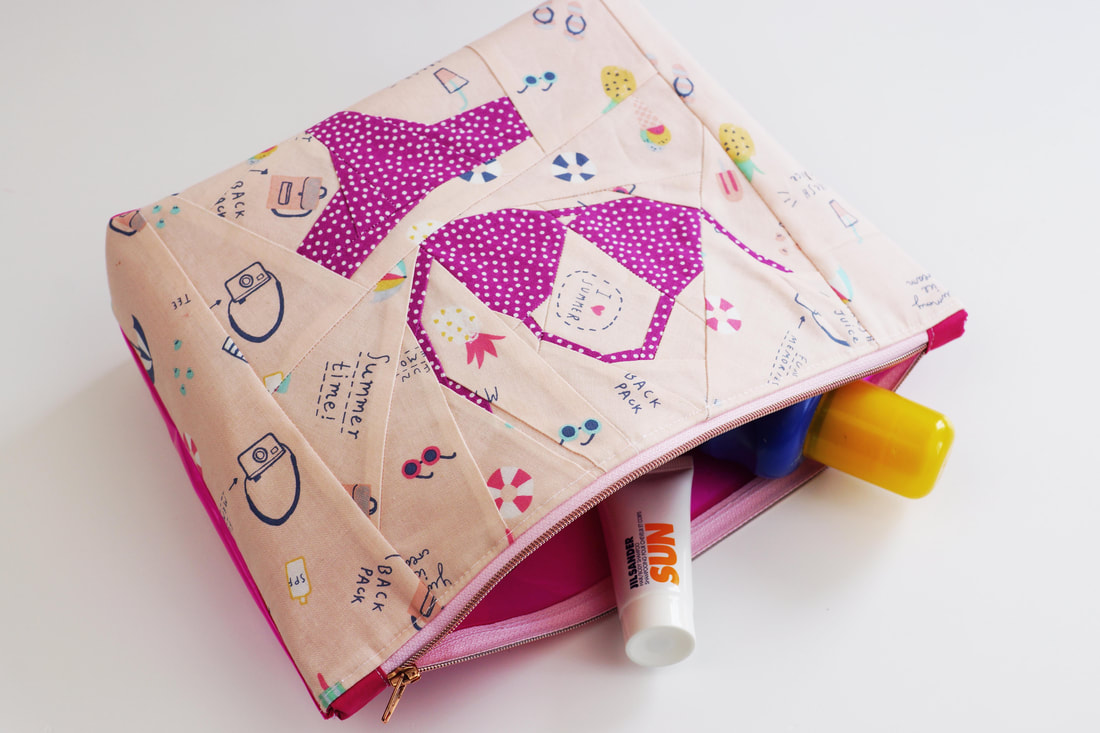
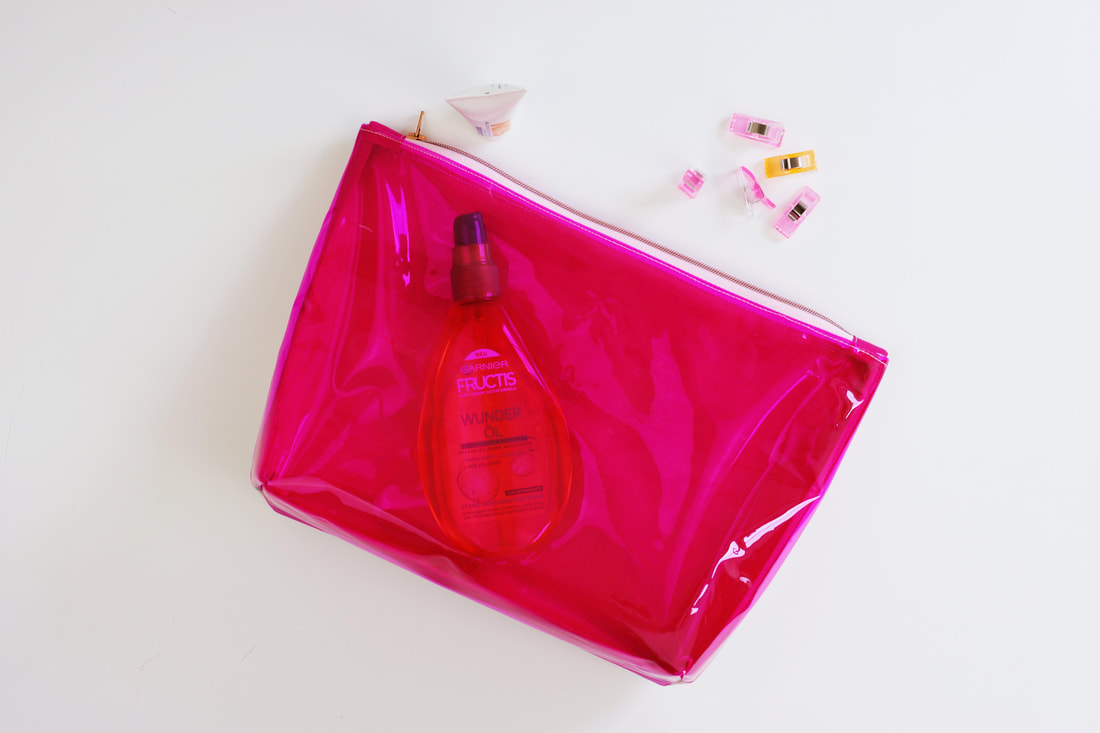
Sometimes connection happens in the most unexpected ways. This happened when I first saw Natalie Santini's profile on Instagram @sewhungryhippie you could even say it was love at first sight, literally. 'I believe we're all interconnected, to each other and to the Earth-more than we realize.'- this is Natalie's quote and she's 100% right. I love her quirky, fun and colorful sewing projects, photos, patterns and general approach to life. She has some fantastic items and projects in her shop, and the thing that really caught my attention are her fun and bright colored vinyls and patterns with them. So immediately there was a pattern idea that popped into my head and Natalie was on the same page right away. And we created the ' TWO PIECE POUCH' #twopiecepouch
a super practical and pretty wet bag for BIKINI/SWIMMSHORTS
This is a fab combination of foundation paper piecing and vinyl.
Natalie's fantastic way of sewing a beautiful pouch with vinyl and two of my summer, beach quilt block patterns make some useful and fantastic pouches. I am sure it happened to you as well, you spend all day at the beach, want to pack your things but all the swimsuits are still wet, so you wrap them in the towels. When you get home, the towels are moist, the pages of your book or magazines are wet and roll themselves. And to top it all off, one of you ( I'm not pointing fingers :-) forgot to close the lid of your sunscreen all the way, so it's spilled nicely all over your beach bag. 
Needless to say these problems will all be solved, when you store your wet bikini or shorts perfectly in this pretty vinyl pouch.
Your beach bag and all the rest of your stuff stays nice and dry, clean and safe. Plus you will be the hit at the pool or beach with this adorable #twopiecepouch. This pattern shows you step by step how to sew a vinyl pouch, as well as two unusual quilt blocks . The instructions are for two different quilt block sizes each, as well as two diffferent pouch sizes. The pouches don't have open vinyl seams, but awesome binding covered seams inside. 
awesome binding covered inside seams
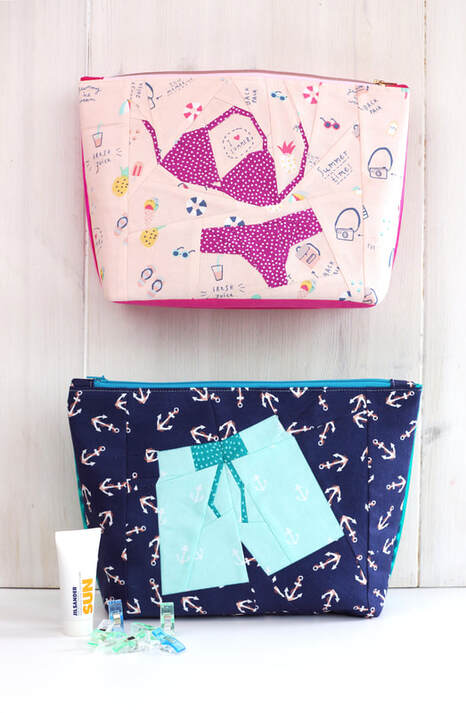
#twopiecepouch bikini and swimshorts
Get your sewing machine ready and make yourself some stunning
beach-bikini-swimmshorts wet bags. Shop the pattern here. And if you share them on social media why not use #twopiecepouch so we can cheer your makes :-) happy sewing Natalie and Ingrid xx 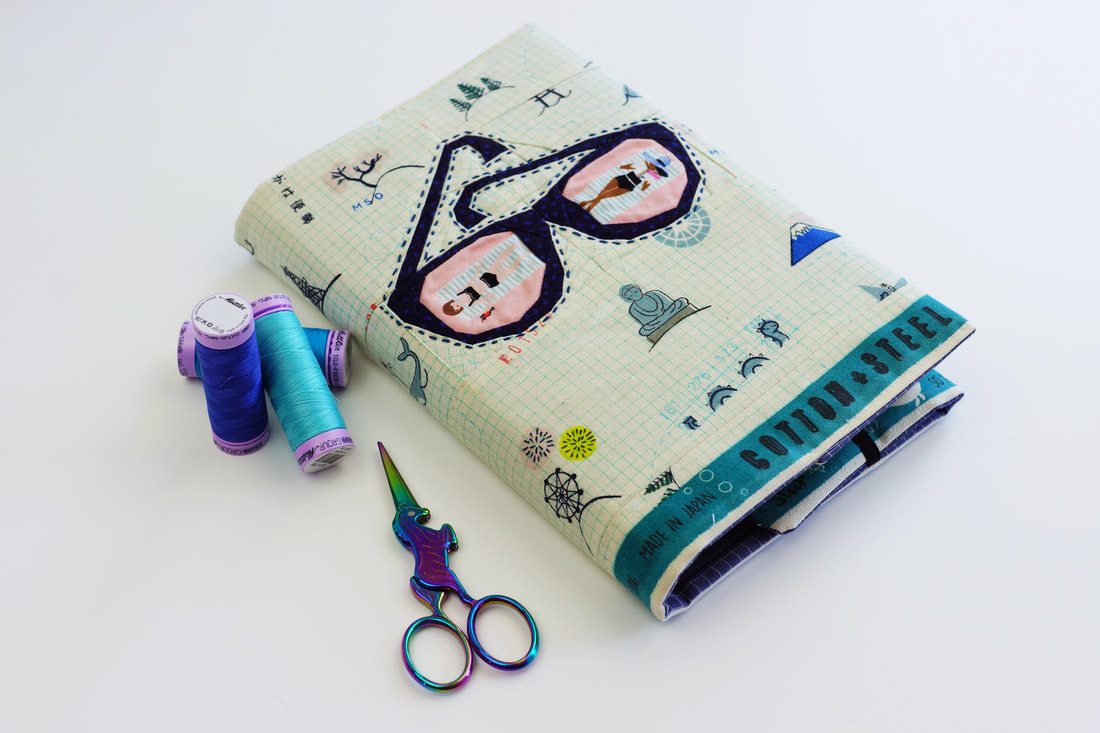
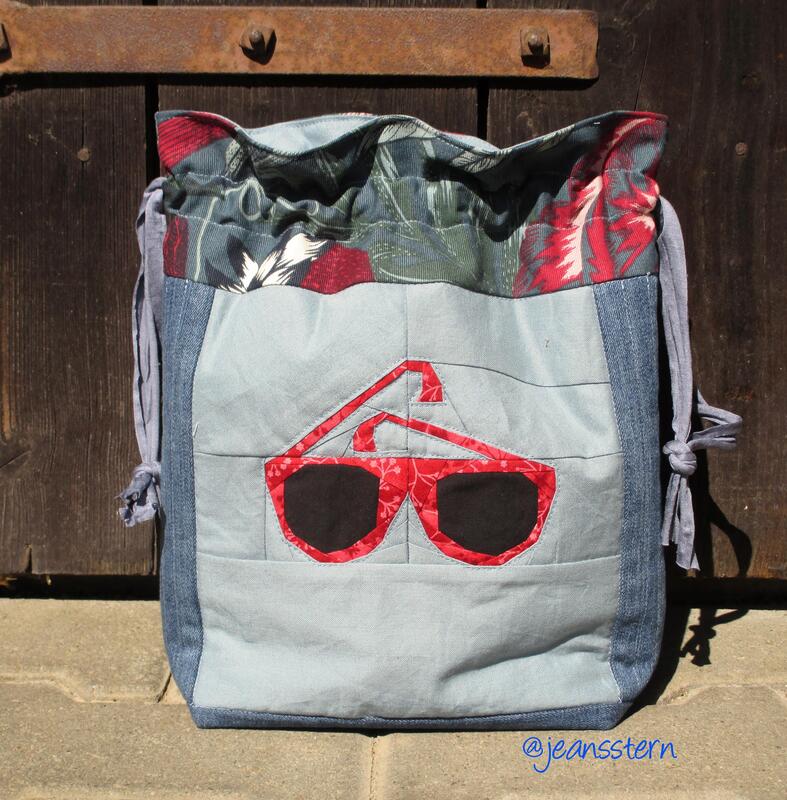
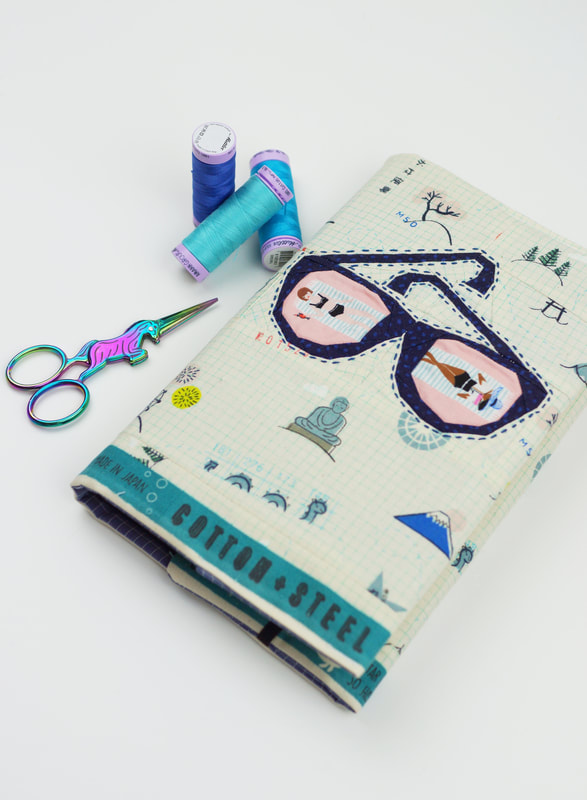
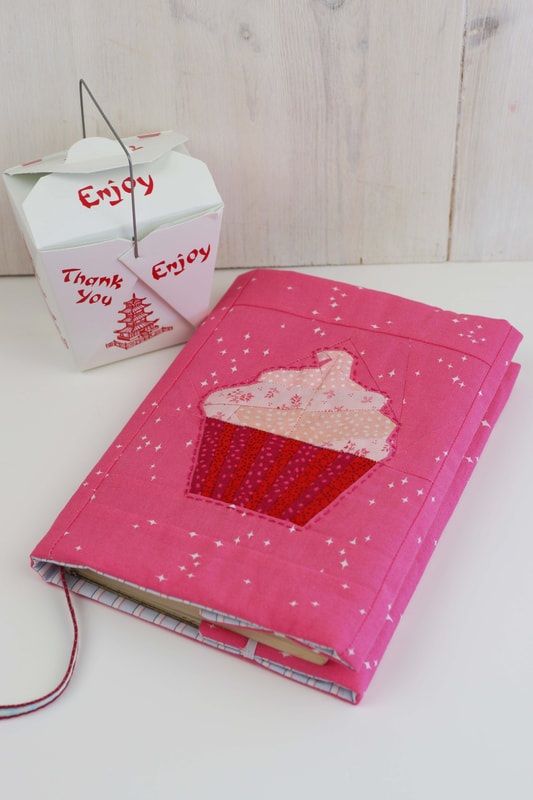
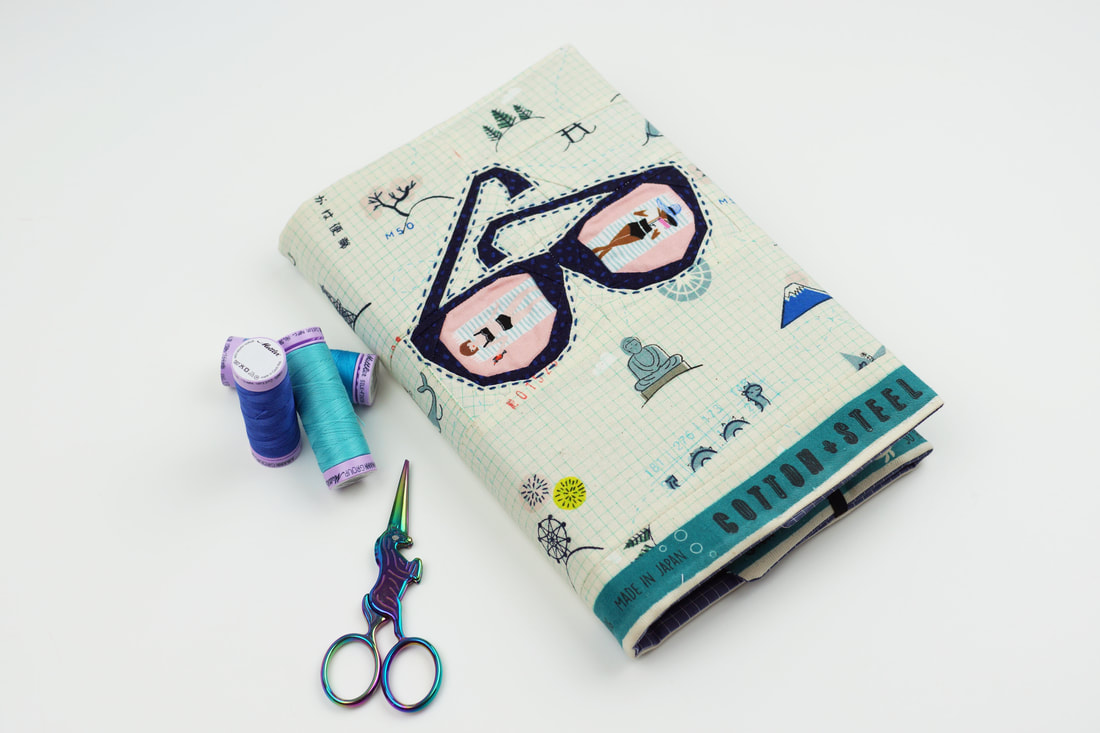
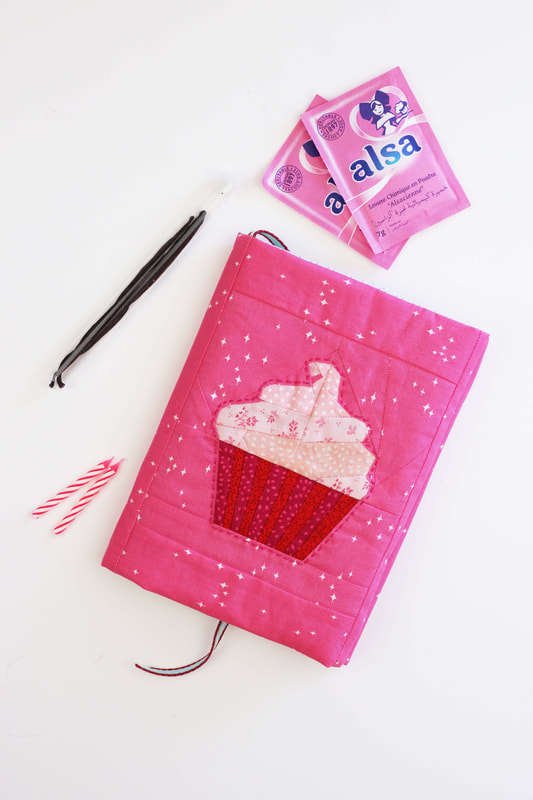
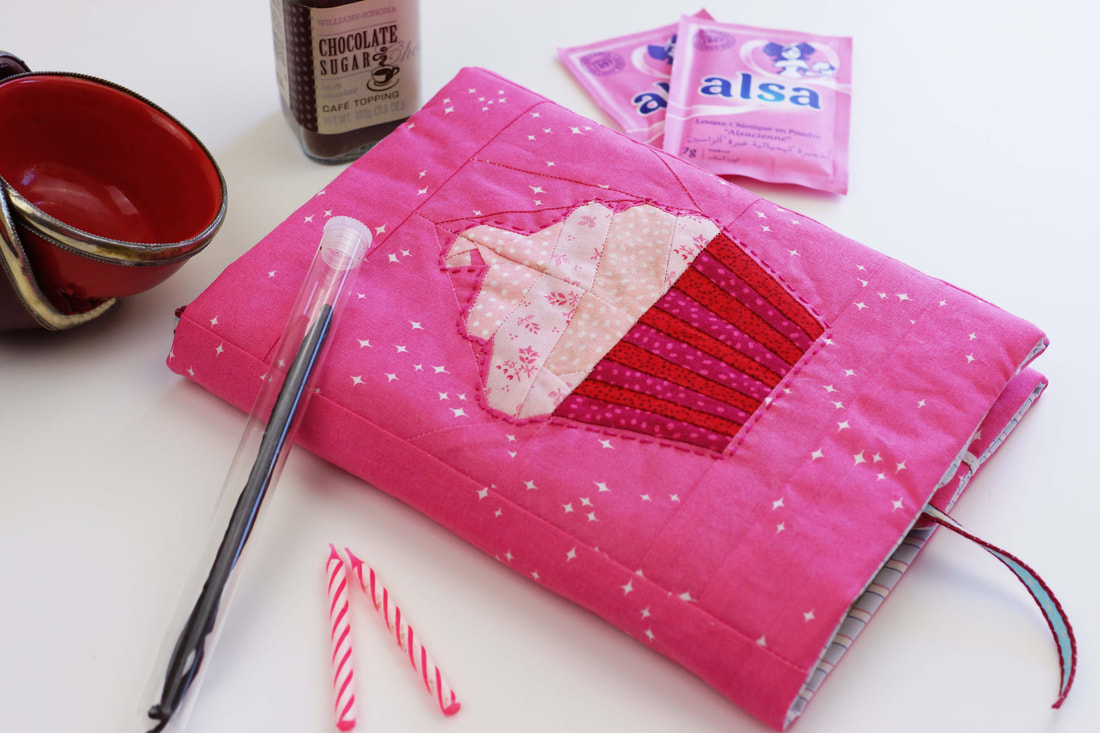
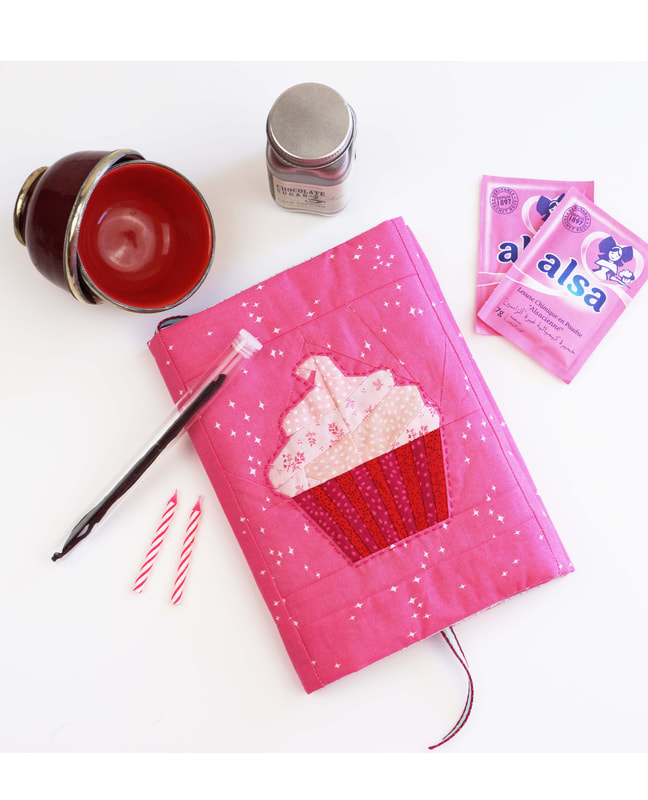
adjustable, quilted, fabric book cover
A quilted fabric book cover is not only extremly pretty on your coffe table,
it also comes in very handy if your reading is as 'deep' as mine. Life is serious enough, so I sometimes enjoy 'easy' literature also called romance novels. Especially on holidays, or to wind down after a long day. But obviously not everyone needs to know what I'm reading, right? Literally no one needs to judge my book by it's cover :-) So why not sew yourself a fun and easy, adjustable, quilted fabric book cover with the sunglasses quilt block pattern of mine? Perfect right?
Materials/ fabrics needed:
> the finished sunglasses quilt block ( or any other ) > fabric for the outer book cover (approx. 10"x 20" including quilt block depending on book size) > fabric for the lining ( approx. 10"x 20" depending on book size) > fusable light weight batting ( 10"x 20" depending on book size) > 10" elastic band > ruler, clips, scissors, thread and sewing machine I use a 1/4" seam allowance unless noted otherwise. 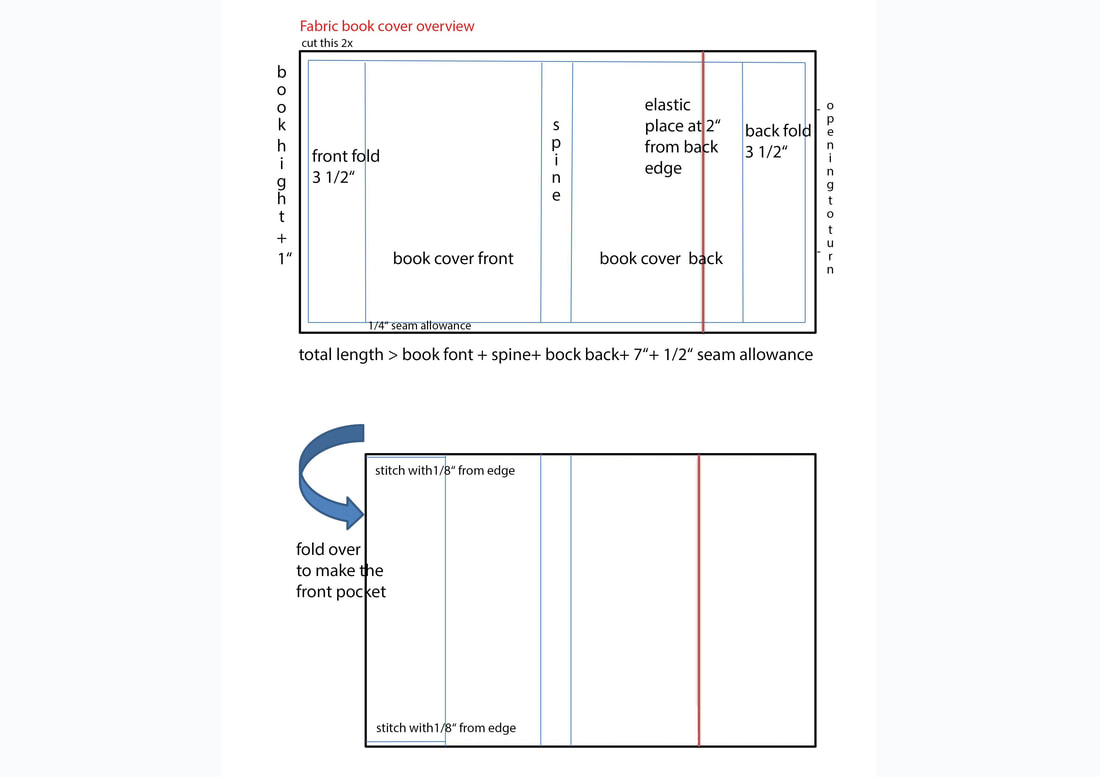
The size of your fabric depends on the size of your book.
I made my book cover to fit most average size hard cover novels, which is roughly 5 1/2 "x 8" with a 1" spine. The book cover is adjustable in length. This is how you calculate the total size of your fabrics and batting needed: > total length will be: book front + spine + book back + 2 x 3 1/2" fold + 1/2" seam allowance > total width (hight or top to bottom) will be: hight of book + 1" . 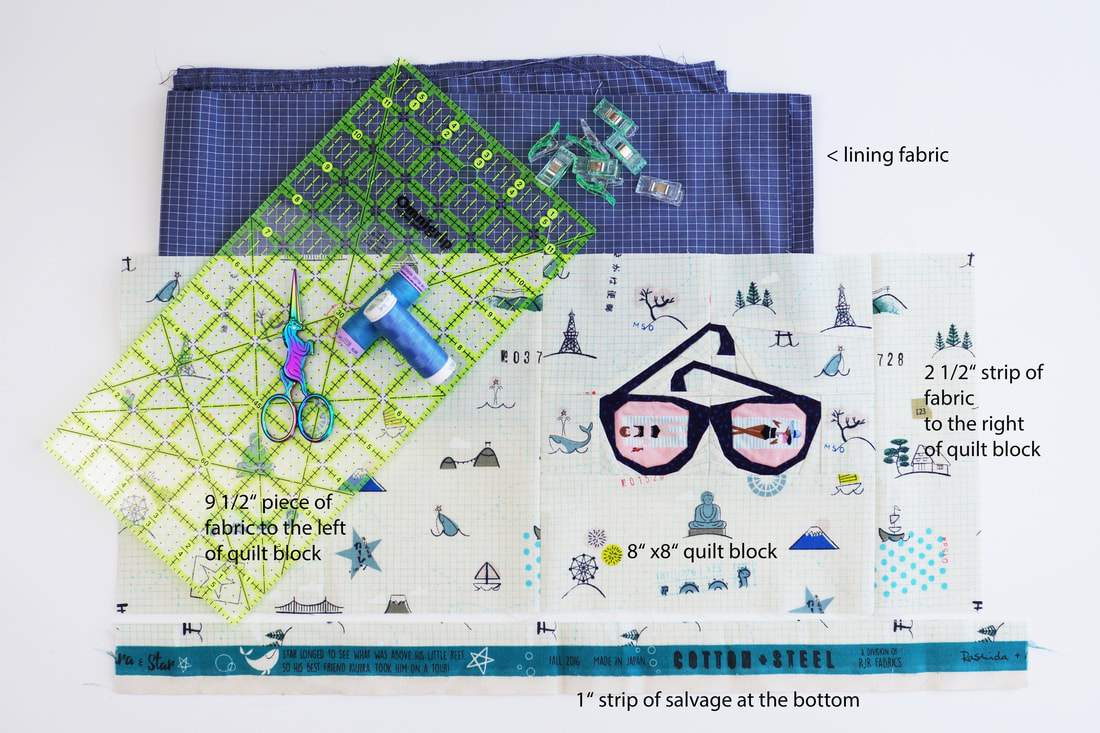
quilted, fabric book cover materials
The sunglasses quilt block I used is 8"x 8" finished, I added a strip of fabric 2 1/2"
to the right and a piece of fabric 9 1/2" to the left. I also added a 1" strip of some very cute selvage to the bottom. The finished piece of outer fabric is 9" x 19 1/2" , same size for lining and batting. 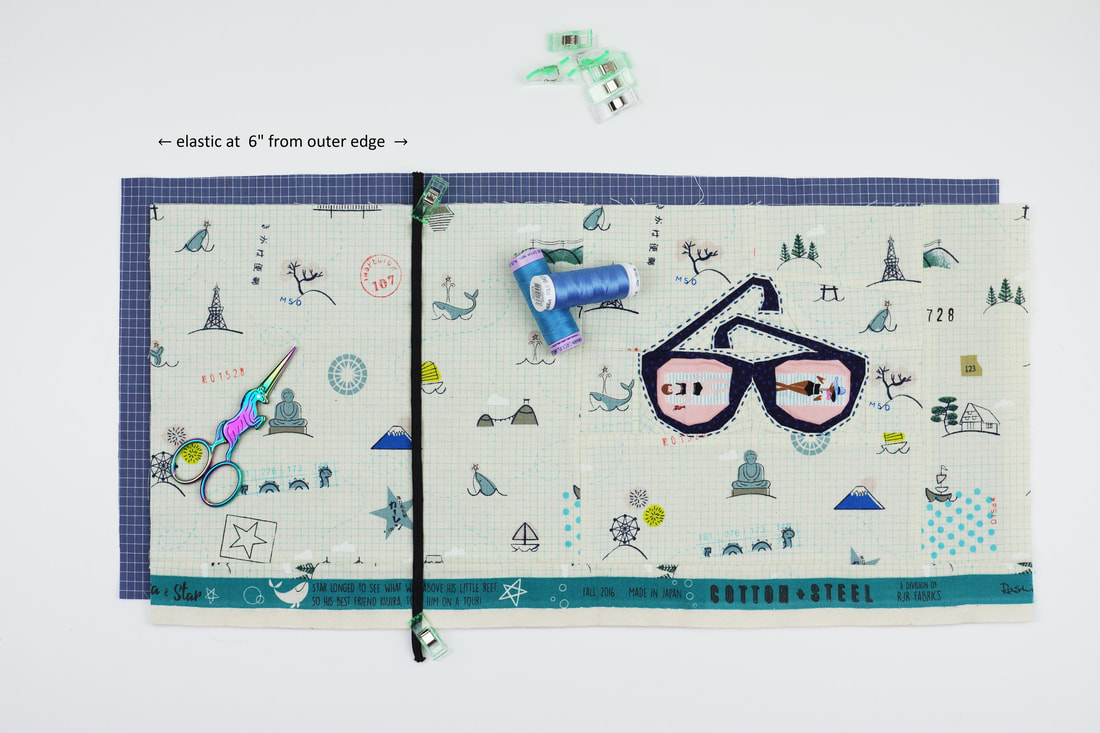
elastic placement
Iron on the fusable batting to the outer book cover fabric then clip the elastic band at about 2" from the back edge of the book (if your size is different then this one) or 6" from the outer edge ( the short side of the fabric).
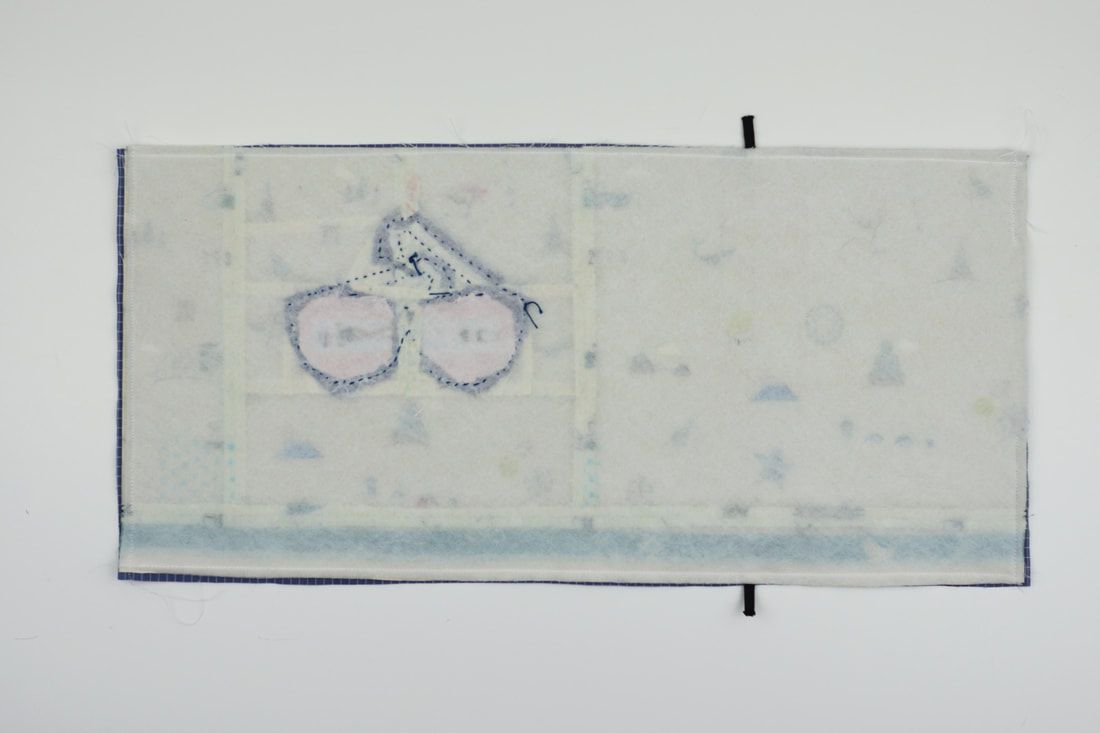
I did some hand stitching around my glasses, you could also quilt the outer fabric with simple straight line quilting, or what ever quilting you prefer. Now place outer fabric and lining, right sides together and clip or pin ( I prefer clips) in place.
Stitch all the way around and leave a 4" opening at the side (the one that will be folded into the book's back) for turning.
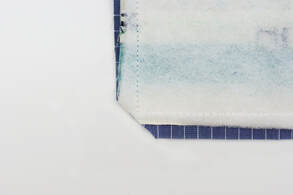
Cut off the edges for nicer corners.

finished quilted fabric book cover
Turn the book cover through the opening on the side, and close the opening,
by folding the seam allowance inside and stitching the opening close with a 1/8" seam from edge. Fold in the front pocket 3" - 3 1/2" and stitch top and bottom with 1/8" seam. Fold the back pocket under the elastic. And well done your adjustable, quilted book cover is finished. 
This quilted book cover will be a wonderful addition if you're gifting a book
or will work just as well for a diary or note book. Any other ideas? Let me know. I cant wait to see what you guys come up with. Share your creations on social media and use #joejuneandmae so I can cheer your makes. happy sewing Ingrid xx 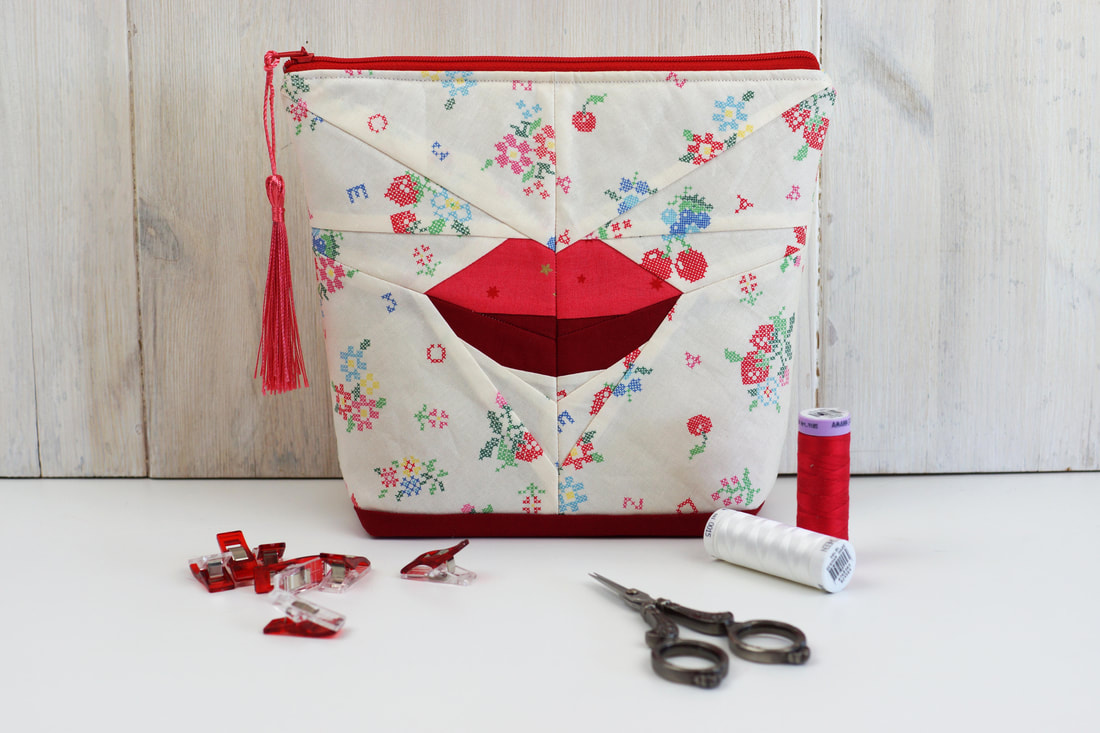
How to quickly sew a zippered pouch with flat bottom?
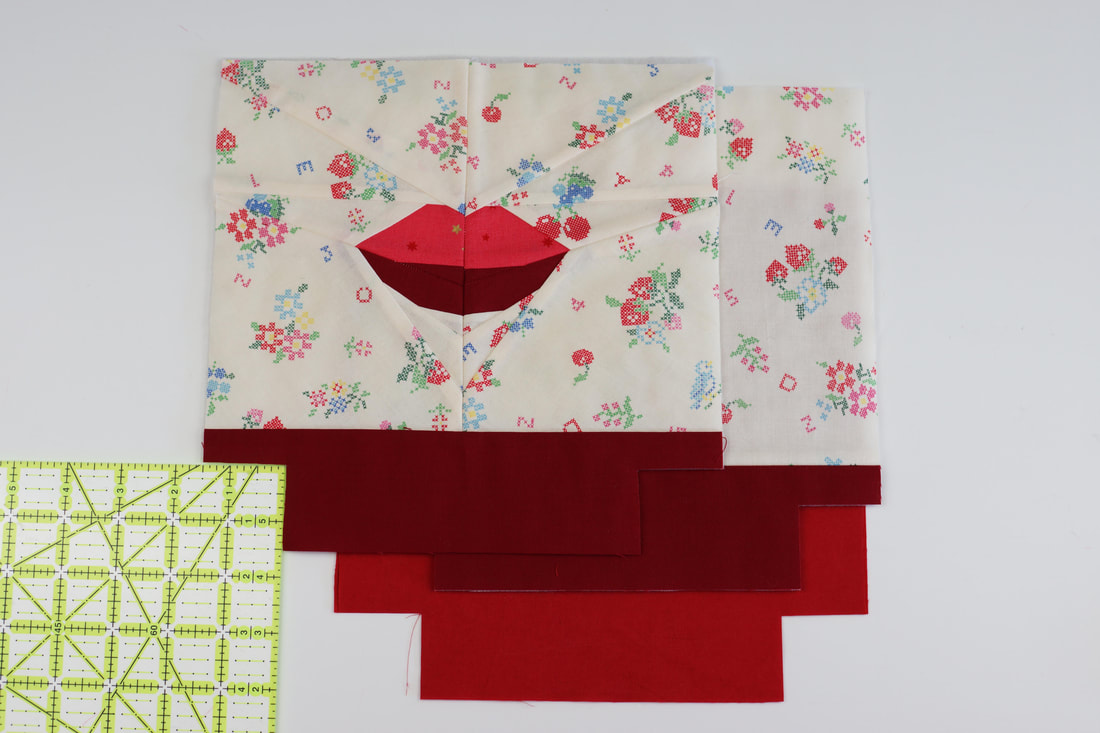
And a beautiful way to use the lips and/ or moustache quilt block pattern from my face mask ....... once you're masked out, like me :-) One can NOT have to many zippered pouches, it's like shoes... you can never ever have too many, right? Zippered pouches are super easy to make and you can use them for anything and everything literally all the time. I'll show you how quick and easy it is, to make one of these beauties using my lips quilt block pattern from the lips mask pattern. This pattern is kind of made for a pouch, because it has the perfect size. Fabric requirements and materials needed: - lips quilt block finished 9.5" x 7.5" - fabric for the back 9.5" x 7.5" - 2x strips of solid fabric 2.5" x 9.5" - lining fabric 2 x 9.5" x 9.5" - medium weight fusable interfacing 2 x 9.5"x 9.5" - 9 " zipper ( if your zipper is too long, check ou this post on how to quickly shorten a zipper ) - clips or pins - scissors or rotay cutter - ruler, thread and sewing machine. 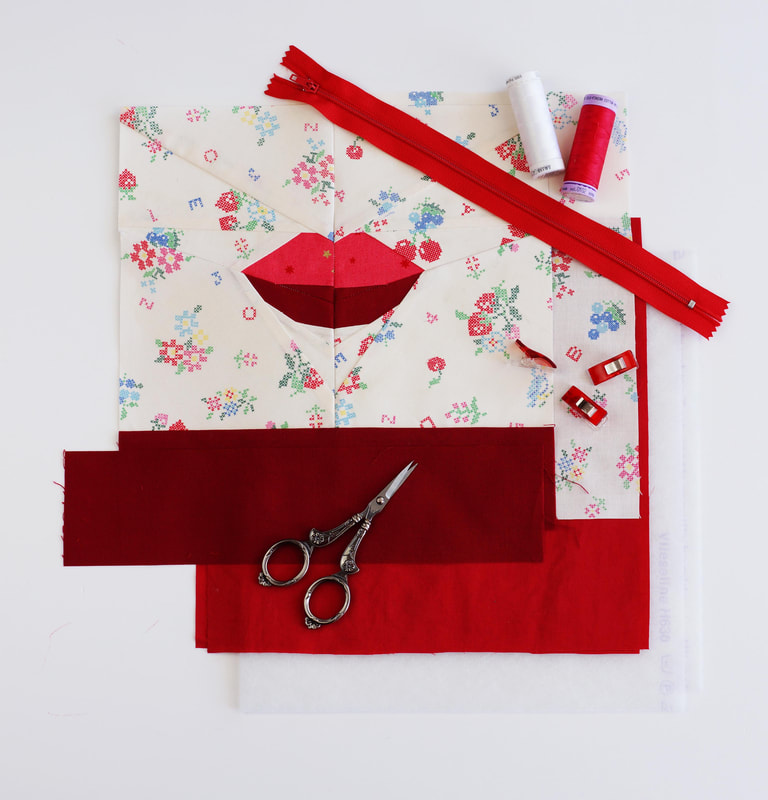
DIY ZIPPER POUCH with foundation paper piecing detail:
This completed zipper pouch measures approx. 8" at the top, 7" at the bottom and is about 3" wide at the bottom. This is a perfect size bag for make up, or sewing notions and would easily fit in you handbag . 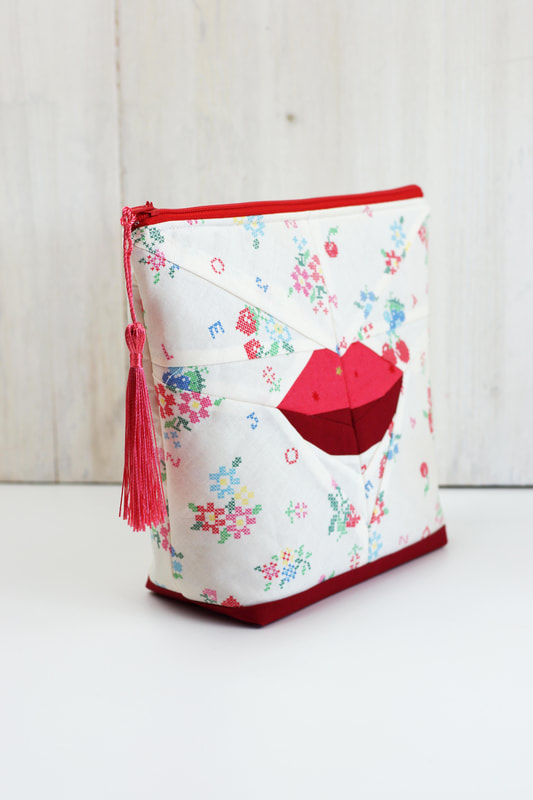
1. Sew the lips quilt block according to the pattern. It should mesure 9.5" x 7.5" when finished.
2. Cut your back fabric , lining fabric and fabric strips according to the mesurements given. 3. Stich the solid fabric strips to the bottom of the quilt block and to the bottom of your back fabric. 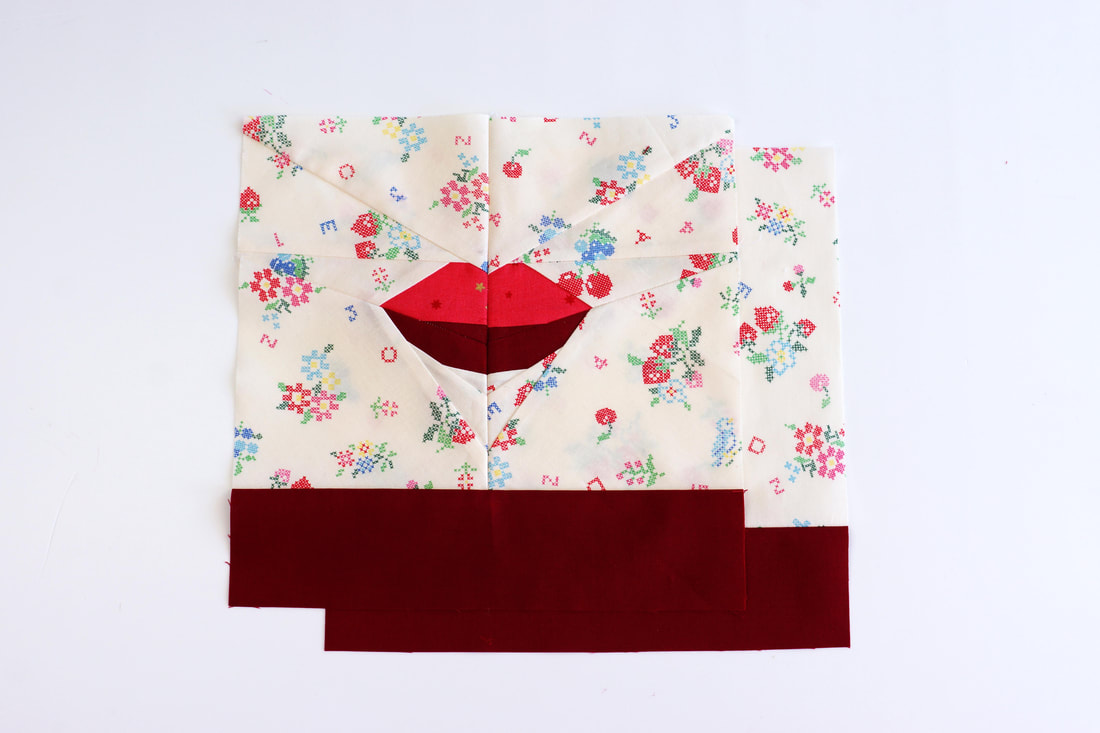
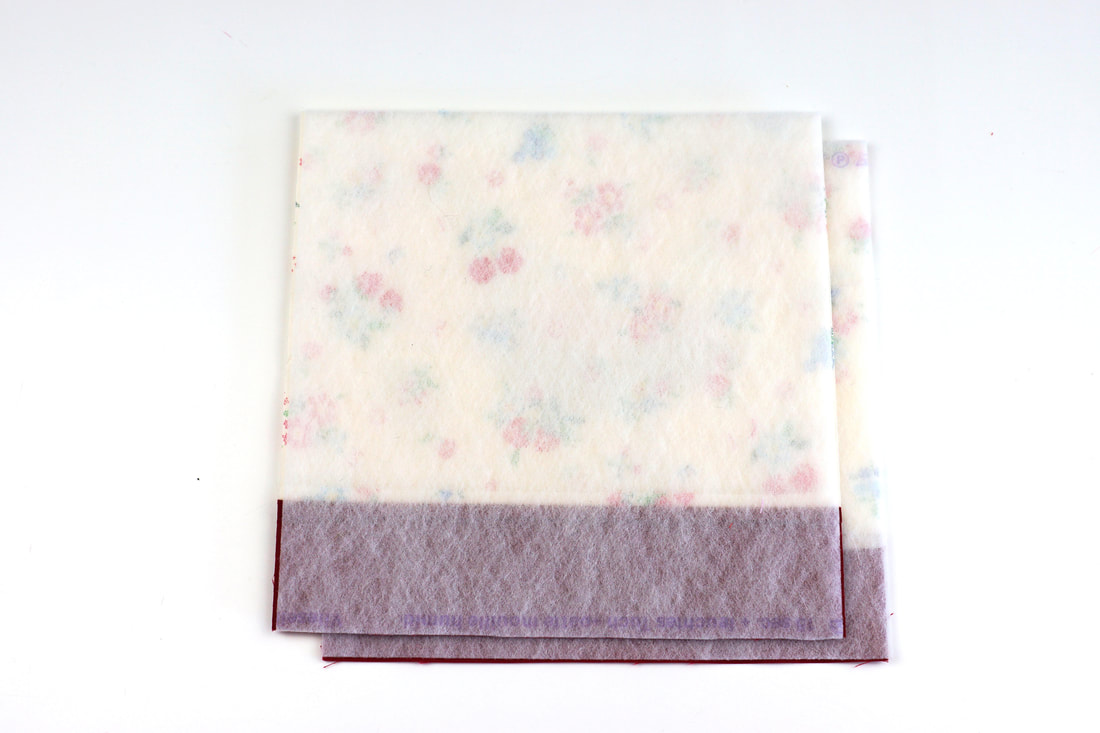
4. Iron on the fusable interfacing to your front and back panel.
5. Cut out 1.5"x 1.5" corners at the bottom of your outside panels and your lining.
This will give you your bottom corners of the pouch. 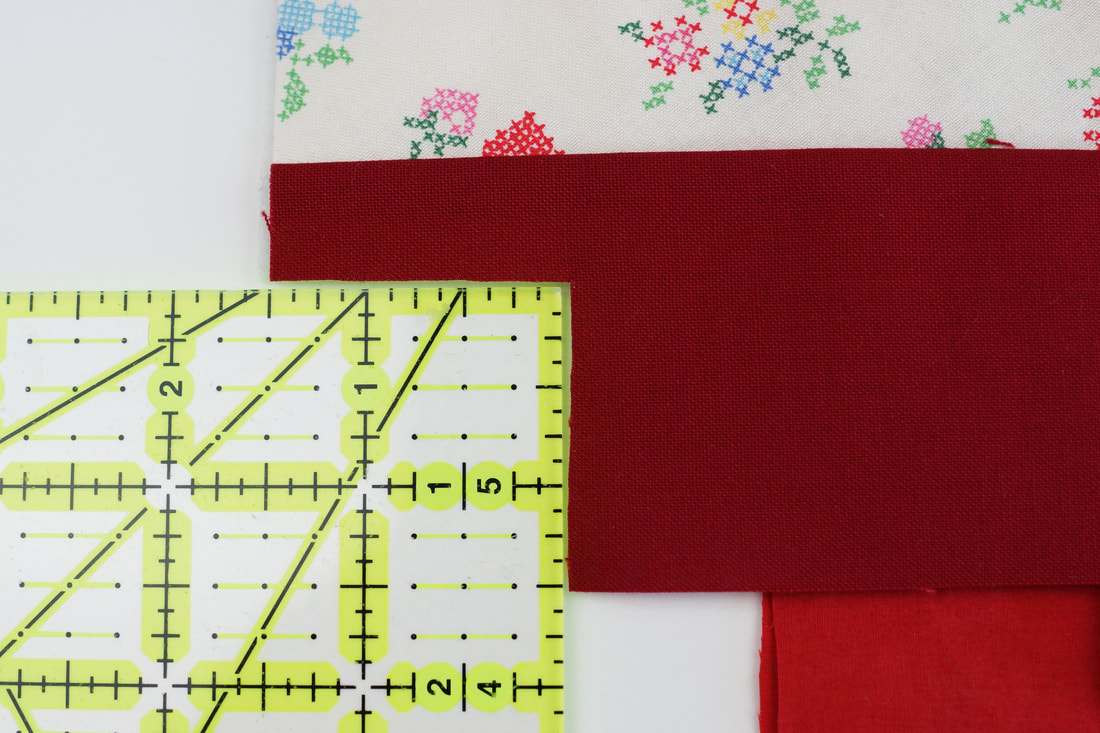
6. Fold the corners so the edges are facing each other and stitch along the 1.5" edge.
This creates a boxed corner. Sew all 8 corners like that.
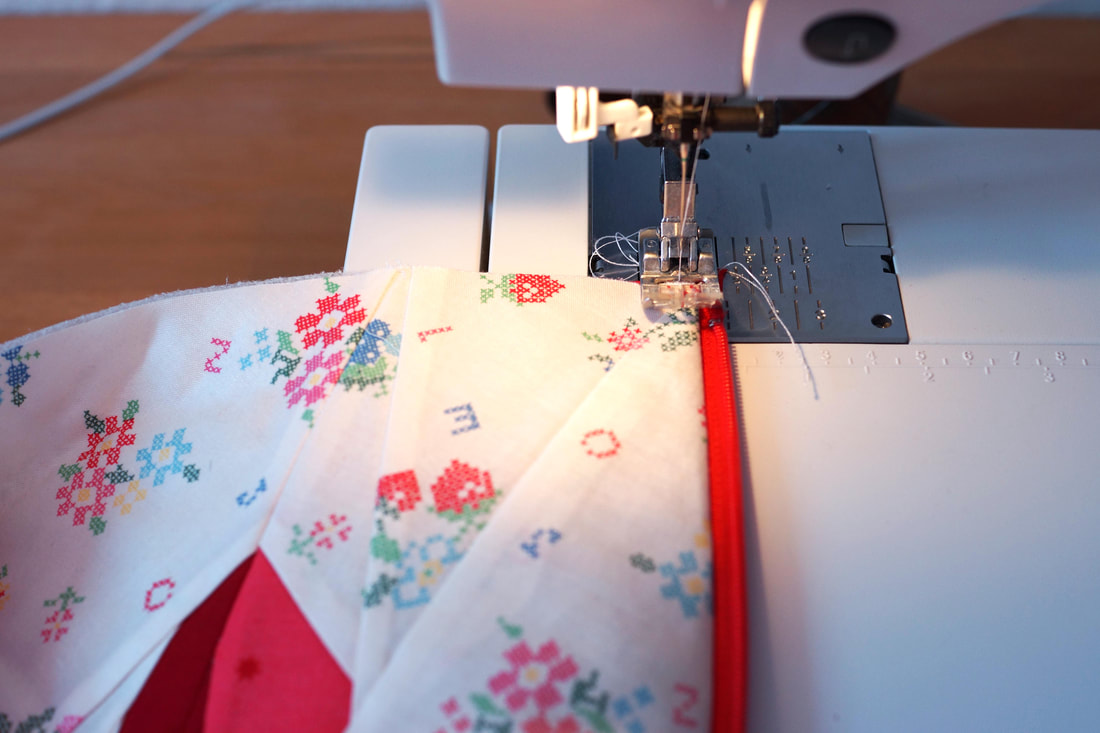
7. Attach the zipper to the front panel right side of front panel facing you and right side of zipper facing down.
Sew the zipper first to the front panel and then to the back, again right side of zipper against the right side of the fabric. 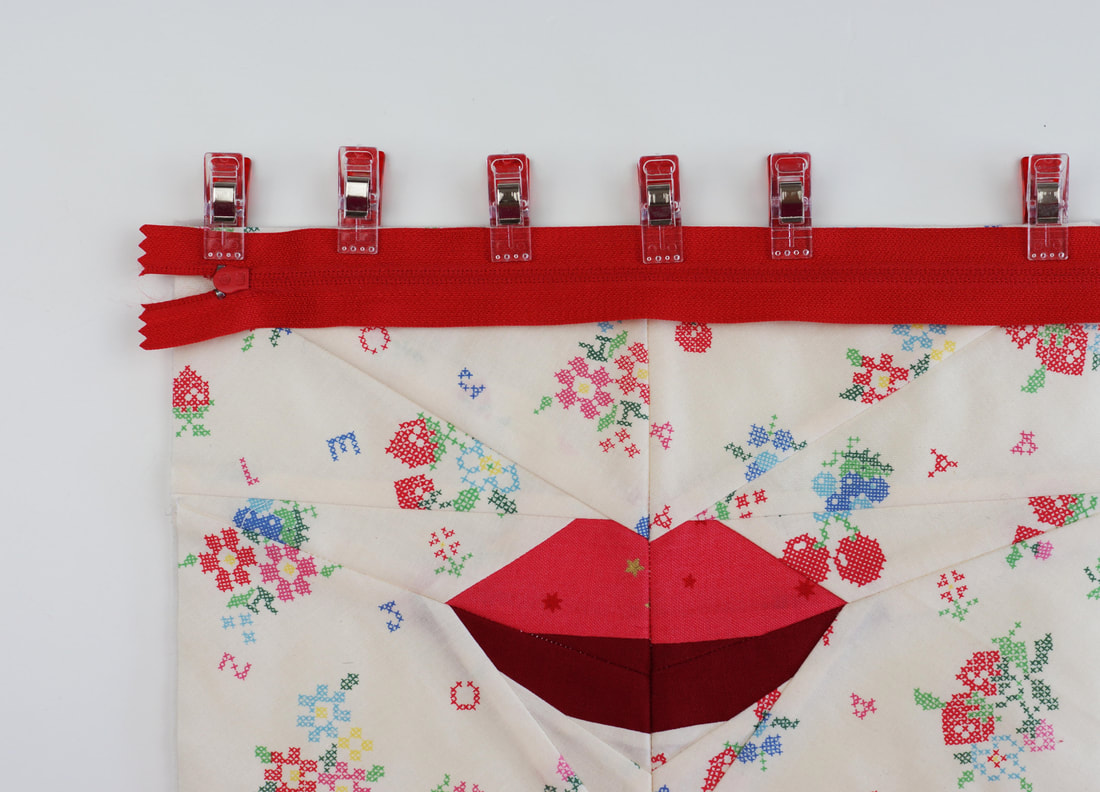
8. Place the lining right sides together on top of outside panel and sew along top edge.
Repeat for the back. 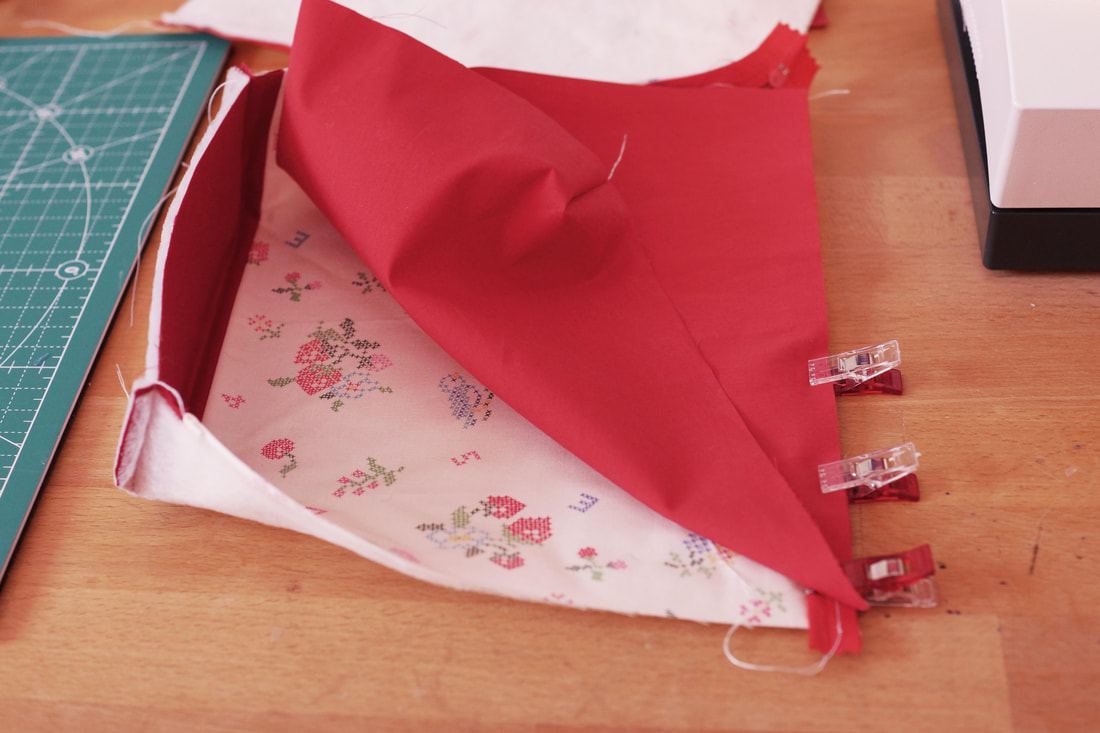
9. Optional: Stitch a top seam along the zipper from the outside,
10. UNDO THE ZIPPER ! This is important for turning the pouch later :-)
And stitch all the way around the pouch , except a 6" turning gap along the bottom of the lining using a 1/4" seam allowance. 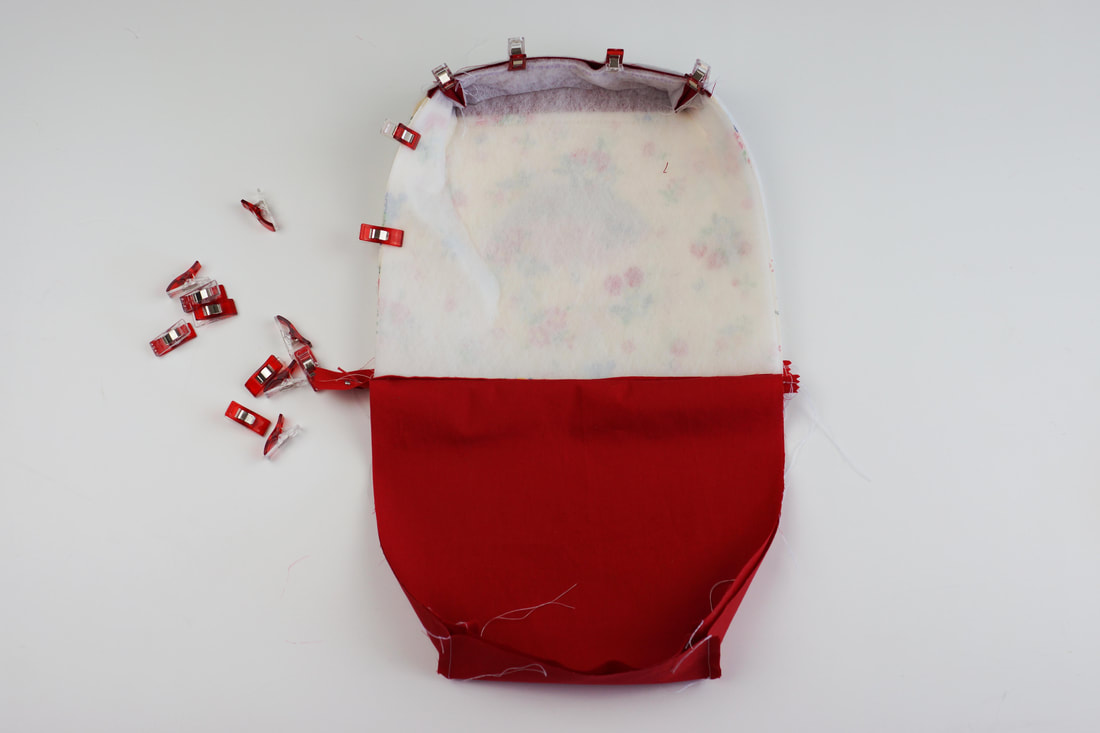
11. Turn the bag right side out. Fold the edges of your turning gap in and stitch to close.
12. Fold lining inside and..... TADAHHH :-)
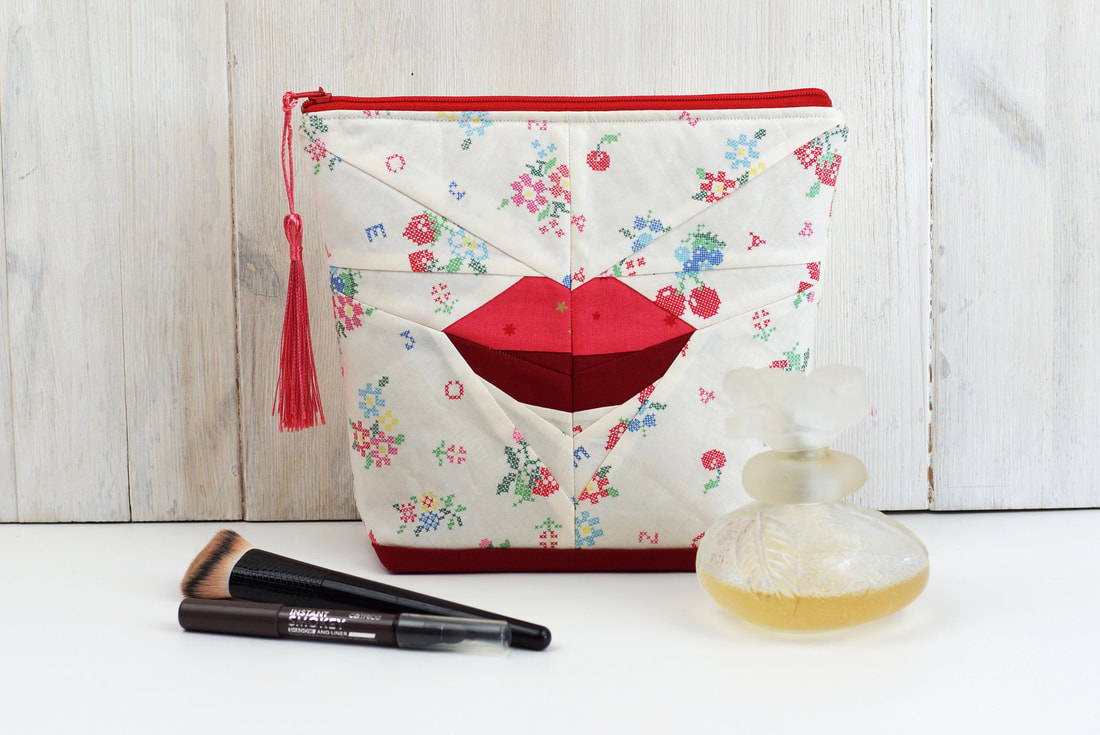
What do you think?
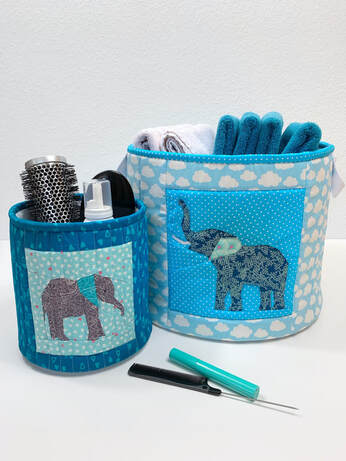
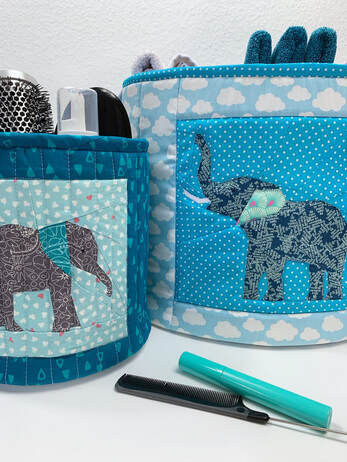
Btw. if you're interested in News and Coupons for future pattern releases, subscribe to my Newsletter here on my site:-) Happy Sewing! 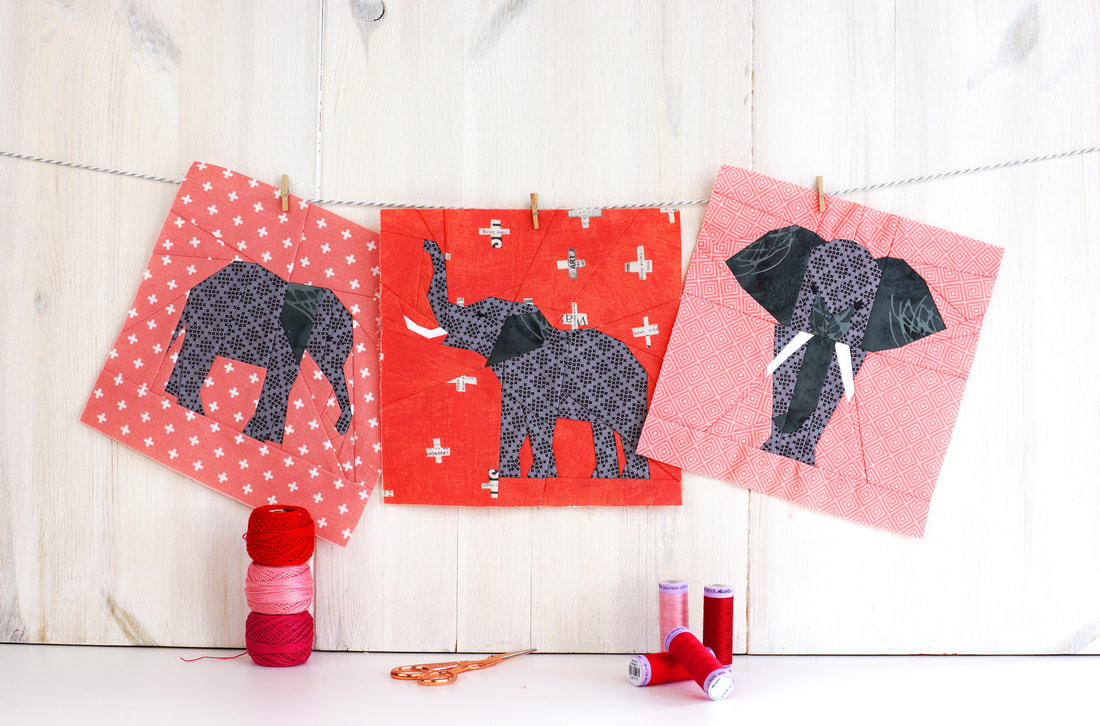 Travelling inspires ... We spent spring break in Africa last April. Marocco to be exact and Marrakech to be even more precise. We're very lucky, it's not far from here to travel to, and it's one of my favorite places on the planet. We always stay right in the middle of the Medina in a Riad. Just writing about it makes me miss it again, and I can hear the sounds and smell the scents... ahhh, it's nothing short of amazing. The city of Marrakech is surrounded by the Atlas mountain range and the desert. Therefore you'll find many camel riding and desert tours. The first time, we stayed at an Oasis outside the city many years ago, inspired me to design my camel quilt block pattern. This time, I added some other African animals to my animal series, the elephant family. These are some of my favorite quilt block patterns ever. They are not only fantastic for all sorts of quilted items, such as pillowcases and table runners, but they will look fantastic as a wall hanging as well , in any room really. 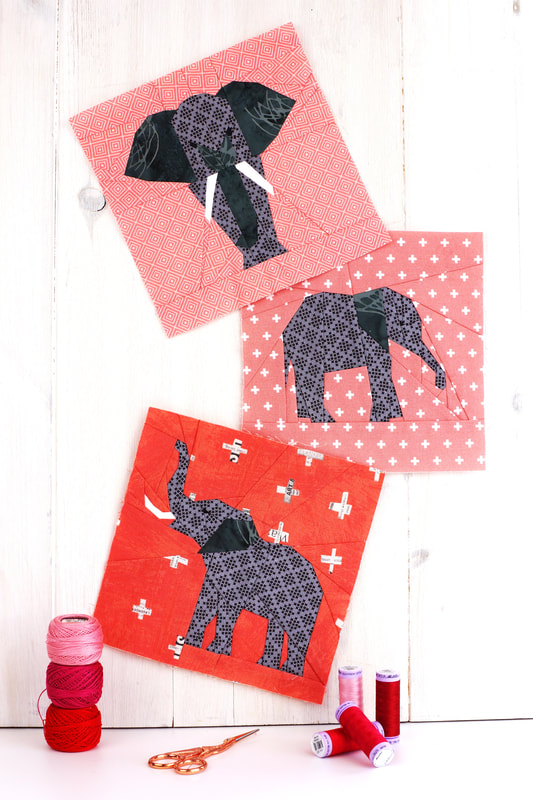 I get asked all the time, what other ways, besides the ones mentioned above, there are to use these blocks, well I thought the elephants would be perfect for fabric baskets... tadaahh (almost the sound of an elephant, right ?) For some reason they suit the round form of the basket, don't you agree? 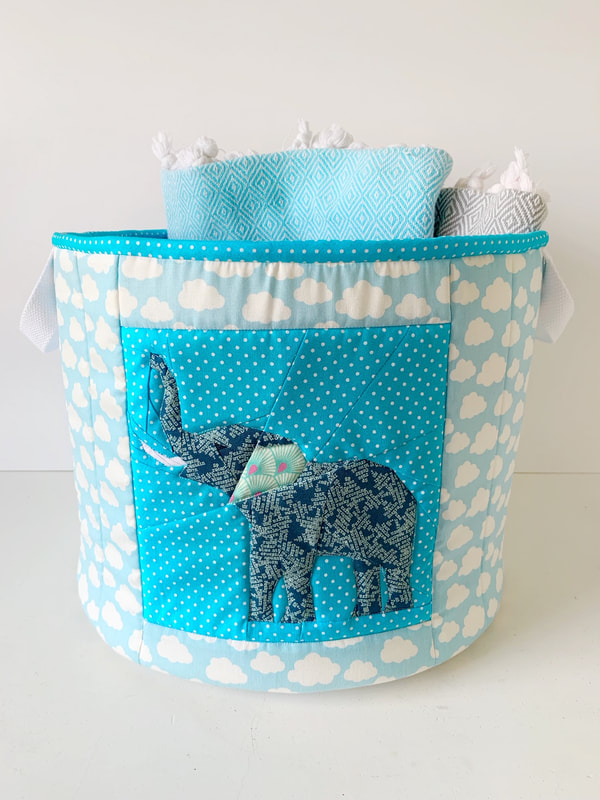 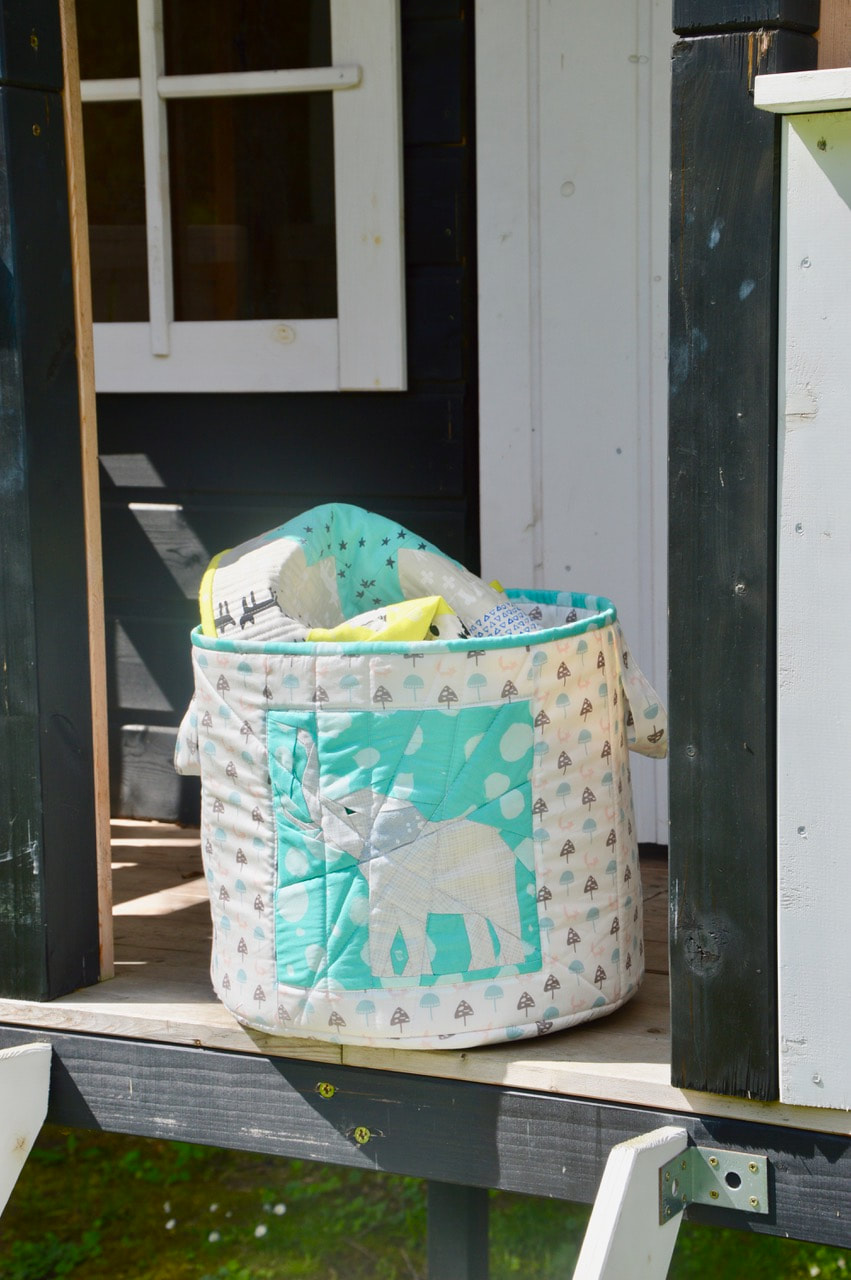 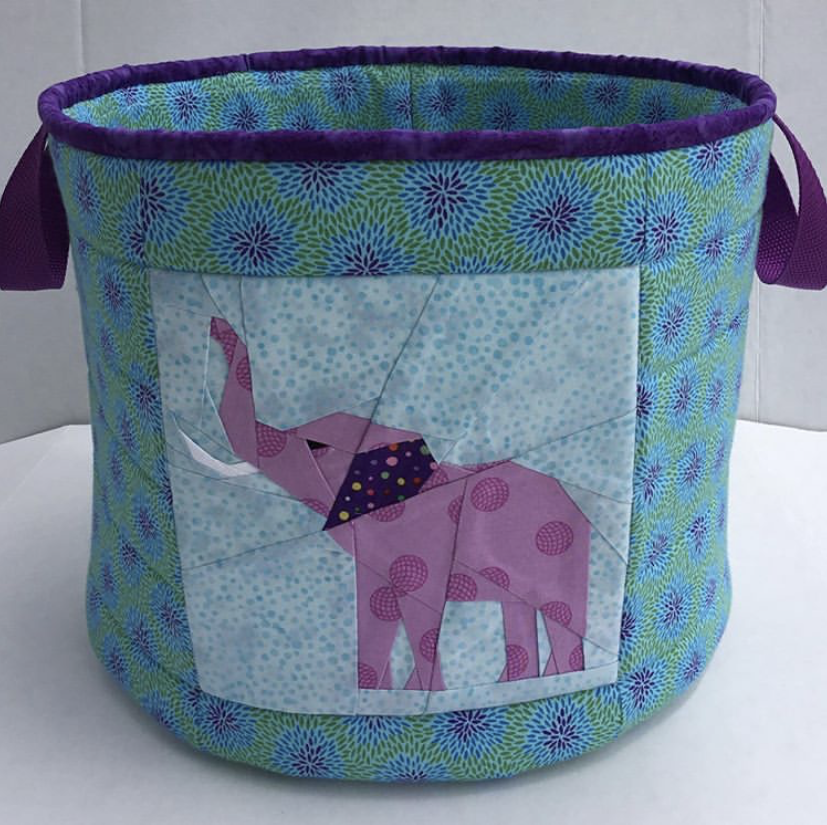 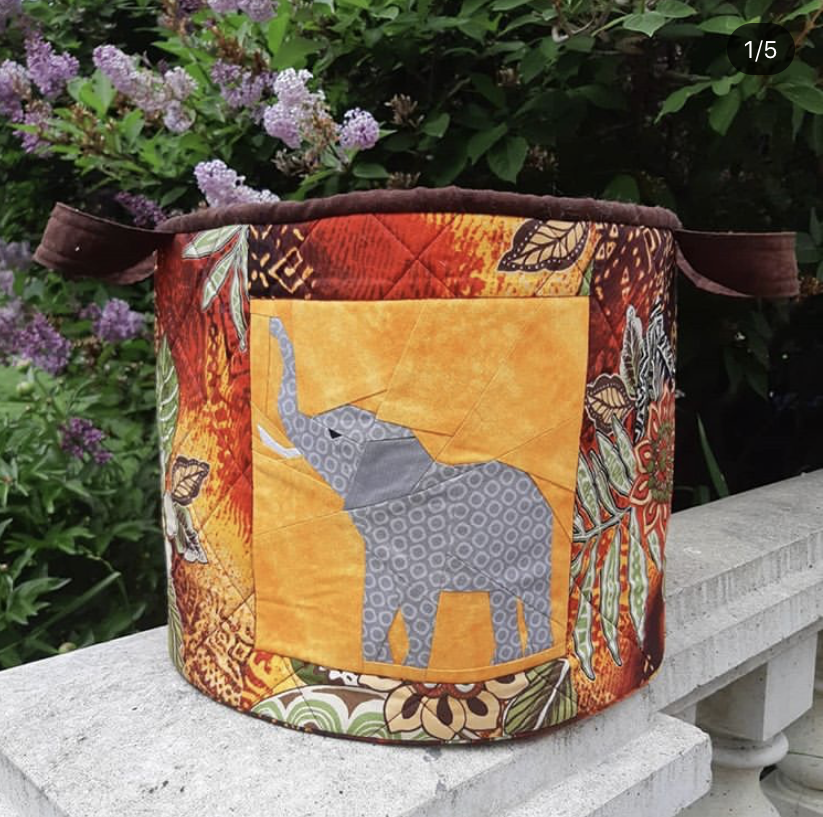 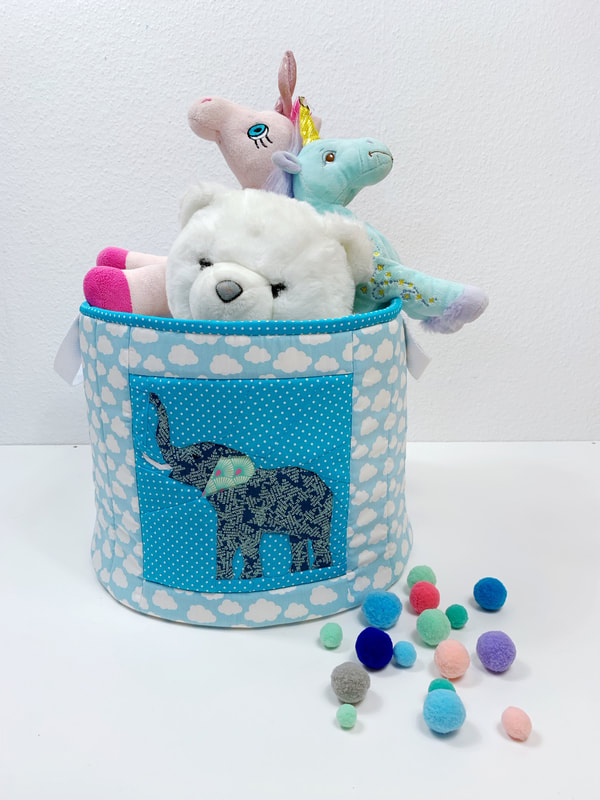
As you can see, there are many ways to use these baskets, I'm using mine in the bathroom for towels and hair stuff, but the possibilities are endless.
You will find the pattern for the baskets here. 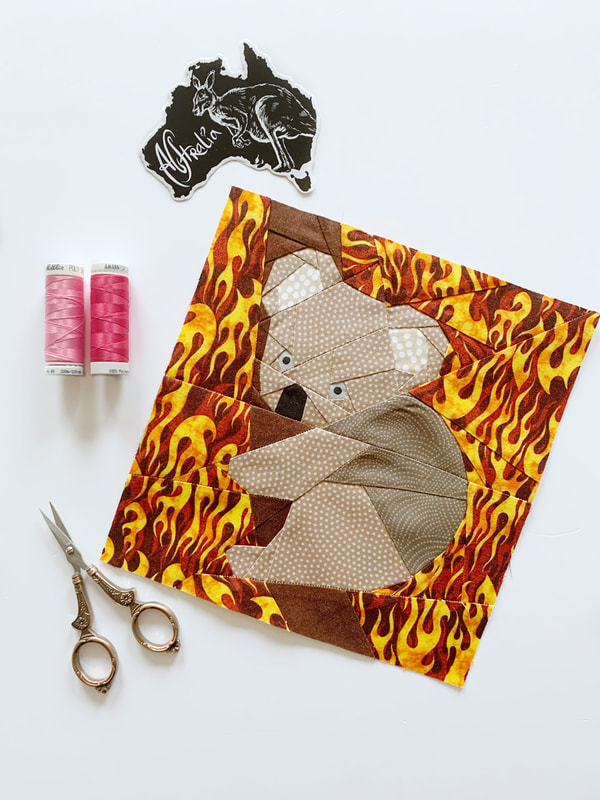
The wildfires are devastating,
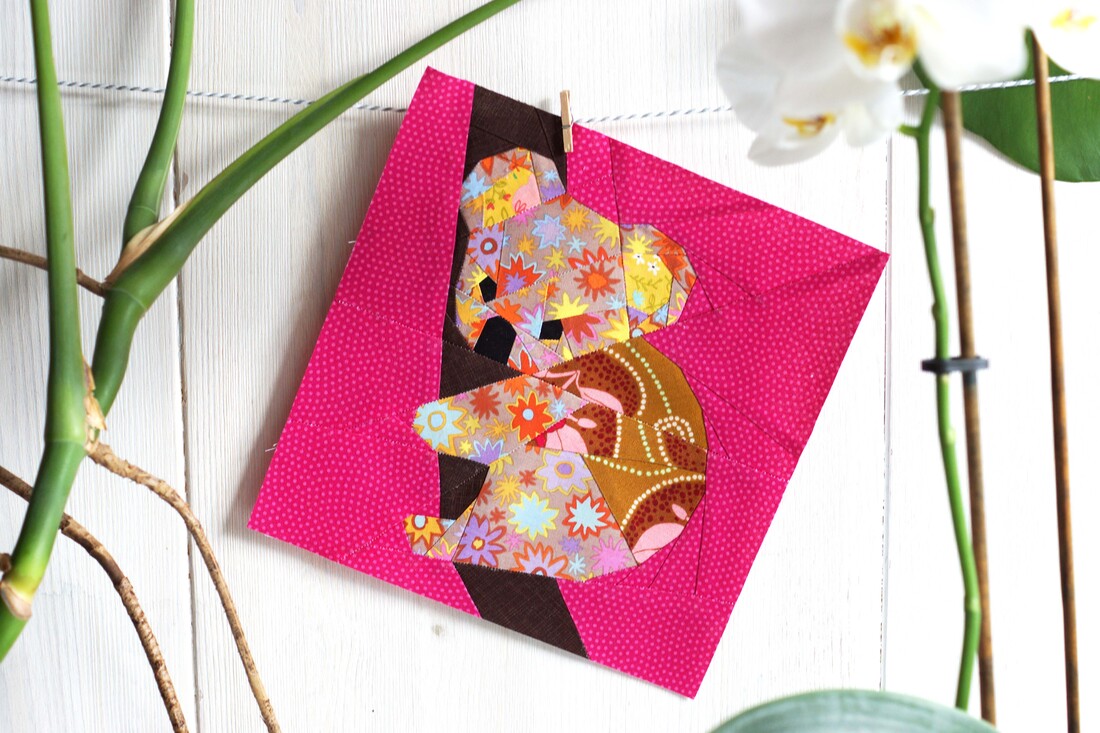
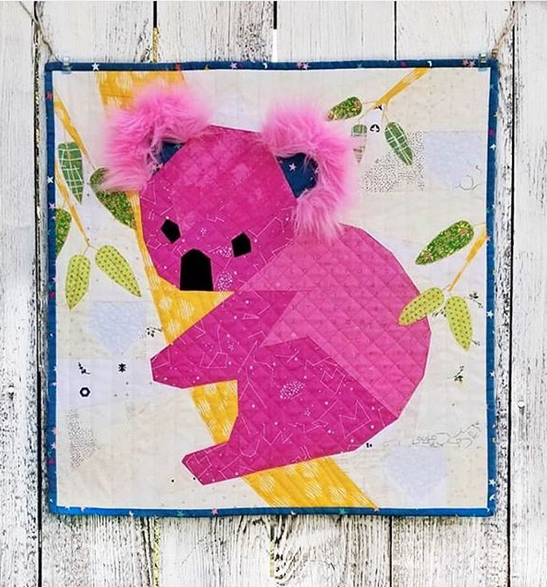
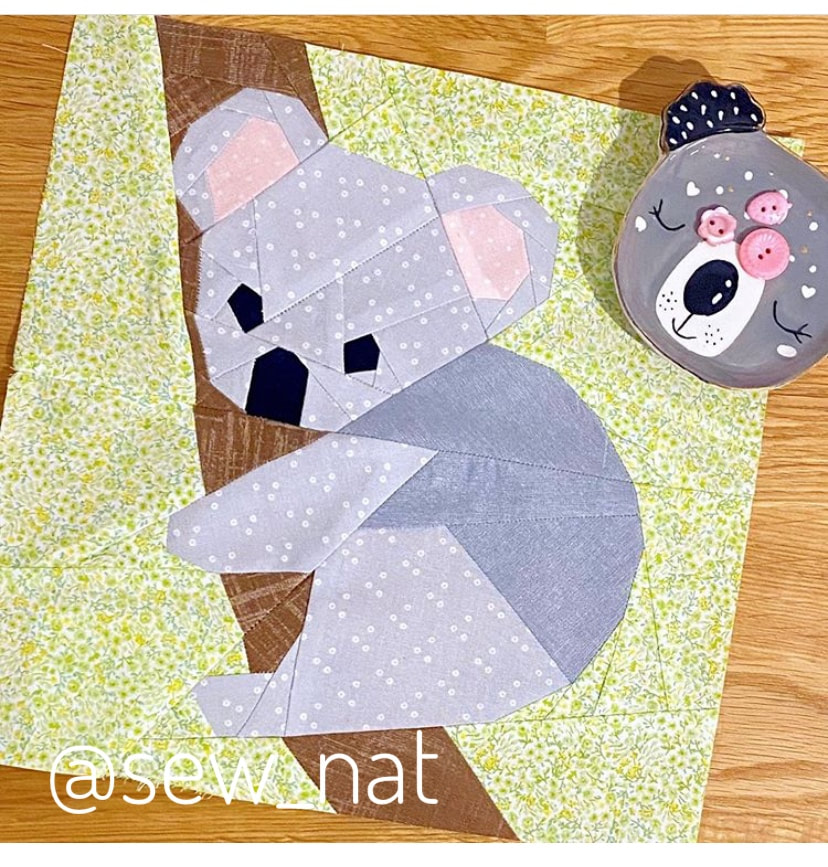
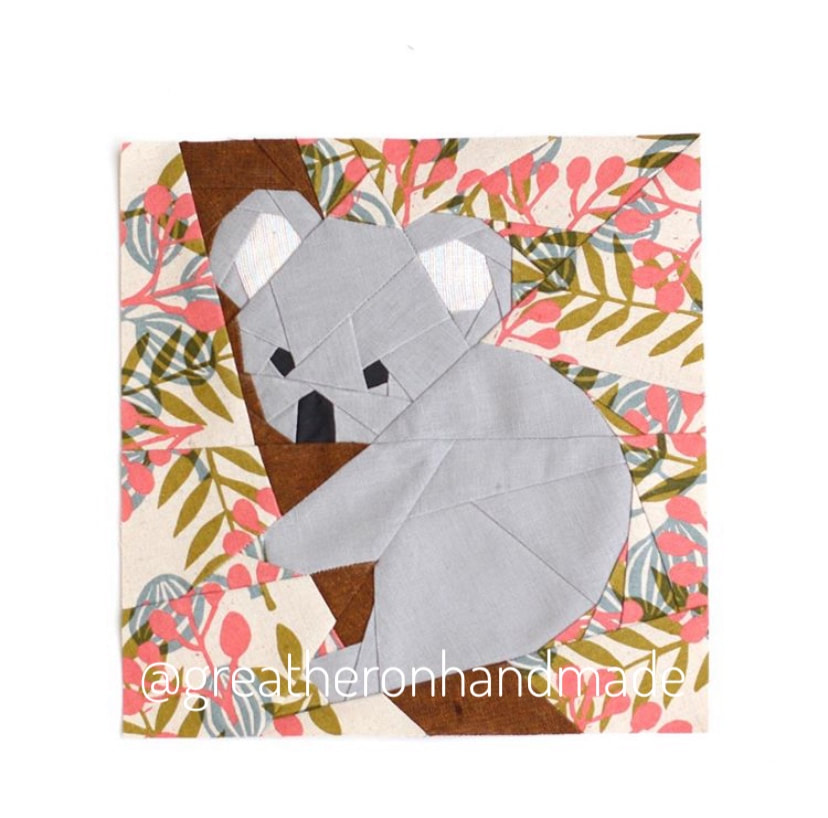
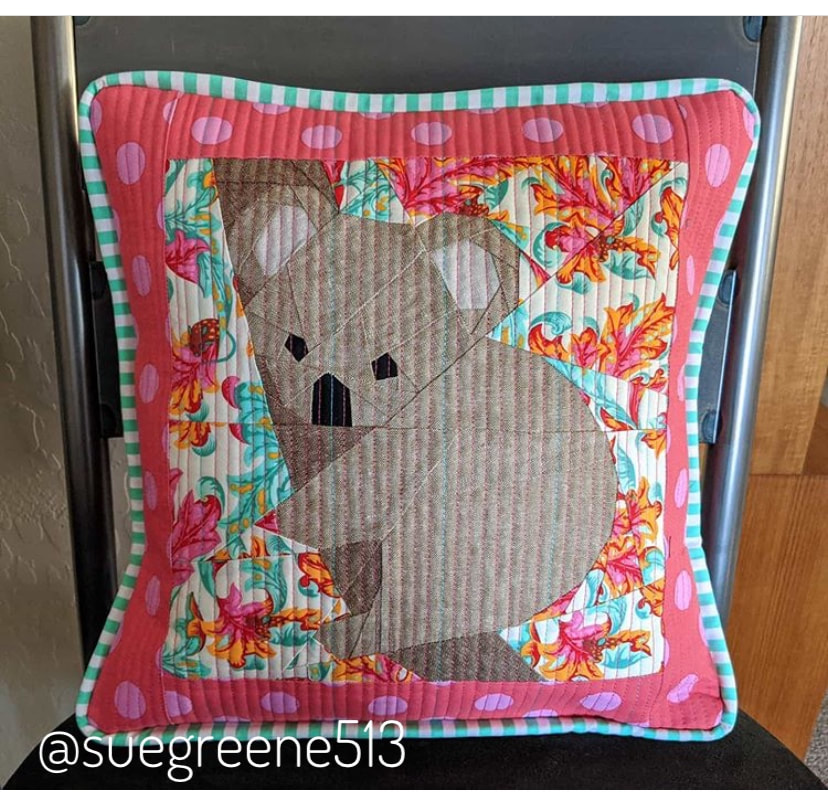
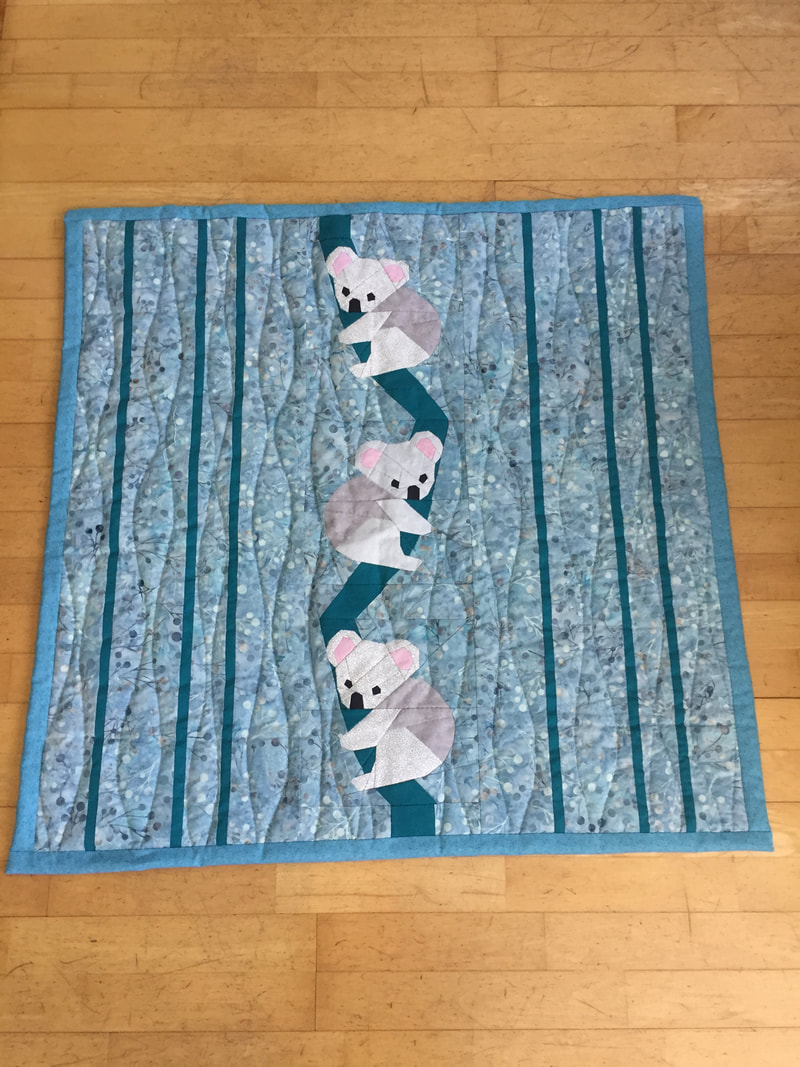
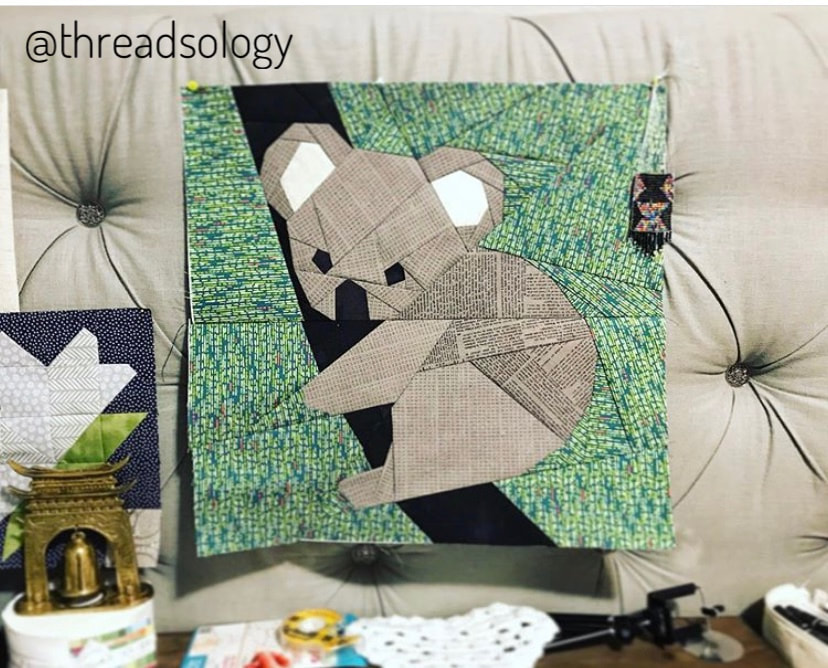
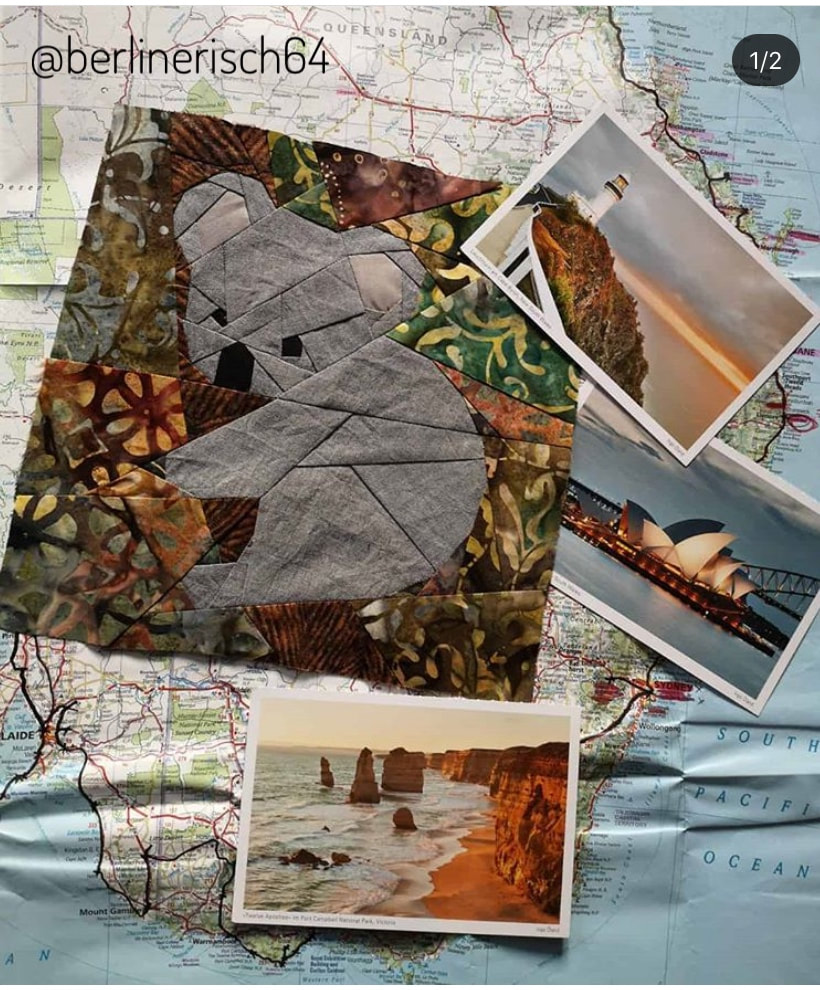
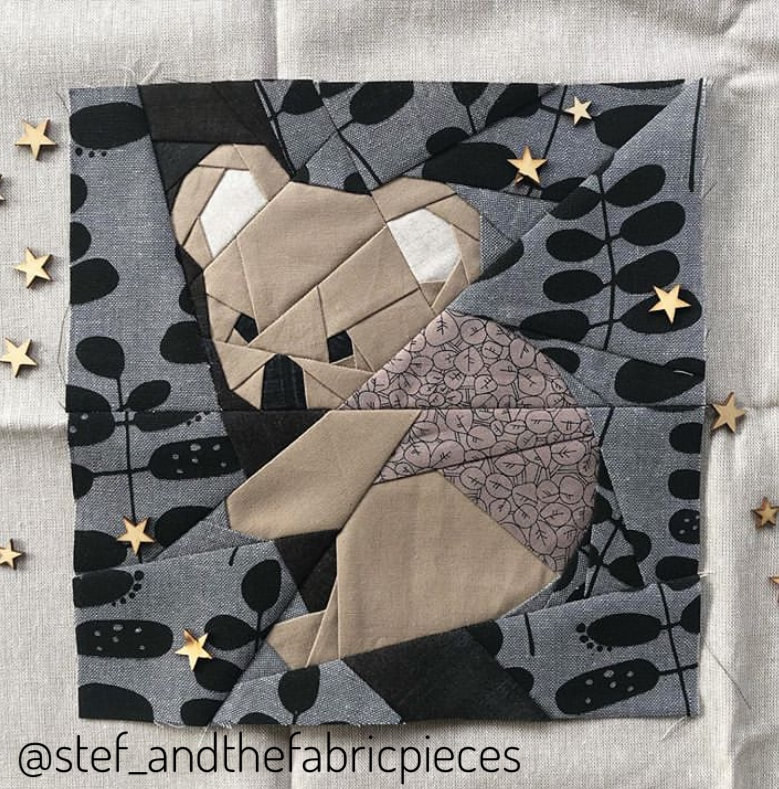
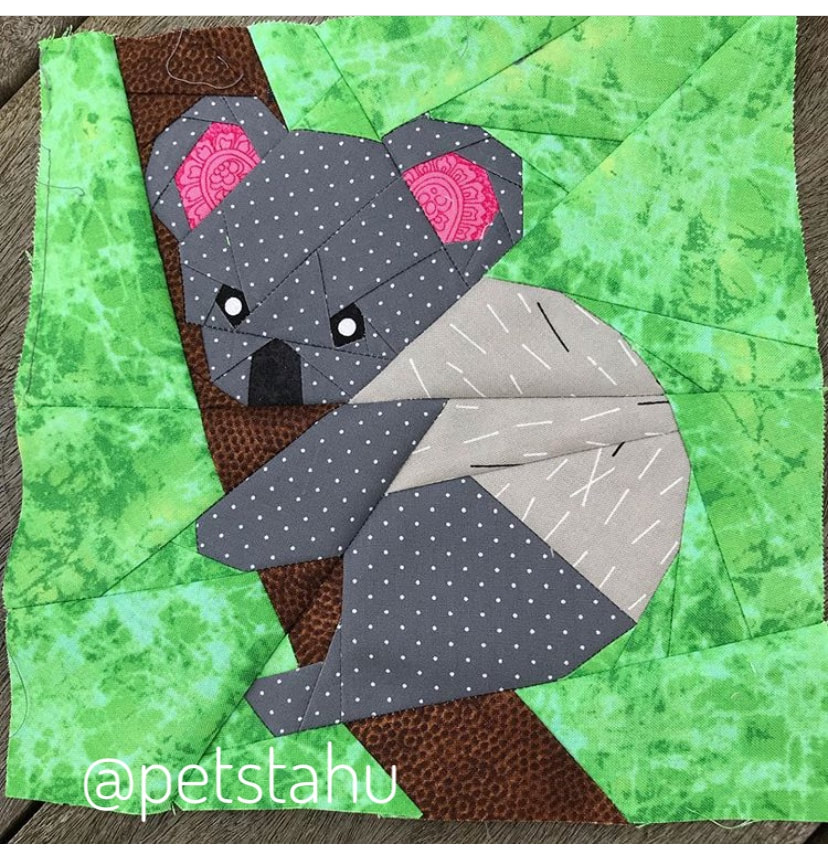
with images of burning forests and dying animals, we feel helpless. We want to do something, but we’re not sure how. Here's what we found helps the most at the moment: DONATION Many of the emergency relief services have said the best option right now is cash. The money can then be directed to those who need it, and it doesn’t require storage like physical items. Please be aware as usual – unfortunately there are quite lot of scams at the moment for fundraising – so do your research when choosing who to donate to. That beeing said... I have designed a koala pattern and 100% of the proceeds throughout January 2020, of this cute pattern will be donated to @therescuecollective www.therescuecollective.com to help support their amazing rescue efforts in Australia.... Renate Kämmer @rlebt has been helping for days now to raise awareness, and her work is amazing! Thank you sooo much Renate. If you were thinking of making a koala quilt block, koala pillowcase, table runner, back pack or whatever else, now is the perfect time.... In case you want to help, but would like a different pattern, there are many other pattern designers out there, that support this cause ... Check out the following accounts on Instagram if you're interested. @quietplay @quiltdesignduo @corinne.sovey @sewquirky They are donating all or some of their proceeds towards the wildlife rescue. Here are some of the fantastic quilt blocks that so many people made with my Koala pattern.... (Feb 2020: we were able to raise over 1,000 Euros for The rescue collective... How amazing is that? Thank you sooo much everyone who participated in this effort ) 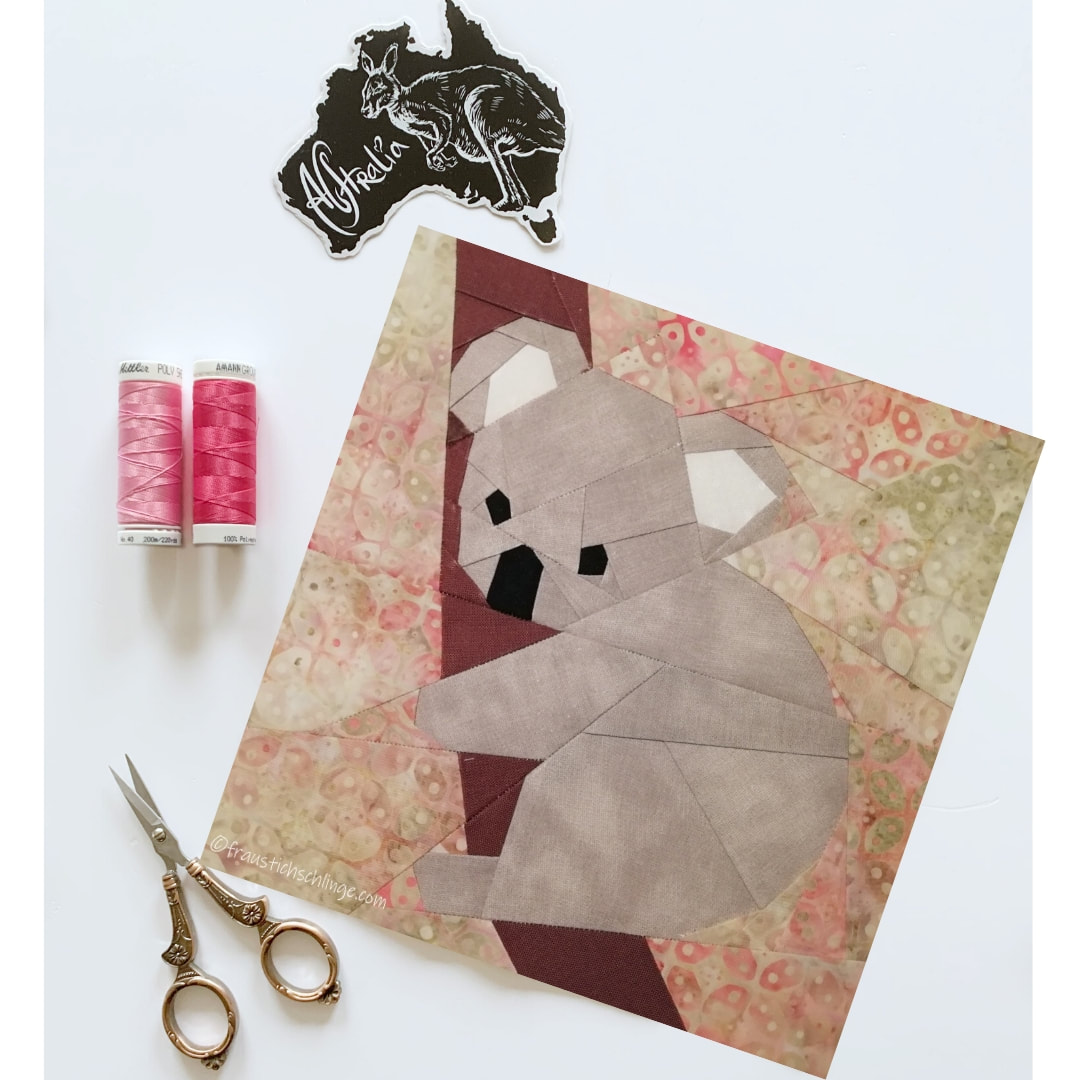
@twinklyhelterskelter 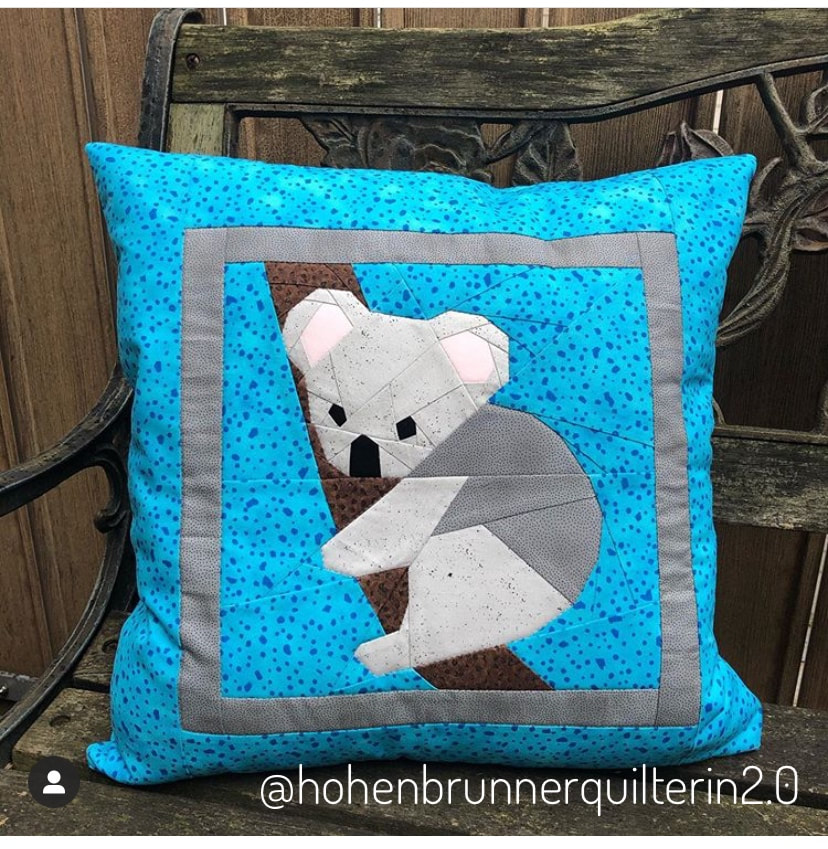
|

Author
Ingrid Alteneder Archive
March 2022
Categories
All
|


 RSS Feed

|
Visit us at
|